Installation d'un serveur NFS sur un RAID 1 sur une VM
Prérequis
- Avoir une VM Debian/Ubuntu et pas un container
- 512MB de RAM
- 1 vcpu
- 2 disque supplémentaire pour le RAID
Paramétrage du RAID 1
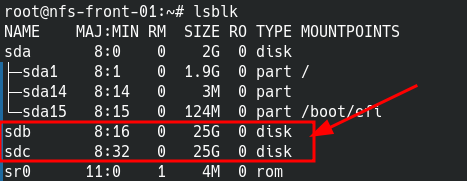
- Vérifier la présence des disques:

On vois que les deux disques sont la !! - Installer le paquet mdadm
apt update && apt install mdadm - Paramétrer les disque libres dans mon exemple sdb et sdc avec la commande fdisk. Pour l'exemple je le fais sur sdb il faudra aussi le faire sur le deuxième disque (ici sdc).
fdisk /dev/sdb- Entrez l'option
npour créer une nouvelle partition.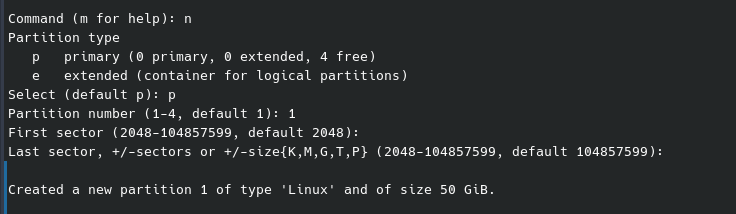
- Paramétrer le type de partition, entrer
tpuis83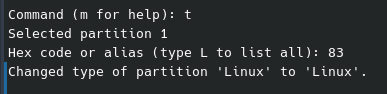
- Enregistrer en tapant
w
- Faire la même chose sur l'autre disque. Vous devriez avoir un résultat comme ça:
root@nfs-front-01:~# lsblk NAME MAJ:MIN RM SIZE RO TYPE MOUNTPOINTS sda 8:0 0 15G 0 disk ├─sda1 8:1 0 14G 0 part / ├─sda2 8:2 0 1K 0 part └─sda5 8:5 0 975M 0 part [SWAP] sdb 8:16 0 50G 0 disk └─sdb1 8:17 0 50G 0 part sdc 8:32 0 50G 0 disk └─sdc1 8:33 0 50G 0 part sr0 11:0 1 629M 0 rom - Création du raid 1
root@nfs-front-01:~# mdadm --create /dev/md0 --level=1 --raid-devices=2 /dev/sdb1 /dev/sdc1
mdadm: Note: this array has metadata at the start and
    may not be suitable as a boot device.  If you plan to
    store '/boot' on this device please ensure that
    your boot-loader understands md/v1.x metadata, or use
    --metadata=0.90
Continue creating array? yes
mdadm: Defaulting to version 1.2 metadata
mdadm: array /dev/md0 started.
On peut voire l'avancée de la création du raid avec les commandes suivante:
root@nfs-front-01:~# cat /proc/mdstat
Personalities : [raid1]
md0 : active raid1 sdc1[1] sdb1[0]
      52393984 blocks super 1.2 [2/2] [UU]
      [===>.................]  resync = 18.7% (9824064/52393984) finish=3.5min speed=196481K/sec

root@nfs-front-01:~# mdadm --detail /dev/md0
/dev/md0:
           Version : 1.2
     Creation Time : Fri Mar  8 17:55:59 2024
        Raid Level : raid1
        Array Size : 52393984 (49.97 GiB 53.65 GB)
     Used Dev Size : 52393984 (49.97 GiB 53.65 GB)
      Raid Devices : 2
     Total Devices : 2
       Persistence : Superblock is persistent

       Update Time : Fri Mar  8 17:58:42 2024
             State : clean, resyncing
    Active Devices : 2
   Working Devices : 2
    Failed Devices : 0
     Spare Devices : 0

Consistency Policy : resync

     Resync Status : 62% complete

              Name : nfs-front-01:0  (local to host nfs-front-01)
              UUID : dad7d1cc:3bed76c7:f30c0a98:bfe003f0
            Events : 10

    Number   Major   Minor   RaidDevice State
       0       8       17        0      active sync   /dev/sdb1
       1       8       33        1      active sync   /dev/sdc1
Tant que le Resync Status n'est pas à 100% on ne peut pas continuer !!
- On va formater le nouveau disque en EXT4 (tout laisser par défaut).
root@nfs-front-01:~# mkfs.ext4 /dev/md0
mke2fs 1.47.0 (5-Feb-2023)
Discarding device blocks: done
Creating filesystem with 13098496 4k blocks and 3276800 inodes
Filesystem UUID: 57e01ca3-e8a9-4098-b875-b135a85a6103
Superblock backups stored on blocks:
        32768, 98304, 163840, 229376, 294912, 819200, 884736, 1605632, 2654208,
        4096000, 7962624, 11239424

Allocating group tables: done
Writing inode tables: done
Creating journal (65536 blocks): done
Writing superblocks and filesystem accounting information:
done


Montage du nouveau disque.
- Créer le point de montage, pour moi ce sera /NFS
root@nfs-front-01:~# mkdir /NFS - Trouver le UUID du nouveau disque
root@nfs-front-01:~# blkid |grep md0 /dev/md0: UUID="57e01ca3-e8a9-4098-b875-b135a85a6103" BLOCK_SIZE="4096" TYPE="ext4"- Ajouter une entrée dans le fichier /etc/fstab:
# /etc/fstab: static file system information.
#
# Use 'blkid' to print the universally unique identifier for a
# device; this may be used with UUID= as a more robust way to name devices
# that works even if disks are added and removed. See fstab(5).
#
# systemd generates mount units based on this file, see systemd.mount(5).
# Please run 'systemctl daemon-reload' after making changes here.
#
# <file system> <mount point>   <type>  <options>       <dump>  <pass>
# / was on /dev/sda1 during installation
UUID=2516b302-d073-4803-bf2f-1e6118ce3c89 /               ext4    errors=remount-ro 0       1
# swap was on /dev/sda5 during installation
UUID=0929167e-0fd7-4211-8d49-c025c871d2fa none            swap    sw              0       0
/dev/sr0        /media/cdrom0   udf,iso9660 user,noauto     0       0
UUID=57e01ca3-e8a9-4098-b875-b135a85a6103 /NFS  ext4            defaults        0       0
- Ajouter une entrée dans le fichier /etc/fstab: