# VCENTER

# 1 - Installation d'ESXi sur VMware workstation

À la fin de ce tuto, tu seras capable d'installer ESXi sur VMware Workstation en partant de zéro.

#### **Prérequis** 

**Prérequis du poste hôte :**

- 500 Go de disque
- 32 Go de RAM
- Virtualisation activée dans le BIOS

**Prérequis à télécharger :**

- VMware Workstation
- ISO : `VMware-VMvisor-Installer-8.0U3-24022510.x86_64.iso`

**Configuration de la VM :**

- 8 Go de RAM
- 500 Go de disque
- 2 vCPU

#### **Création de la VM**

1. [![image.png](https://book.techoops.fr/uploads/images/gallery/2026-09/scaled-1680-/MzHimage.png)](https://book.techoops.fr/uploads/images/gallery/2026-09/MzHimage.png)
2. [![image.png](https://book.techoops.fr/uploads/images/gallery/2026-09/scaled-1680-/qkoimage.png)](https://book.techoops.fr/uploads/images/gallery/2026-09/qkoimage.png)
3. [![image.png](https://book.techoops.fr/uploads/images/gallery/2026-09/scaled-1680-/pc6image.png)](https://book.techoops.fr/uploads/images/gallery/2026-09/pc6image.png)
4. [![image.png](https://book.techoops.fr/uploads/images/gallery/2026-09/scaled-1680-/J8mimage.png)](https://book.techoops.fr/uploads/images/gallery/2026-09/J8mimage.png)
5. [![image.png](https://book.techoops.fr/uploads/images/gallery/2026-09/scaled-1680-/ZIaimage.png)](https://book.techoops.fr/uploads/images/gallery/2026-09/ZIaimage.png)
6. [![image.png](https://book.techoops.fr/uploads/images/gallery/2026-09/scaled-1680-/Ctnimage.png)](https://book.techoops.fr/uploads/images/gallery/2026-09/Ctnimage.png)
7. Changer La RAM pour 8 Go  
    [![image.png](https://book.techoops.fr/uploads/images/gallery/2026-09/scaled-1680-/q81image.png)](https://book.techoops.fr/uploads/images/gallery/2026-09/q81image.png)
8. Vérifier Si la virtualisation est activée  
    [![image.png](https://book.techoops.fr/uploads/images/gallery/2026-09/scaled-1680-/Rmaimage.png)](https://book.techoops.fr/uploads/images/gallery/2026-09/Rmaimage.png)
9. Démarrer la VM  
    [![image.png](https://book.techoops.fr/uploads/images/gallery/2026-09/scaled-1680-/Yjcimage.png)](https://book.techoops.fr/uploads/images/gallery/2026-09/Yjcimage.png)
10. Laisser l'installation se faire  
    [![image.png](https://book.techoops.fr/uploads/images/gallery/2026-09/scaled-1680-/4xFimage.png)](https://book.techoops.fr/uploads/images/gallery/2026-09/4xFimage.png)
    
    [![image.png](https://book.techoops.fr/uploads/images/gallery/2026-09/scaled-1680-/lbUimage.png)](https://book.techoops.fr/uploads/images/gallery/2026-09/lbUimage.png)
11. Paramétrage de l'OS  
    [![image.png](https://book.techoops.fr/uploads/images/gallery/2026-09/scaled-1680-/itkimage.png)](https://book.techoops.fr/uploads/images/gallery/2026-09/itkimage.png)
12. Accepter la licence  
    [![image.png](https://book.techoops.fr/uploads/images/gallery/2026-09/scaled-1680-/vMKimage.png)](https://book.techoops.fr/uploads/images/gallery/2026-09/vMKimage.png)
13. Paramétrer le stockage  
    [![image.png](https://book.techoops.fr/uploads/images/gallery/2026-09/scaled-1680-/2uNimage.png)](https://book.techoops.fr/uploads/images/gallery/2026-09/2uNimage.png)
14. Sélectionner le type de clavier [![image.png](https://book.techoops.fr/uploads/images/gallery/2026-09/scaled-1680-/fjFimage.png)](https://book.techoops.fr/uploads/images/gallery/2026-09/fjFimage.png)
15. Paramétrer le mot de passe je conseil Espoir15$  
    [![image.png](https://book.techoops.fr/uploads/images/gallery/2026-09/scaled-1680-/DxKimage.png)](https://book.techoops.fr/uploads/images/gallery/2026-09/DxKimage.png)
16. Confirmer l'installation  
    [![image.png](https://book.techoops.fr/uploads/images/gallery/2026-09/scaled-1680-/SgAimage.png)](https://book.techoops.fr/uploads/images/gallery/2026-09/SgAimage.png)
17. Redémarrer le serveur  
    [![image.png](https://book.techoops.fr/uploads/images/gallery/2026-09/scaled-1680-/zgeimage.png)](https://book.techoops.fr/uploads/images/gallery/2026-09/zgeimage.png)
18. Paramétrer le nom du serveur et le domaine de recherche DNS  
    [![image.png](https://book.techoops.fr/uploads/images/gallery/2026-09/scaled-1680-/dtPimage.png)](https://book.techoops.fr/uploads/images/gallery/2026-09/dtPimage.png)
    
    [![image.png](https://book.techoops.fr/uploads/images/gallery/2026-09/scaled-1680-/Pcyimage.png)](https://book.techoops.fr/uploads/images/gallery/2026-09/Pcyimage.png)
    
    [![image.png](https://book.techoops.fr/uploads/images/gallery/2026-09/scaled-1680-/6dhimage.png)](https://book.techoops.fr/uploads/images/gallery/2026-09/6dhimage.png)
    
    [![image.png](https://book.techoops.fr/uploads/images/gallery/2026-09/scaled-1680-/51timage.png)](https://book.techoops.fr/uploads/images/gallery/2026-09/51timage.png)
    
    [![image.png](https://book.techoops.fr/uploads/images/gallery/2026-09/scaled-1680-/9Quimage.png)](https://book.techoops.fr/uploads/images/gallery/2026-09/9Quimage.png)
    
    [![image.png](https://book.techoops.fr/uploads/images/gallery/2026-09/scaled-1680-/T8gimage.png)](https://book.techoops.fr/uploads/images/gallery/2026-09/T8gimage.png)
    
    [![image.png](https://book.techoops.fr/uploads/images/gallery/2026-09/scaled-1680-/sdKimage.png)](https://book.techoops.fr/uploads/images/gallery/2026-09/sdKimage.png)
    
    [![image.png](https://book.techoops.fr/uploads/images/gallery/2026-09/scaled-1680-/XlBimage.png)](https://book.techoops.fr/uploads/images/gallery/2026-09/XlBimage.png)
19. Accéder à la webui  
    [![image.png](https://book.techoops.fr/uploads/images/gallery/2026-09/scaled-1680-/6Cyimage.png)](https://book.techoops.fr/uploads/images/gallery/2026-09/6Cyimage.png)
    
    [![image.png](https://book.techoops.fr/uploads/images/gallery/2026-09/scaled-1680-/gj9image.png)](https://book.techoops.fr/uploads/images/gallery/2026-09/gj9image.png)
    
    [![image.png](https://book.techoops.fr/uploads/images/gallery/2026-09/scaled-1680-/oSsimage.png)](https://book.techoops.fr/uploads/images/gallery/2026-09/oSsimage.png)

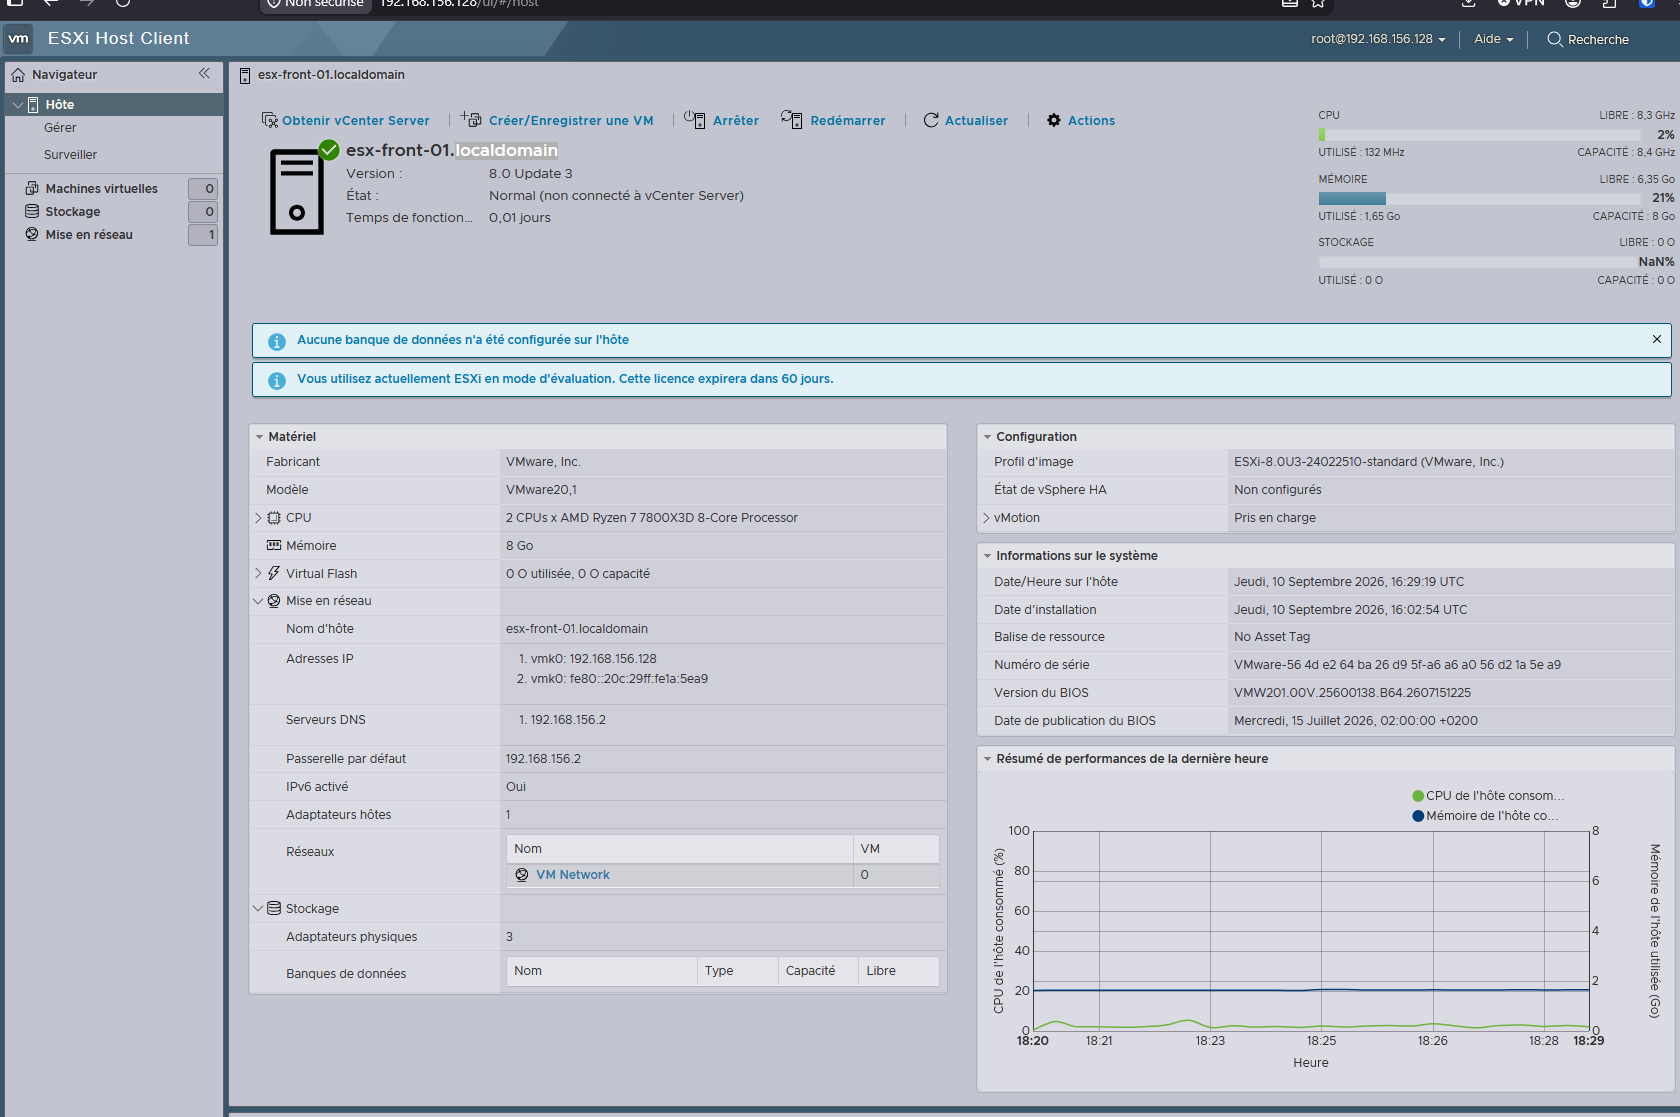
<p class="callout success">Bravo !! L'ESXi est installé  
</p>

[![image.png](https://book.techoops.fr/uploads/images/gallery/2026-09/scaled-1680-/pp1image.png)](https://book.techoops.fr/uploads/images/gallery/2026-09/pp1image.png)

# 2 - Paramétrage du Réseau

### Prérequis:

- Avoir un ESX fonctionnel

### Mise en place:

- Sur Wokstation ajouter des cartes réseau une pour le stockage (vmnet1) une autre pour les VMs (vmnet2)  
    [![image.png](https://book.techoops.fr/uploads/images/gallery/2026-09/scaled-1680-/aT0image.png)](https://book.techoops.fr/uploads/images/gallery/2026-09/aT0image.png)
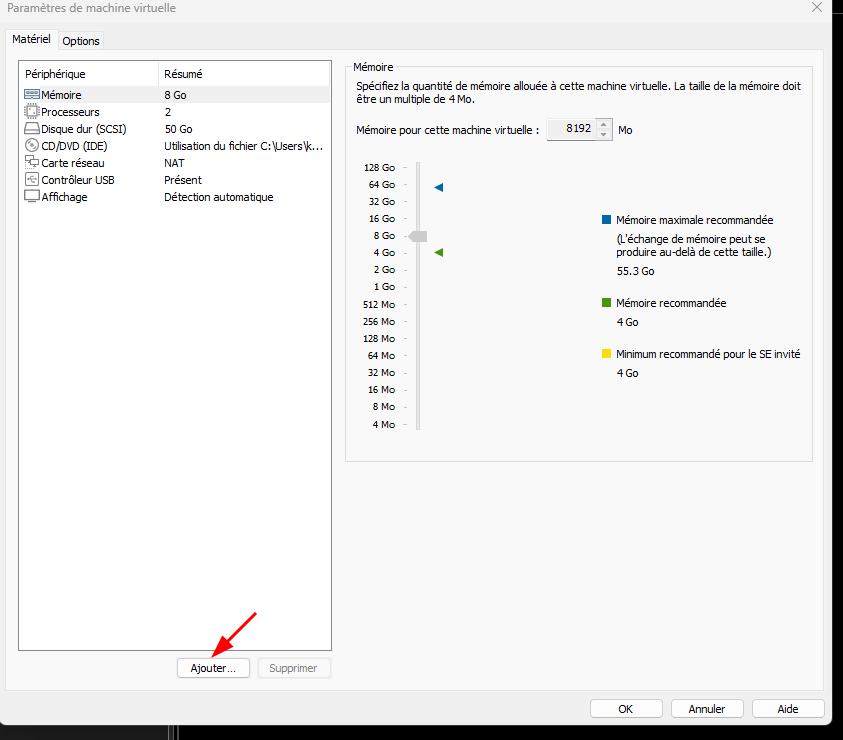
    
    [![image.png](https://book.techoops.fr/uploads/images/gallery/2026-09/scaled-1680-/w0Himage.png)](https://book.techoops.fr/uploads/images/gallery/2026-09/w0Himage.png)
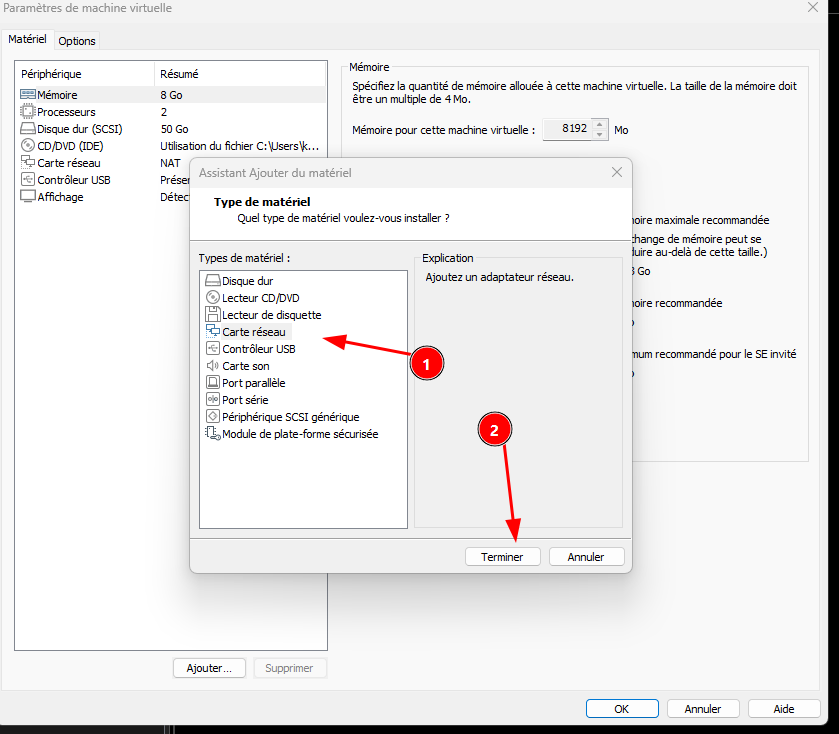
    
    [![image.png](https://book.techoops.fr/uploads/images/gallery/2026-09/scaled-1680-/nzwimage.png)](https://book.techoops.fr/uploads/images/gallery/2026-09/nzwimage.png)
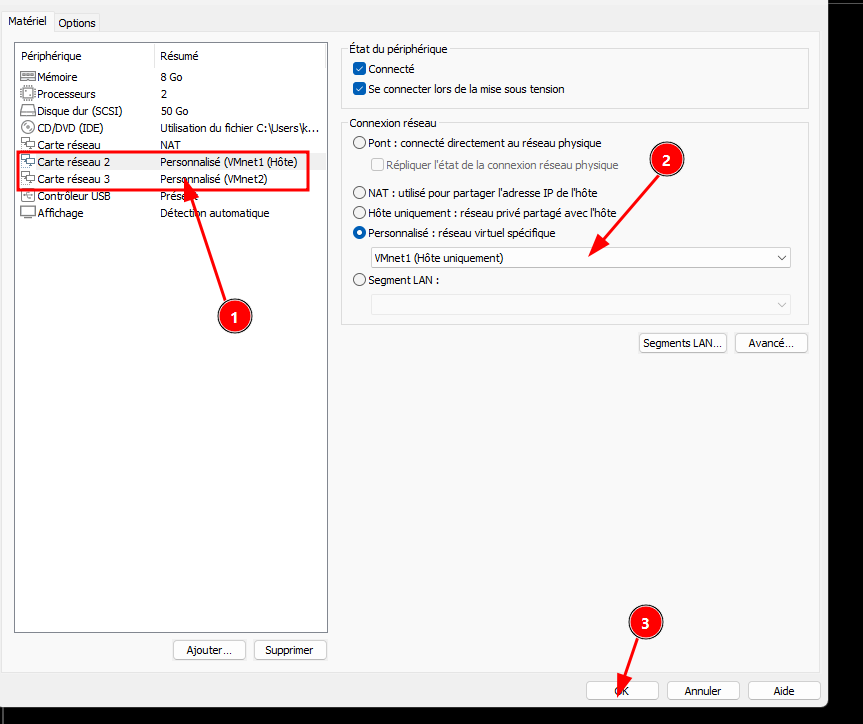
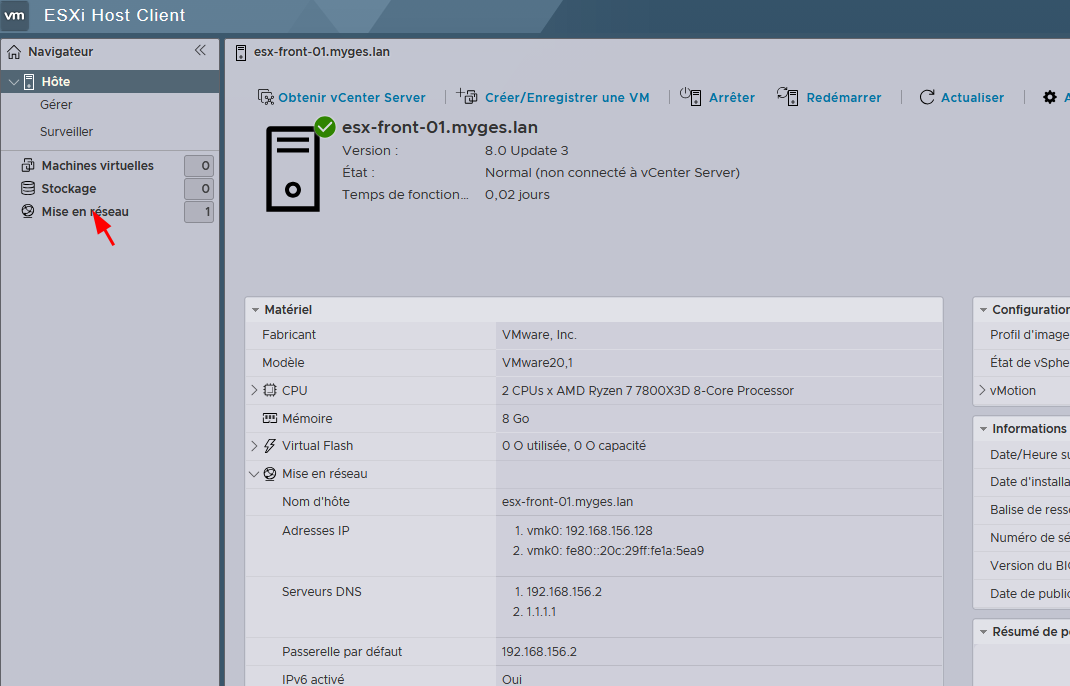
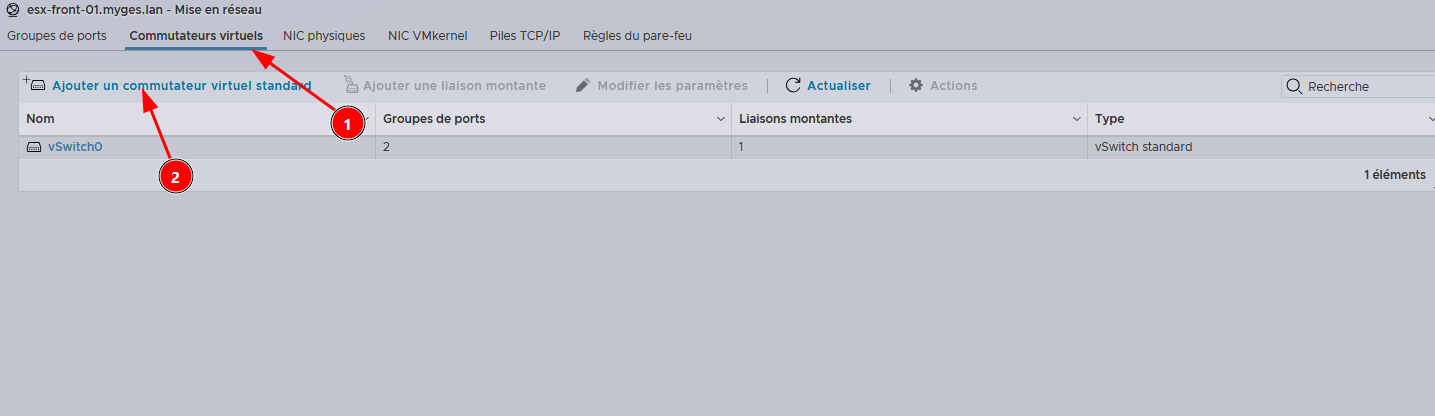
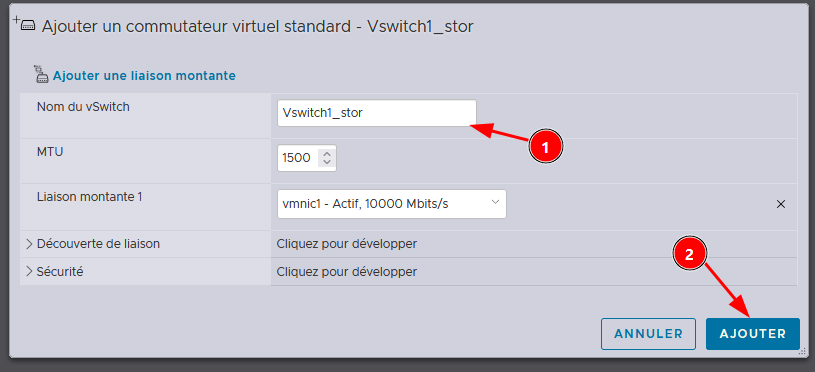
- Sur le serveur ESXi on va ajouter les vswitch et les connecter aux cartes réseau  
    [![image.png](https://book.techoops.fr/uploads/images/gallery/2026-09/scaled-1680-/MPtimage.png)](https://book.techoops.fr/uploads/images/gallery/2026-09/MPtimage.png)
    
    [![image.png](https://book.techoops.fr/uploads/images/gallery/2026-09/scaled-1680-/XPUimage.png)](https://book.techoops.fr/uploads/images/gallery/2026-09/XPUimage.png)
    
    [![image.png](https://book.techoops.fr/uploads/images/gallery/2026-09/scaled-1680-/Ds3image.png)](https://book.techoops.fr/uploads/images/gallery/2026-09/Ds3image.png)
    
    [![image.png](https://book.techoops.fr/uploads/images/gallery/2026-09/scaled-1680-/0QBimage.png)](https://book.techoops.fr/uploads/images/gallery/2026-09/0QBimage.png)

- Configurer les ports groups:  
    [![image.png](https://book.techoops.fr/uploads/images/gallery/2026-09/scaled-1680-/e96image.png)](https://book.techoops.fr/uploads/images/gallery/2026-09/e96image.png)
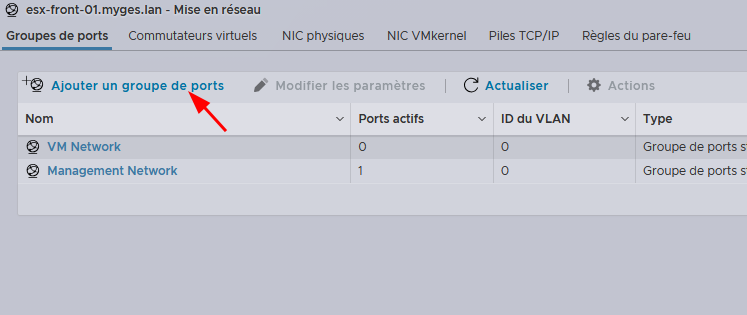
    
    [![image.png](https://book.techoops.fr/uploads/images/gallery/2026-09/scaled-1680-/aQwimage.png)](https://book.techoops.fr/uploads/images/gallery/2026-09/aQwimage.png)
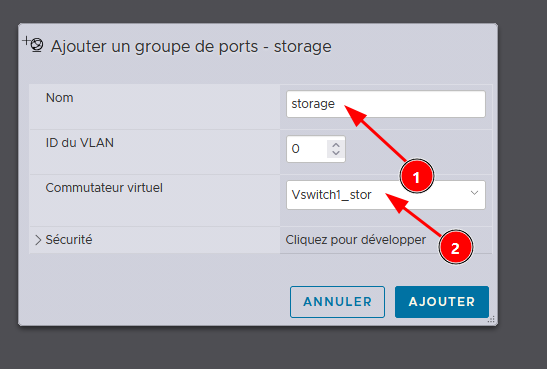
    
    [![image.png](https://book.techoops.fr/uploads/images/gallery/2026-09/scaled-1680-/RZeimage.png)](https://book.techoops.fr/uploads/images/gallery/2026-09/RZeimage.png)

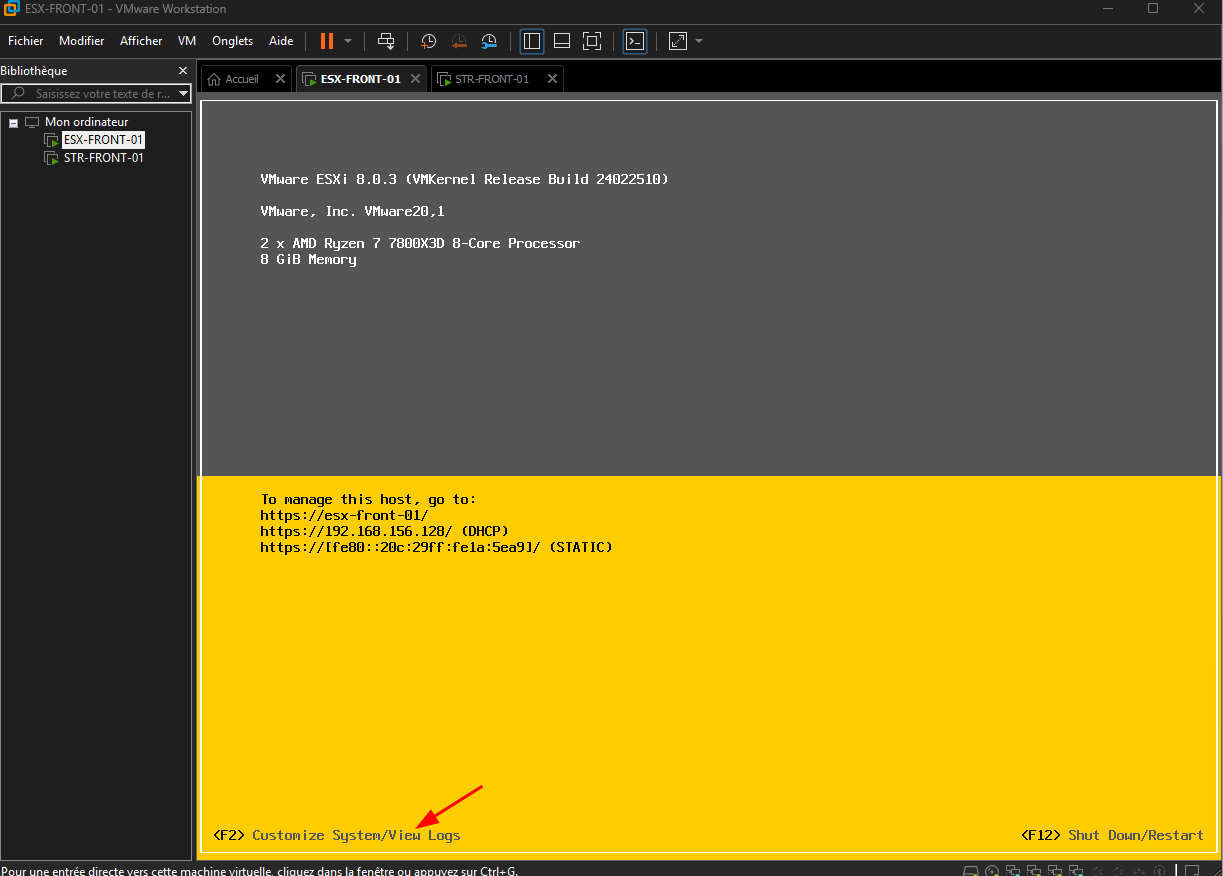
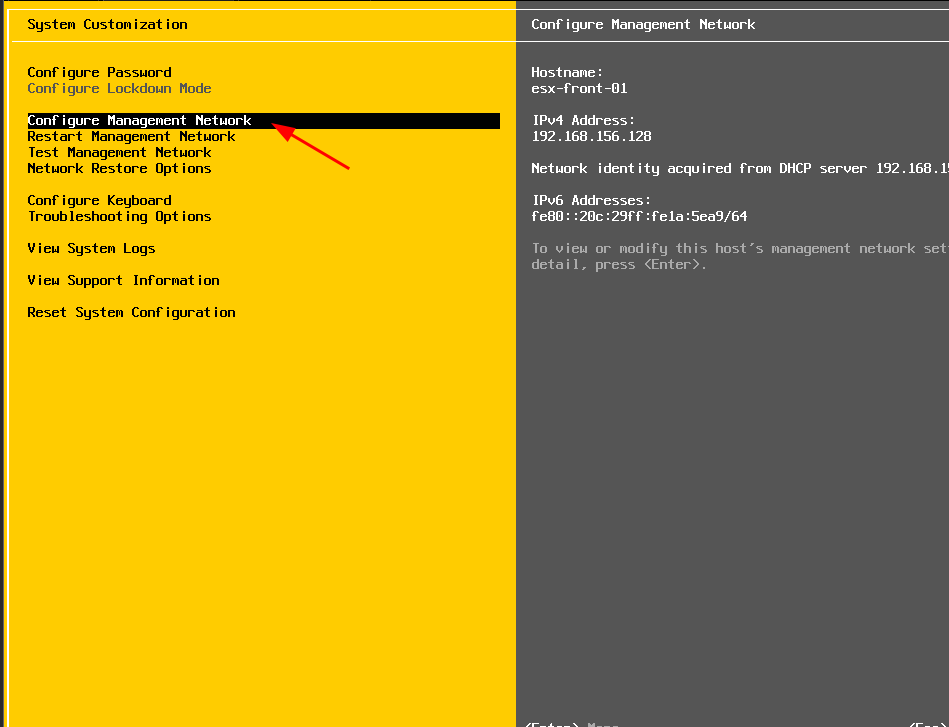
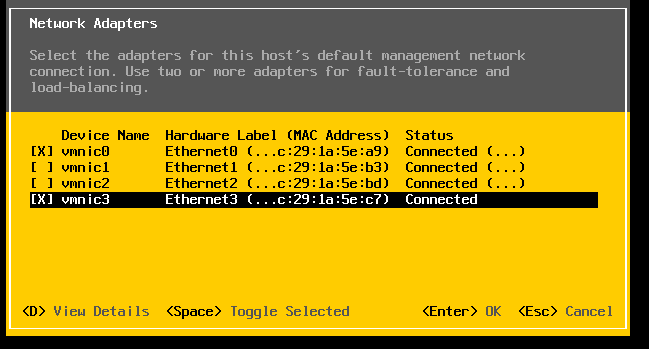
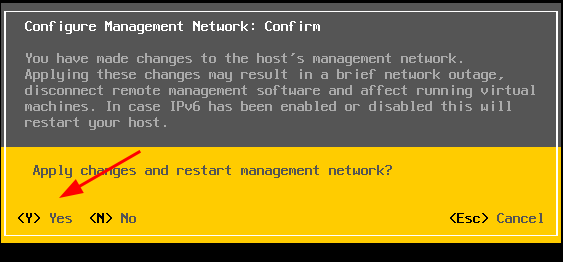
- Mise en place une liaison redondée sur l'interface de management 
    - Ajouter une carte réseau supplémentaire à l'ESX  
        [![image.png](https://book.techoops.fr/uploads/images/gallery/2026-09/scaled-1680-/ucKimage.png)](https://book.techoops.fr/uploads/images/gallery/2026-09/ucKimage.png)
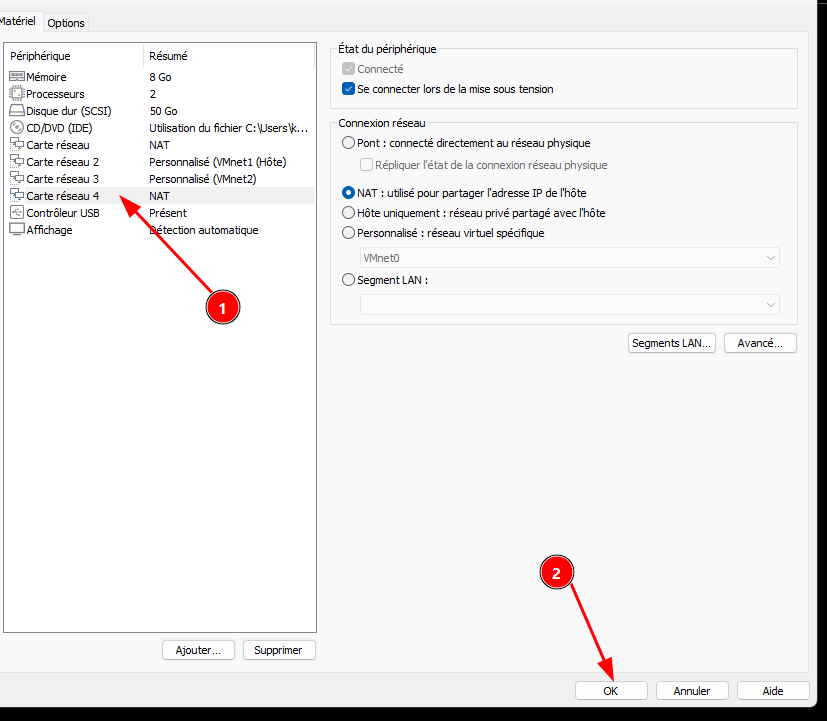
    - Redémarrer l'ESX  
        [![image.png](https://book.techoops.fr/uploads/images/gallery/2026-09/scaled-1680-/YeUimage.png)](https://book.techoops.fr/uploads/images/gallery/2026-09/YeUimage.png)
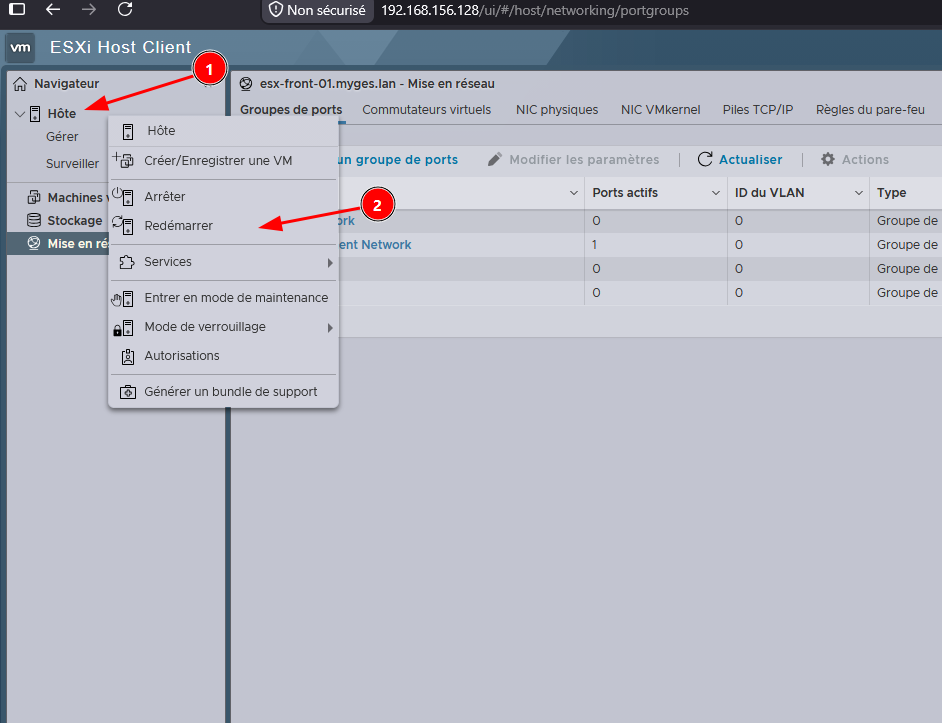
- Modification du BIOS  
    [![image.png](https://book.techoops.fr/uploads/images/gallery/2026-09/scaled-1680-/Gmqimage.png)](https://book.techoops.fr/uploads/images/gallery/2026-09/Gmqimage.png)
    
    [![image.png](https://book.techoops.fr/uploads/images/gallery/2026-09/scaled-1680-/Nsiimage.png)](https://book.techoops.fr/uploads/images/gallery/2026-09/Nsiimage.png)
    
    [![image.png](https://book.techoops.fr/uploads/images/gallery/2026-09/scaled-1680-/Zpbimage.png)](https://book.techoops.fr/uploads/images/gallery/2026-09/Zpbimage.png)
    
    [![image.png](https://book.techoops.fr/uploads/images/gallery/2026-09/scaled-1680-/Mugimage.png)](https://book.techoops.fr/uploads/images/gallery/2026-09/Mugimage.png)
    
    [![image.png](https://book.techoops.fr/uploads/images/gallery/2026-09/scaled-1680-/9sZimage.png)](https://book.techoops.fr/uploads/images/gallery/2026-09/9sZimage.png)
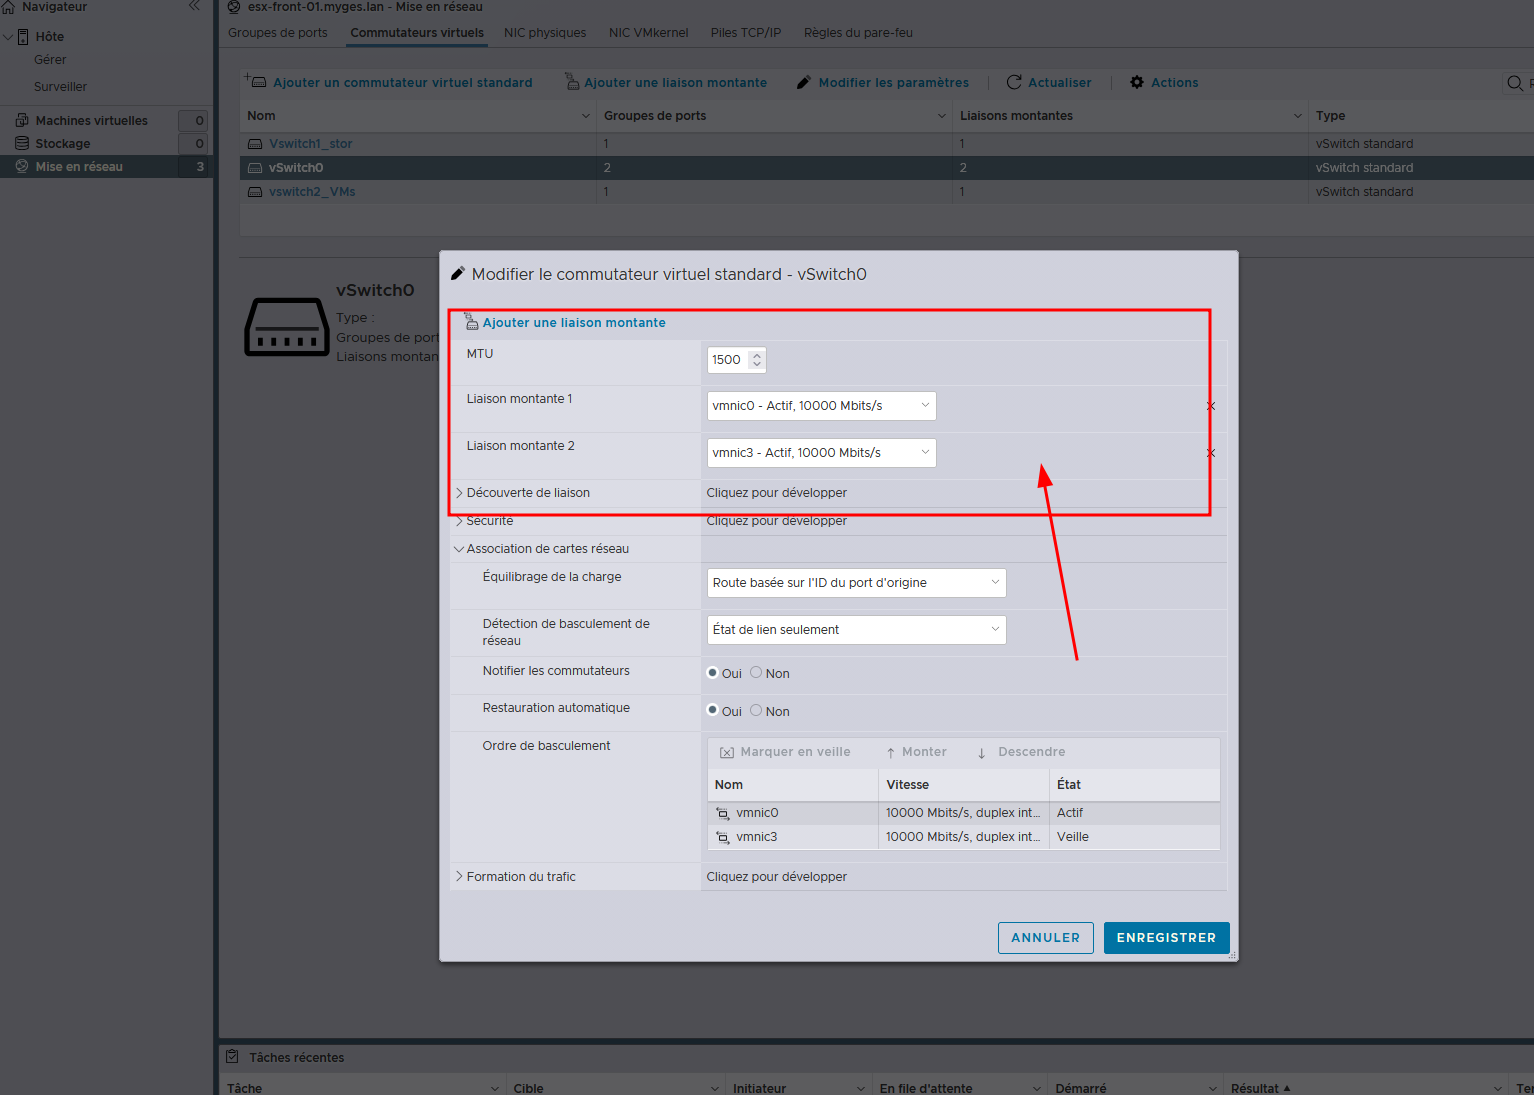
# 3 - Paramétrage du stockage

### Prérequis:

- Avoir un ESX
- Avoir un serveur de fichier type NFS ou ISCSI --&gt; [Installation d'un serveur NFS sur un RAID 1 sur une VM](https://book.techoops.fr/books/nfs-server/page/installation-dun-serveur-nfs-sur-un-raid-1-sur-une-vm "Installation d'un serveur NFS sur un RAID 1 sur une VM")
- Avoir paramétré les interface réseaux
- Avoir paramétré le réseau strorage sur la bonne interface

### Ajout du serveur de fichier en tant banque de donnée:

#### NFS:

Mon serveur de fichier est un debian 13 portant l'IP 192.168.133.10/24.  
Le serveur ESX portera la .11, voici comment la configurer:

[![image.png](https://book.techoops.fr/uploads/images/gallery/2026-09/scaled-1680-/NPaimage.png)](https://book.techoops.fr/uploads/images/gallery/2026-09/NPaimage.png)
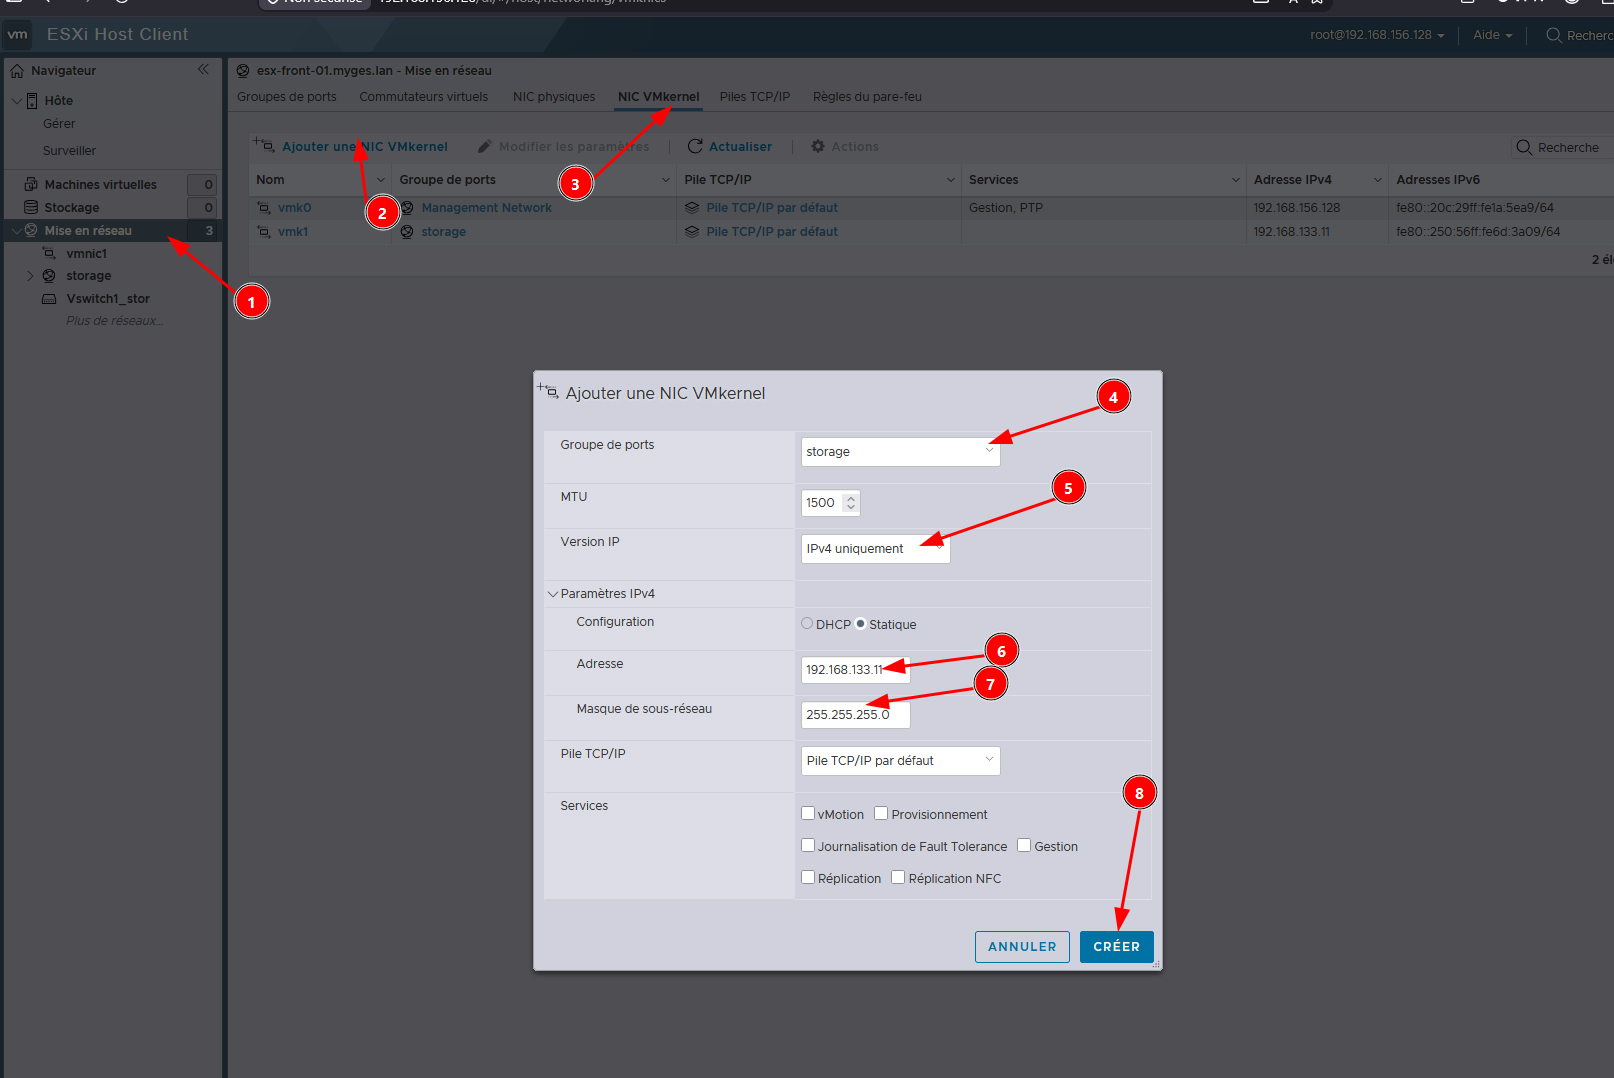
Ajouter une banque de donnée NFS:

[![image.png](https://book.techoops.fr/uploads/images/gallery/2026-09/scaled-1680-/gRiimage.png)](https://book.techoops.fr/uploads/images/gallery/2026-09/gRiimage.png)
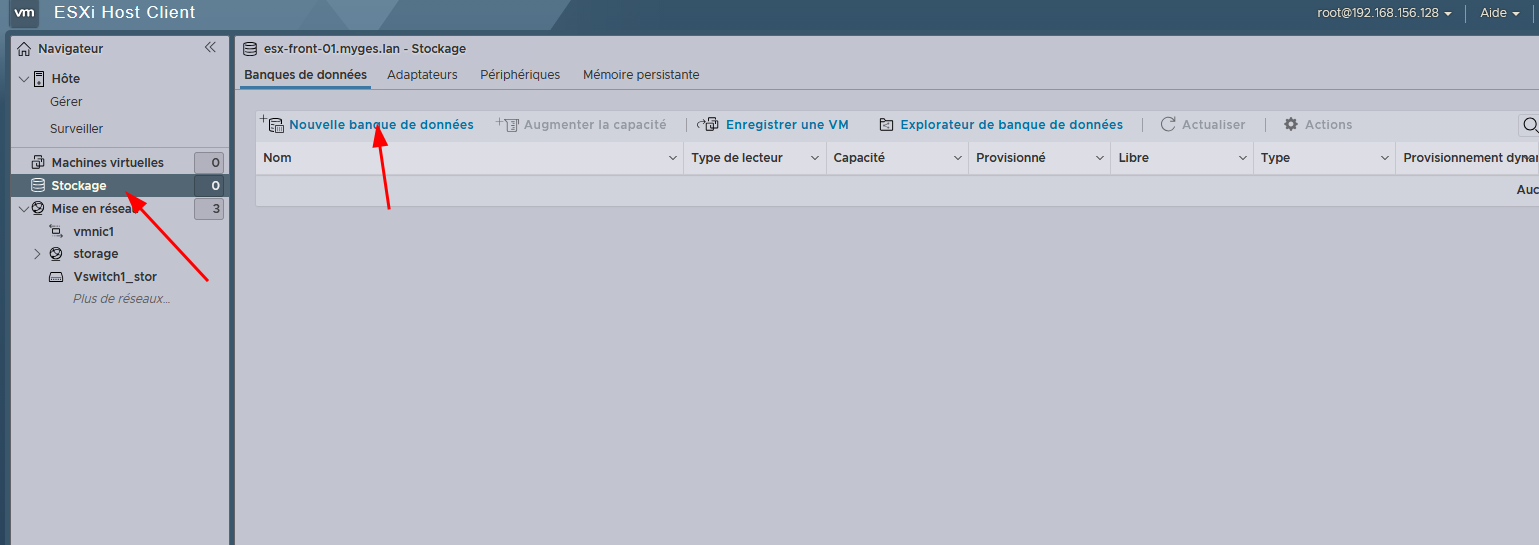
[![image.png](https://book.techoops.fr/uploads/images/gallery/2026-09/scaled-1680-/Xaiimage.png)](https://book.techoops.fr/uploads/images/gallery/2026-09/Xaiimage.png)
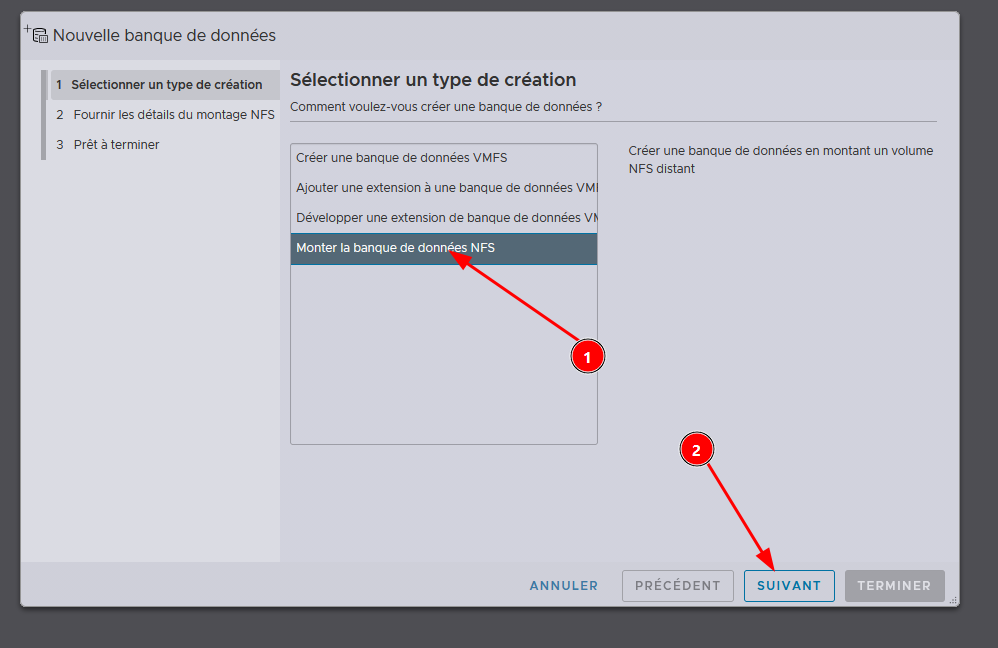
[![image.png](https://book.techoops.fr/uploads/images/gallery/2026-09/scaled-1680-/Wqhimage.png)](https://book.techoops.fr/uploads/images/gallery/2026-09/Wqhimage.png)
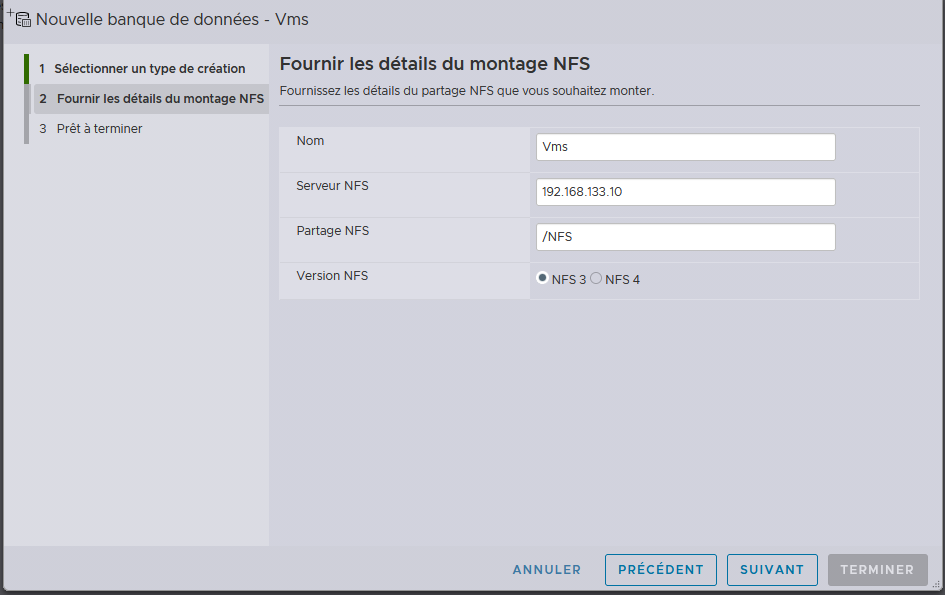
[![image.png](https://book.techoops.fr/uploads/images/gallery/2026-09/scaled-1680-/YSHimage.png)](https://book.techoops.fr/uploads/images/gallery/2026-09/YSHimage.png)

# 4 - Création d'une VM

### Prérequis:

- Avoir configuré le réseau
- Avoir configuré une banque de donnée
- Disposer d'une ISO

### Création de la VM

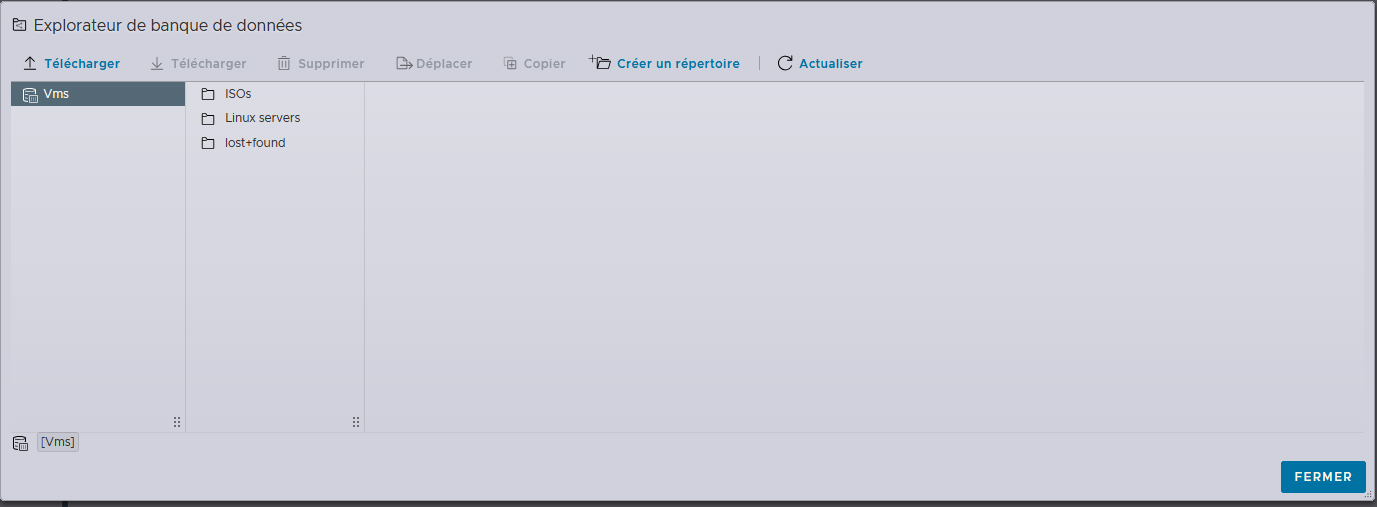
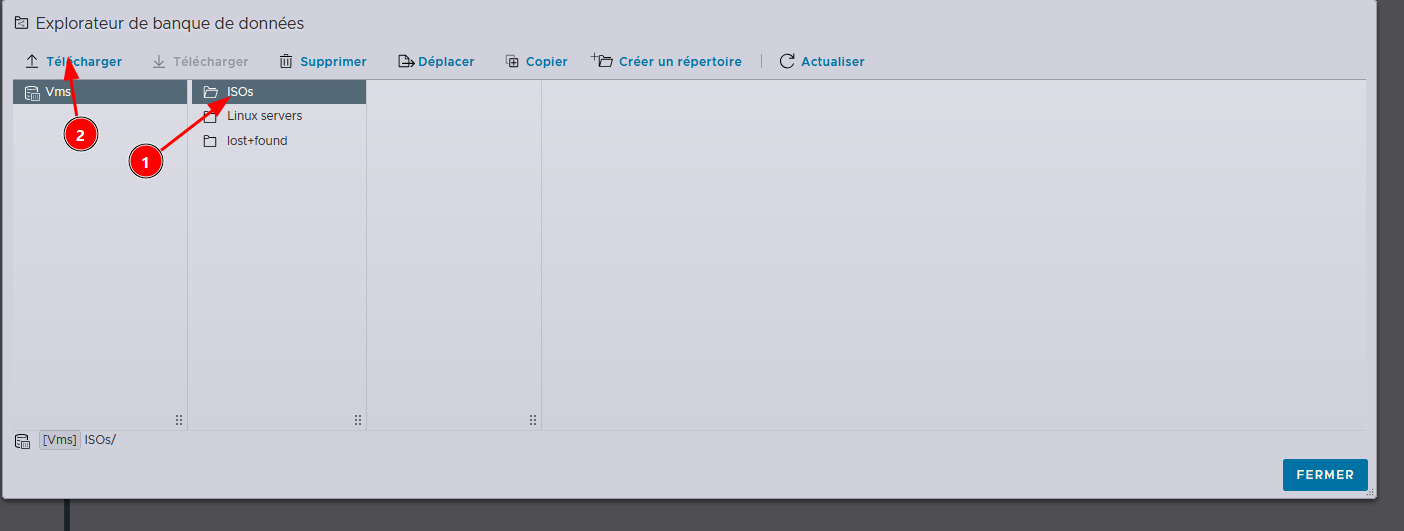
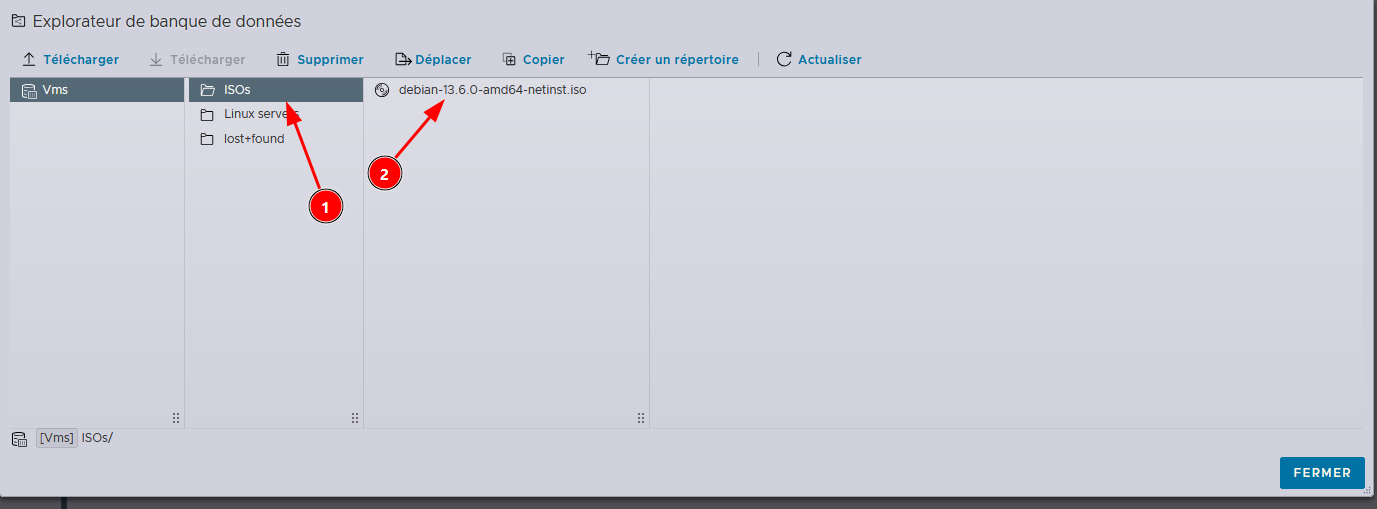
- Ajouter un fichier ISO à la banque de donnée (Je me servirai de Debian) 
    - Créer un dossier pour les ISOs et un pour les VMs [![image.png](https://book.techoops.fr/uploads/images/gallery/2026-09/scaled-1680-/L0Simage.png)](https://book.techoops.fr/uploads/images/gallery/2026-09/L0Simage.png)
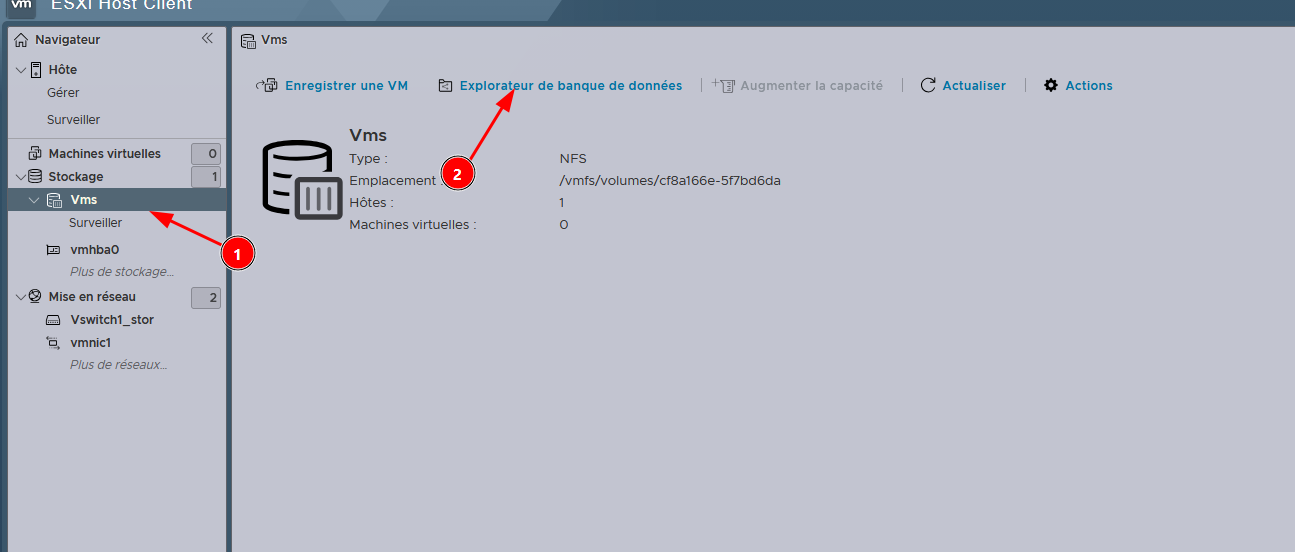
        
        [![image.png](https://book.techoops.fr/uploads/images/gallery/2026-09/scaled-1680-/8w6image.png)](https://book.techoops.fr/uploads/images/gallery/2026-09/8w6image.png)
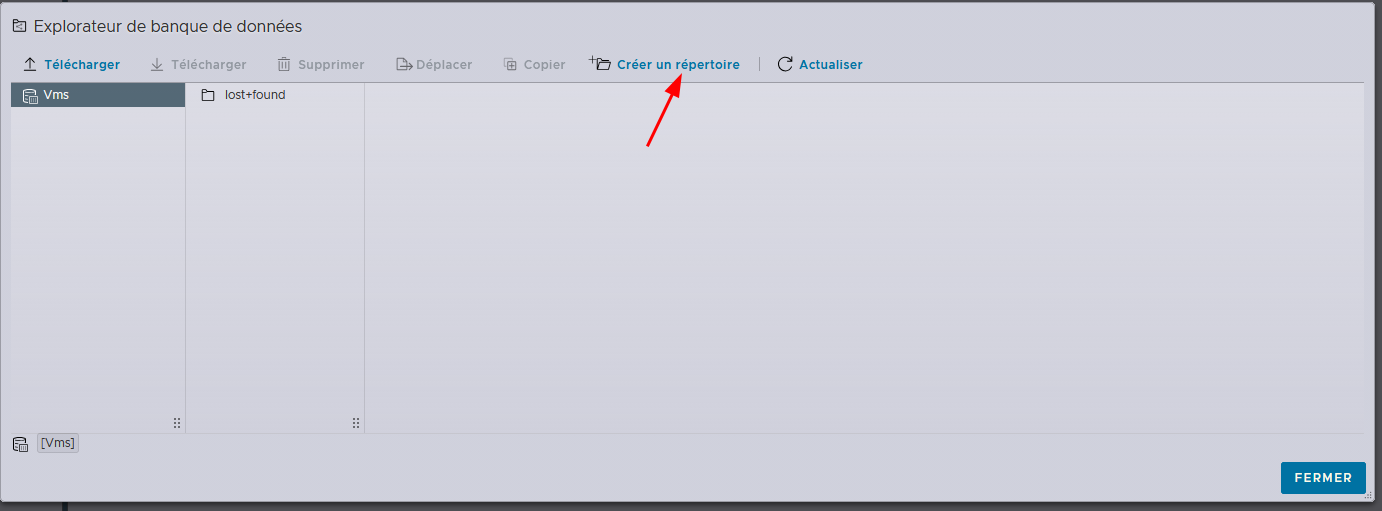
        
        [![image.png](https://book.techoops.fr/uploads/images/gallery/2026-09/scaled-1680-/Ninimage.png)](https://book.techoops.fr/uploads/images/gallery/2026-09/Ninimage.png)
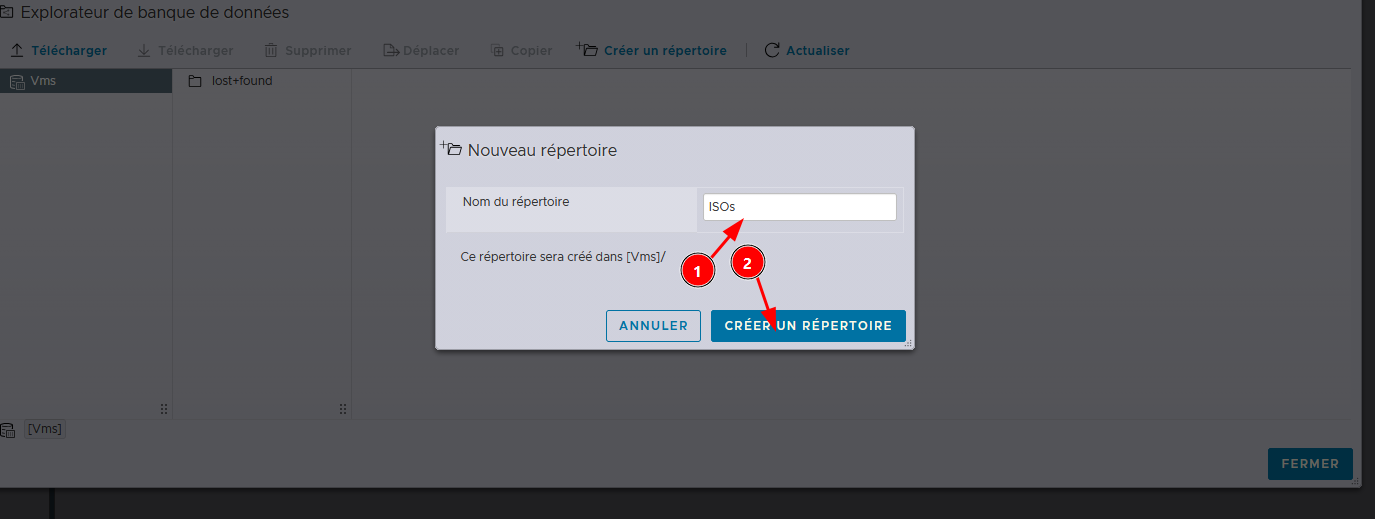
        
        [![image.png](https://book.techoops.fr/uploads/images/gallery/2026-09/scaled-1680-/Yzuimage.png)](https://book.techoops.fr/uploads/images/gallery/2026-09/Yzuimage.png)
        
        [![image.png](https://book.techoops.fr/uploads/images/gallery/2026-09/scaled-1680-/3a0image.png)](https://book.techoops.fr/uploads/images/gallery/2026-09/3a0image.png)
        
        [![image.png](https://book.techoops.fr/uploads/images/gallery/2026-09/scaled-1680-/EMRimage.png)](https://book.techoops.fr/uploads/images/gallery/2026-09/EMRimage.png)
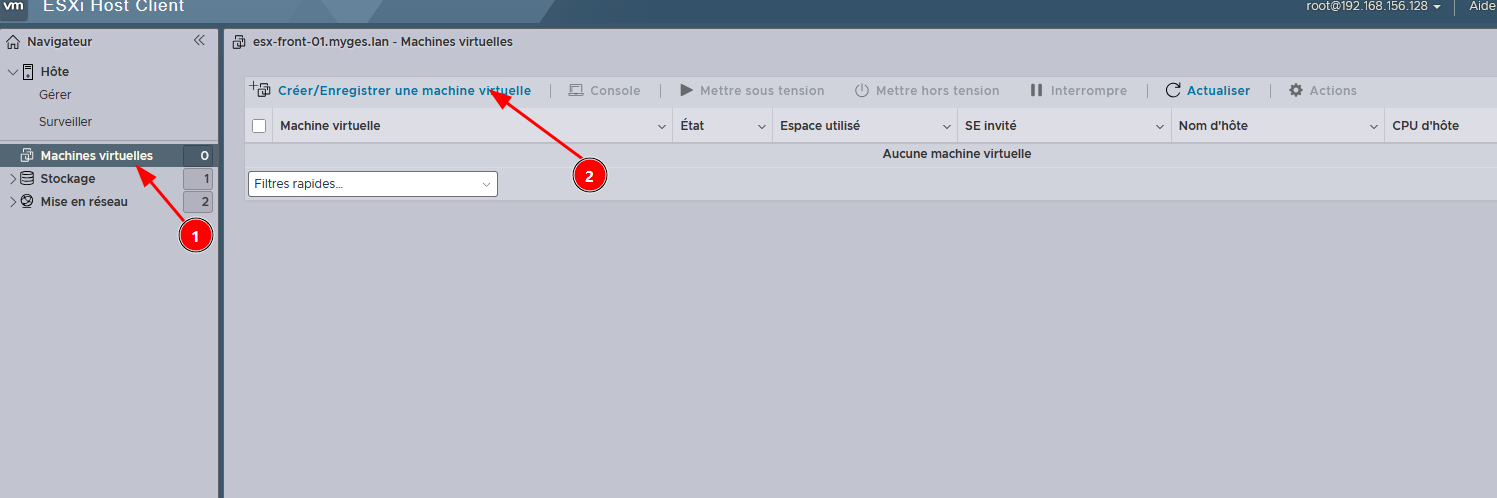
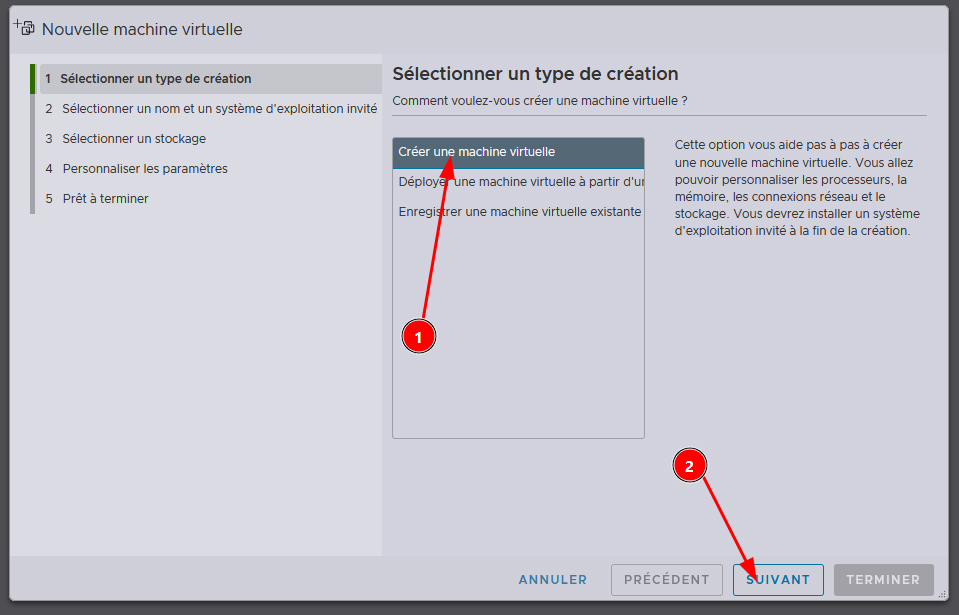
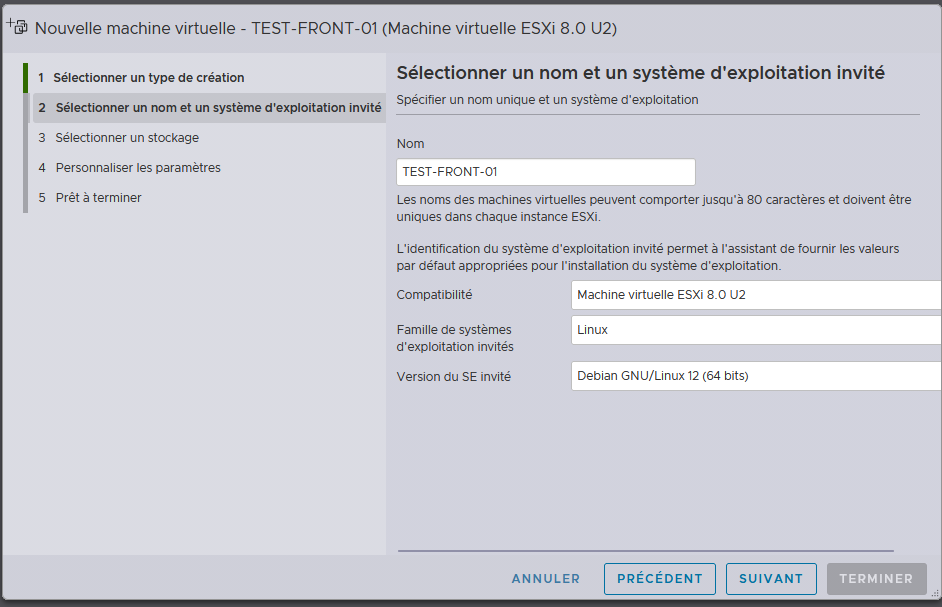
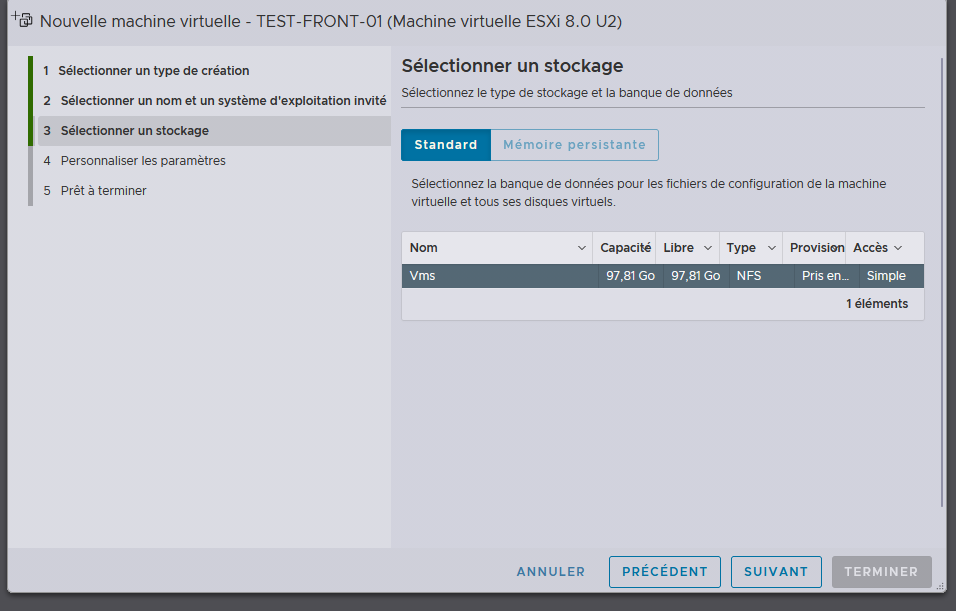
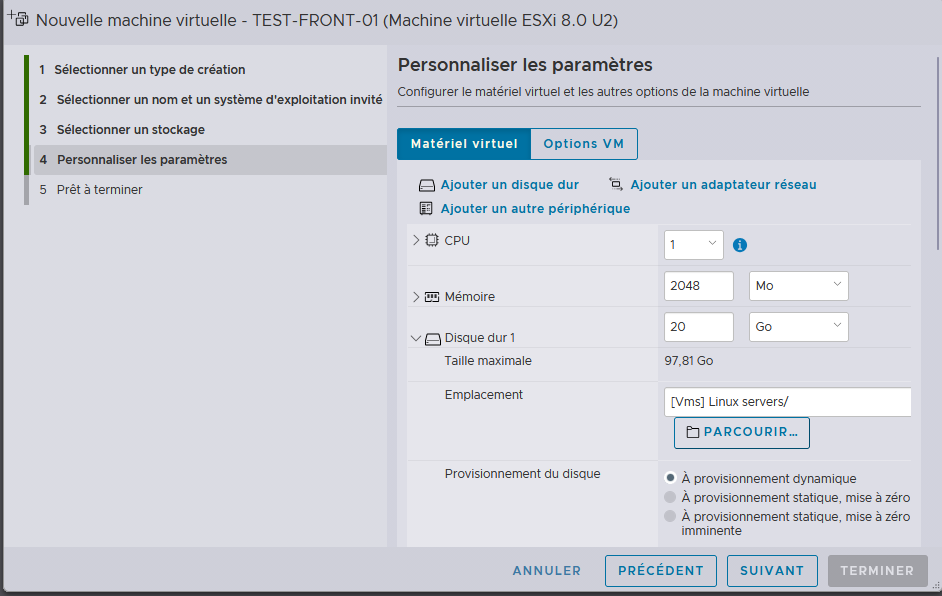
- Créer la VM  
    [![image.png](https://book.techoops.fr/uploads/images/gallery/2026-09/scaled-1680-/Cibimage.png)](https://book.techoops.fr/uploads/images/gallery/2026-09/Cibimage.png)
    
    [![image.png](https://book.techoops.fr/uploads/images/gallery/2026-09/scaled-1680-/JnIimage.png)](https://book.techoops.fr/uploads/images/gallery/2026-09/JnIimage.png)
    
    [![image.png](https://book.techoops.fr/uploads/images/gallery/2026-09/scaled-1680-/HLqimage.png)](https://book.techoops.fr/uploads/images/gallery/2026-09/HLqimage.png)
    
    [![image.png](https://book.techoops.fr/uploads/images/gallery/2026-09/scaled-1680-/WoCimage.png)](https://book.techoops.fr/uploads/images/gallery/2026-09/WoCimage.png)
    
    [![image.png](https://book.techoops.fr/uploads/images/gallery/2026-09/scaled-1680-/ps9image.png)](https://book.techoops.fr/uploads/images/gallery/2026-09/ps9image.png)
    
    [![image.png](https://book.techoops.fr/uploads/images/gallery/2026-09/scaled-1680-/3Ldimage.png)](https://book.techoops.fr/uploads/images/gallery/2026-09/3Ldimage.png)
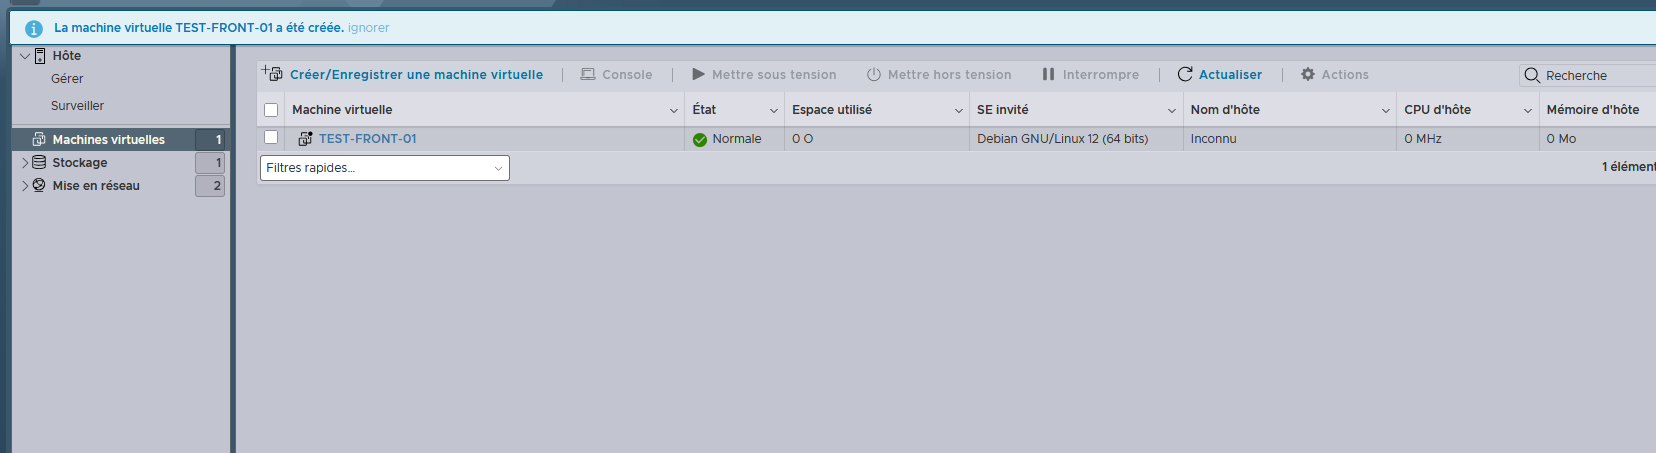
# 5 - Installation de vcenter

#### **À quoi sert vCenter ?**

vCenter permet aux administrateurs informatiques de gérer plusieurs serveurs physiques et leurs machines virtuelles depuis une interface unique.

Ses principales fonctions :

- Gestion des hôtes ESXi : administrer plusieurs serveurs physiques.
- Gestion des machines virtuelles (VM) : créer, démarrer, arrêter et configurer des VM.
- vMotion : déplacer une machine virtuelle d’un hôte ESXi à un autre sans interruption de service, sous certaines conditions.
- Haute disponibilité (HA) : redémarrer automatiquement les VM sur un autre hôte en cas de panne, si l’environnement est configuré pour cela.
- Gestion des ressources : répartir les ressources CPU et mémoire entre les machines virtuelles.

####  **Prérequis** 

**Prérequis du poste hôte :**

- 500 Go de disque
- 32 Go de RAM
- Virtualisation activée dans le BIOS
- 2 VM ESXi

**Prérequis à télécharger :**

- VMware Workstation
- ISO : `VMware-VCSA-all-8.0.3.iso`

#### **Installation de vcenter**

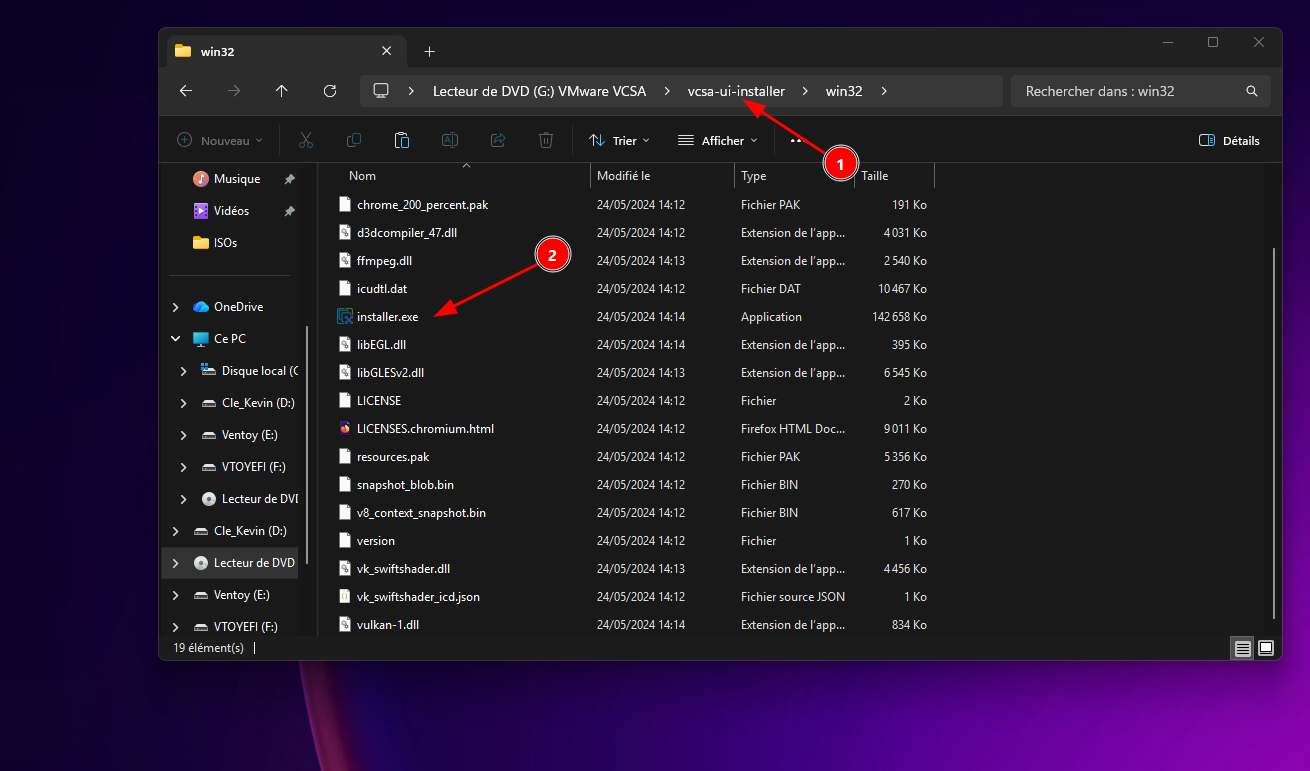
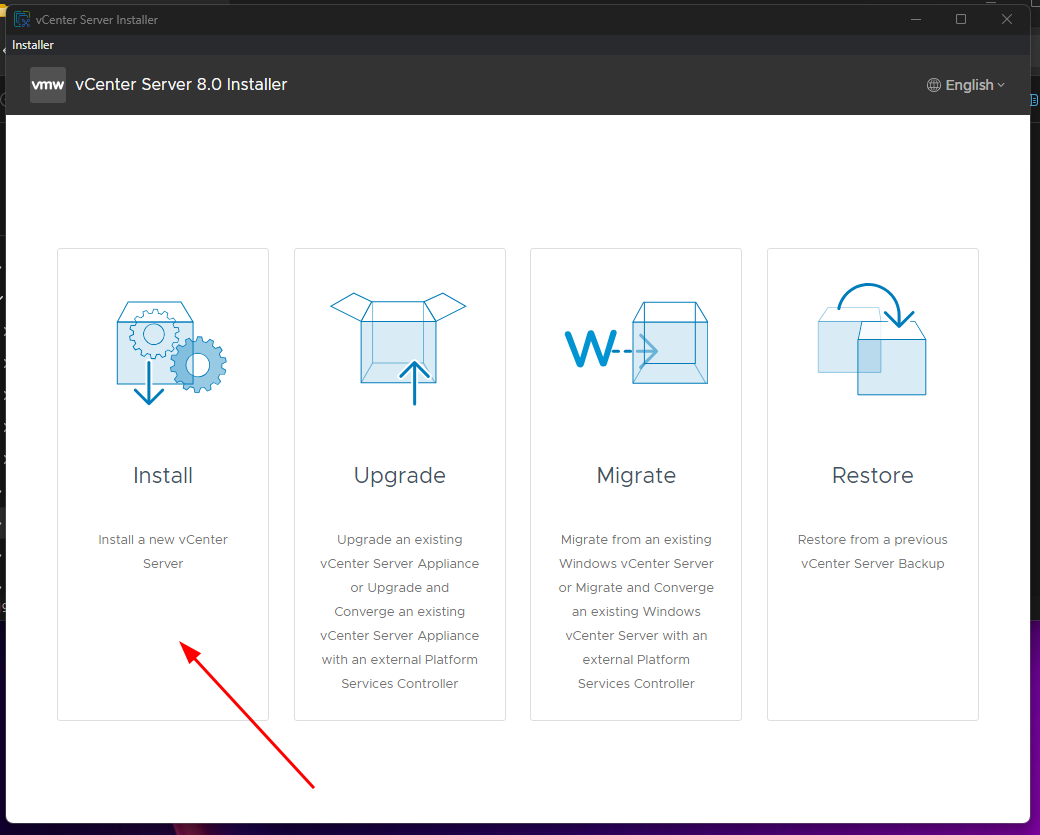
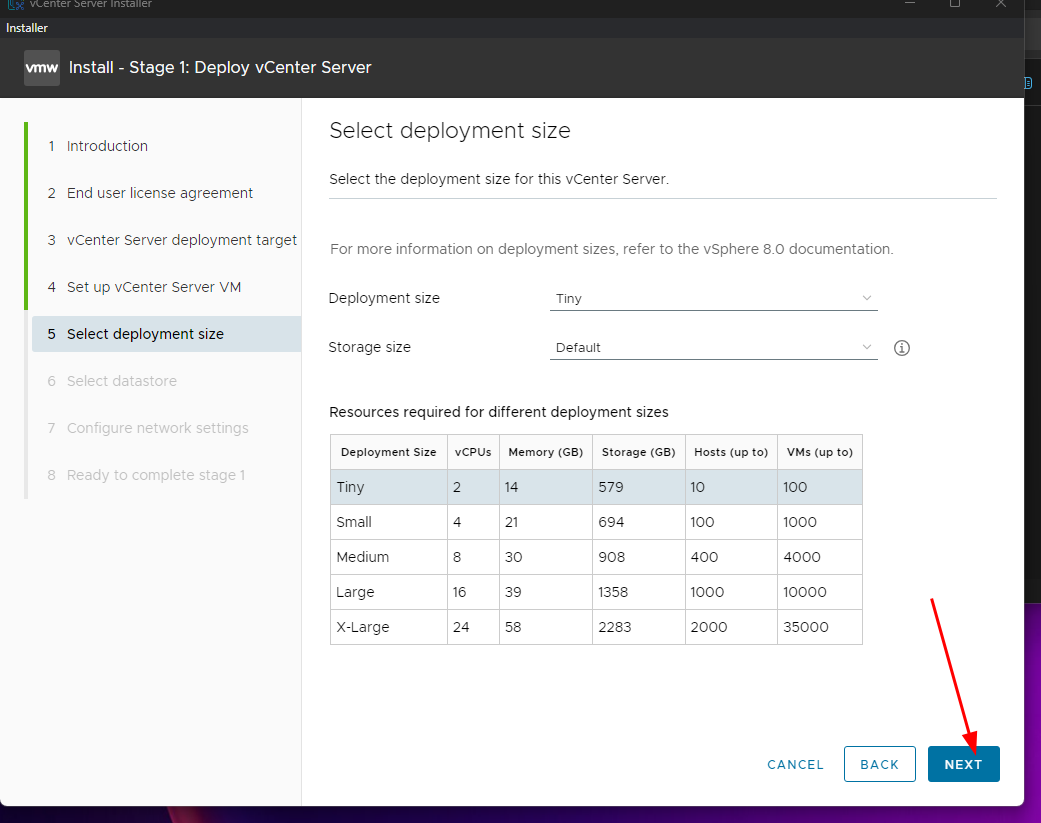
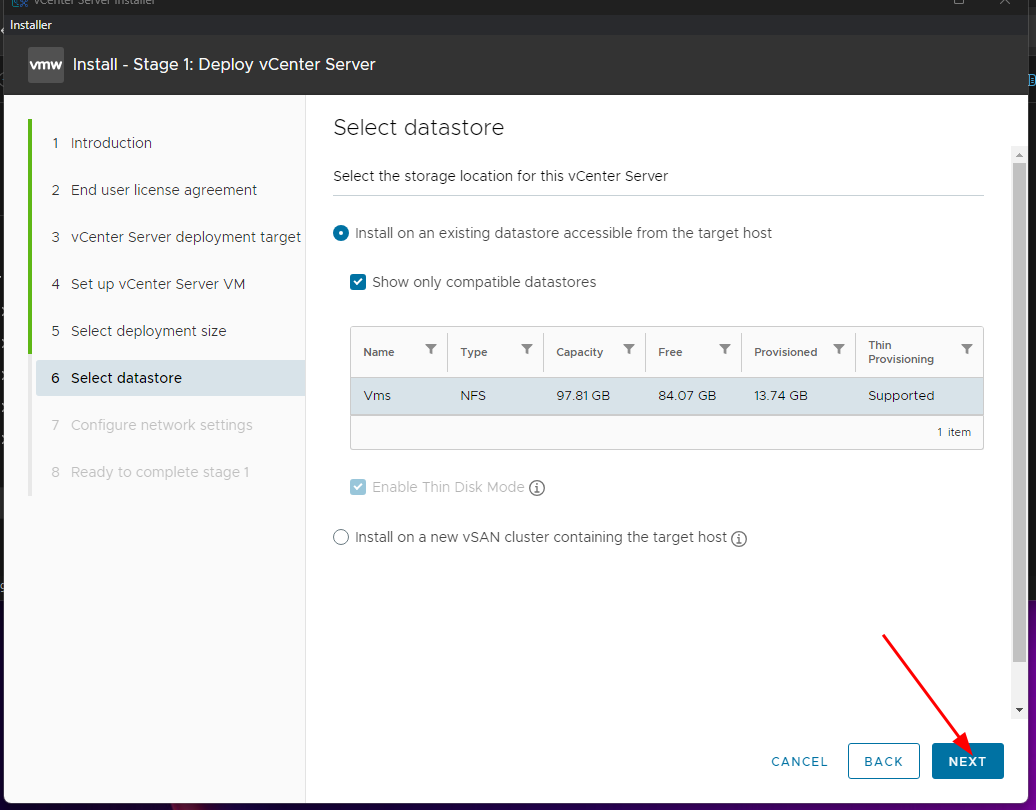
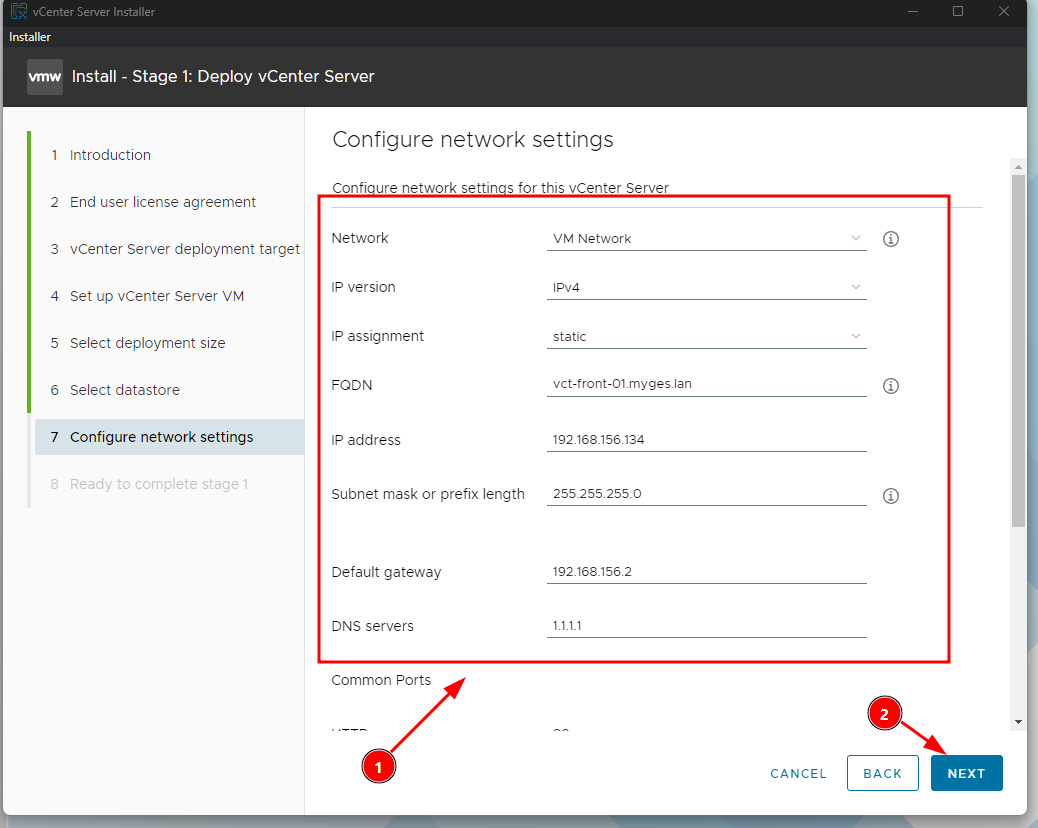
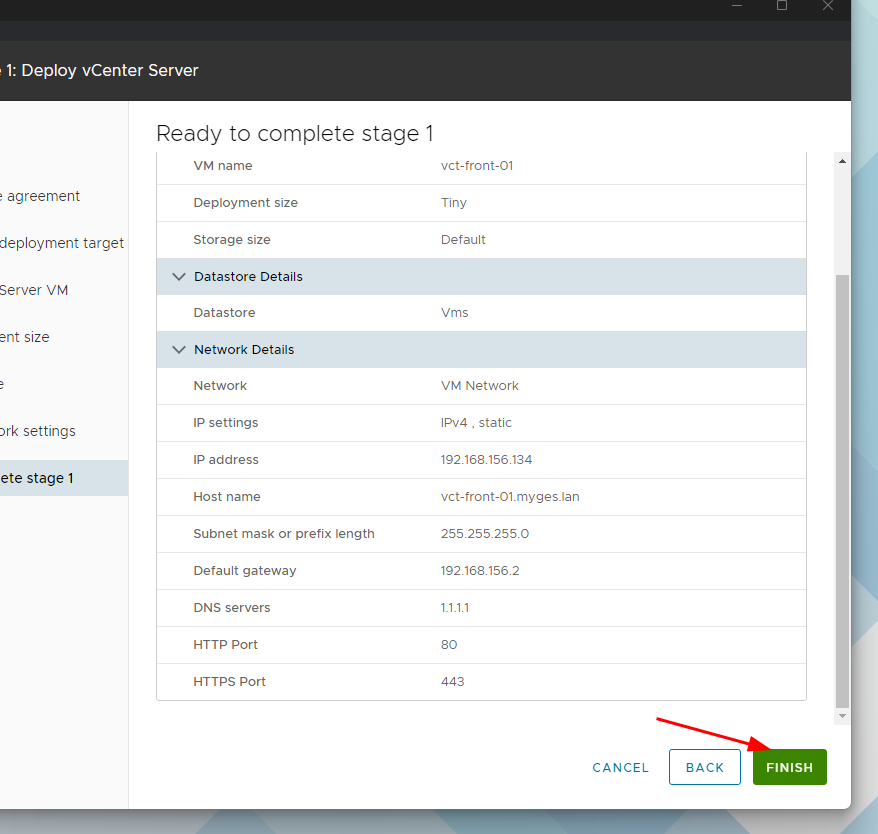
1. Monter l'ISO sur votre PC et lancer l'installer [![image.png](https://book.techoops.fr/uploads/images/gallery/2026-10/scaled-1680-/JqNimage.png)](https://book.techoops.fr/uploads/images/gallery/2026-10/JqNimage.png)
    
    [![image.png](https://book.techoops.fr/uploads/images/gallery/2026-10/scaled-1680-/5m2image.png)](https://book.techoops.fr/uploads/images/gallery/2026-10/5m2image.png)
    
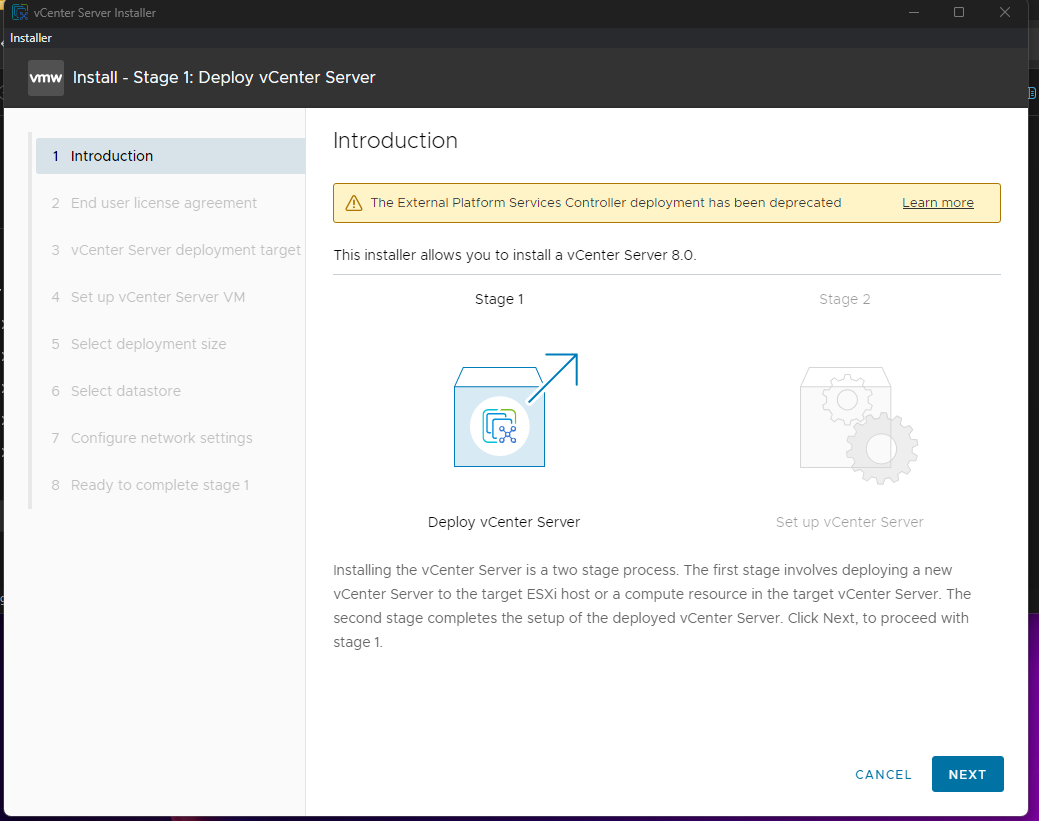
    [![image.png](https://book.techoops.fr/uploads/images/gallery/2026-10/scaled-1680-/2A2image.png)](https://book.techoops.fr/uploads/images/gallery/2026-10/2A2image.png)
    
    [![image.png](https://book.techoops.fr/uploads/images/gallery/2026-10/scaled-1680-/EZnimage.png)](https://book.techoops.fr/uploads/images/gallery/2026-10/EZnimage.png)
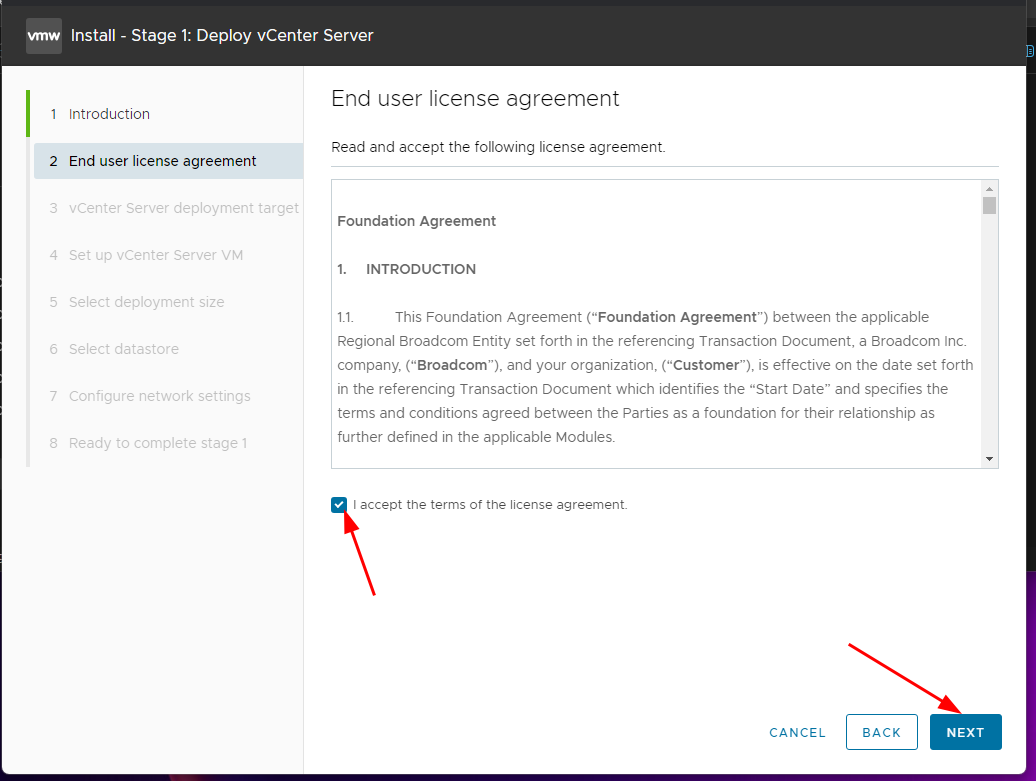
    
    [![image.png](https://book.techoops.fr/uploads/images/gallery/2026-10/scaled-1680-/mhXimage.png)](https://book.techoops.fr/uploads/images/gallery/2026-10/mhXimage.png)
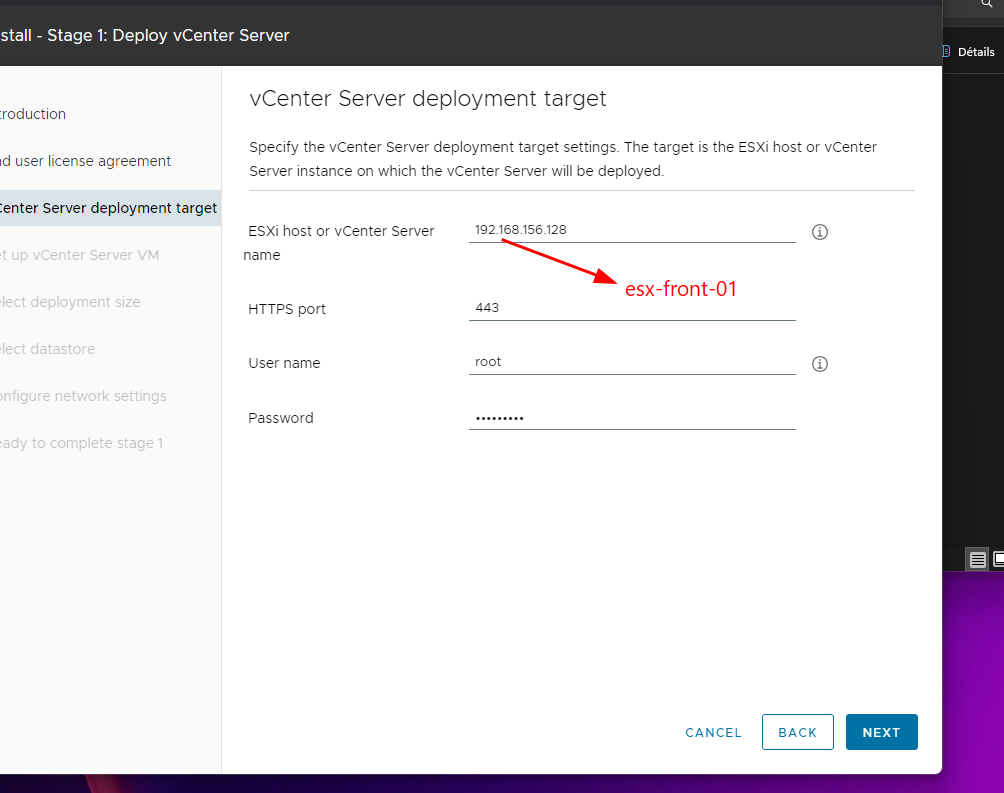
    
    [![image.png](https://book.techoops.fr/uploads/images/gallery/2026-10/scaled-1680-/hS1image.png)](https://book.techoops.fr/uploads/images/gallery/2026-10/hS1image.png)
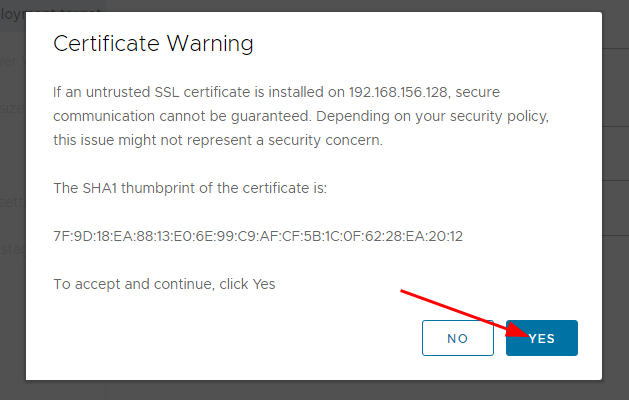
    
    [![image.png](https://book.techoops.fr/uploads/images/gallery/2026-10/scaled-1680-/isDimage.png)](https://book.techoops.fr/uploads/images/gallery/2026-10/isDimage.png)
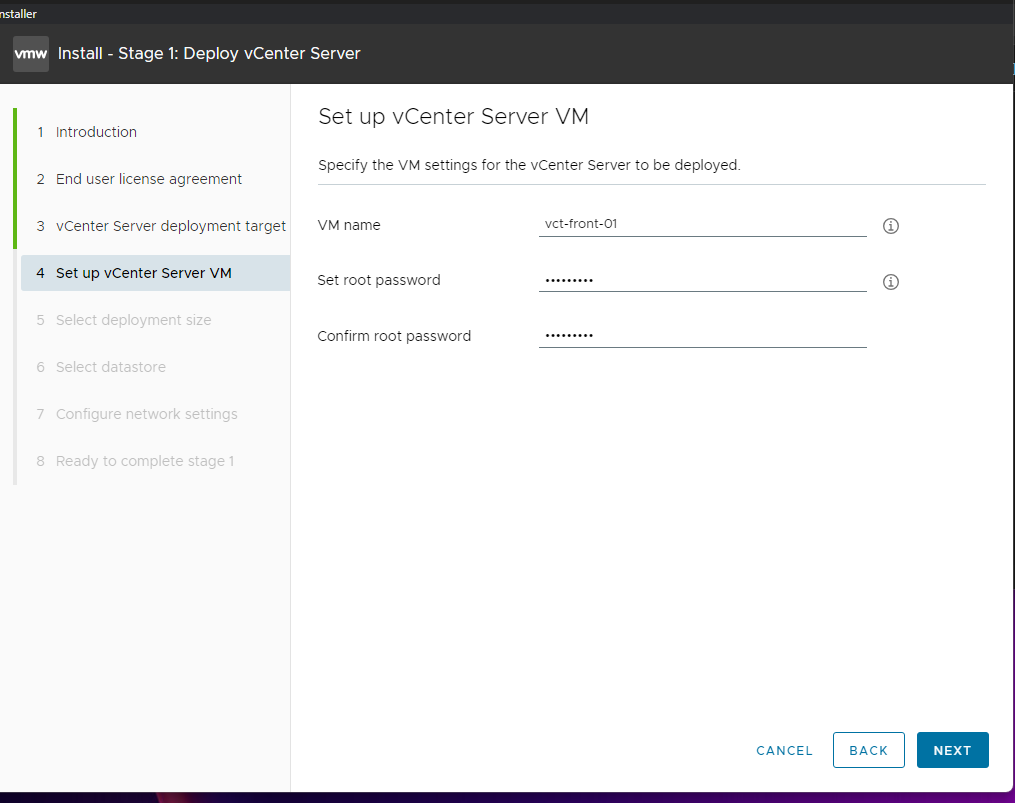
    
    [![image.png](https://book.techoops.fr/uploads/images/gallery/2026-10/scaled-1680-/uZOimage.png)](https://book.techoops.fr/uploads/images/gallery/2026-10/uZOimage.png)
    
    [![image.png](https://book.techoops.fr/uploads/images/gallery/2026-10/scaled-1680-/ZQPimage.png)](https://book.techoops.fr/uploads/images/gallery/2026-10/ZQPimage.png)
    
    [![image.png](https://book.techoops.fr/uploads/images/gallery/2026-10/scaled-1680-/d9simage.png)](https://book.techoops.fr/uploads/images/gallery/2026-10/d9simage.png)
    
    [![image.png](https://book.techoops.fr/uploads/images/gallery/2026-10/scaled-1680-/LuBimage.png)](https://book.techoops.fr/uploads/images/gallery/2026-10/LuBimage.png)
    
    [![image.png](https://book.techoops.fr/uploads/images/gallery/2026-10/scaled-1680-/uvTimage.png)](https://book.techoops.fr/uploads/images/gallery/2026-10/uvTimage.png)
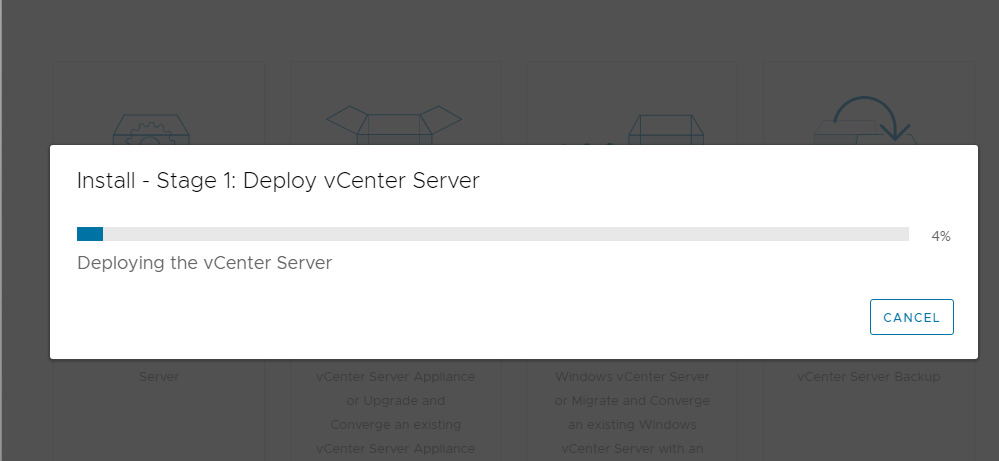
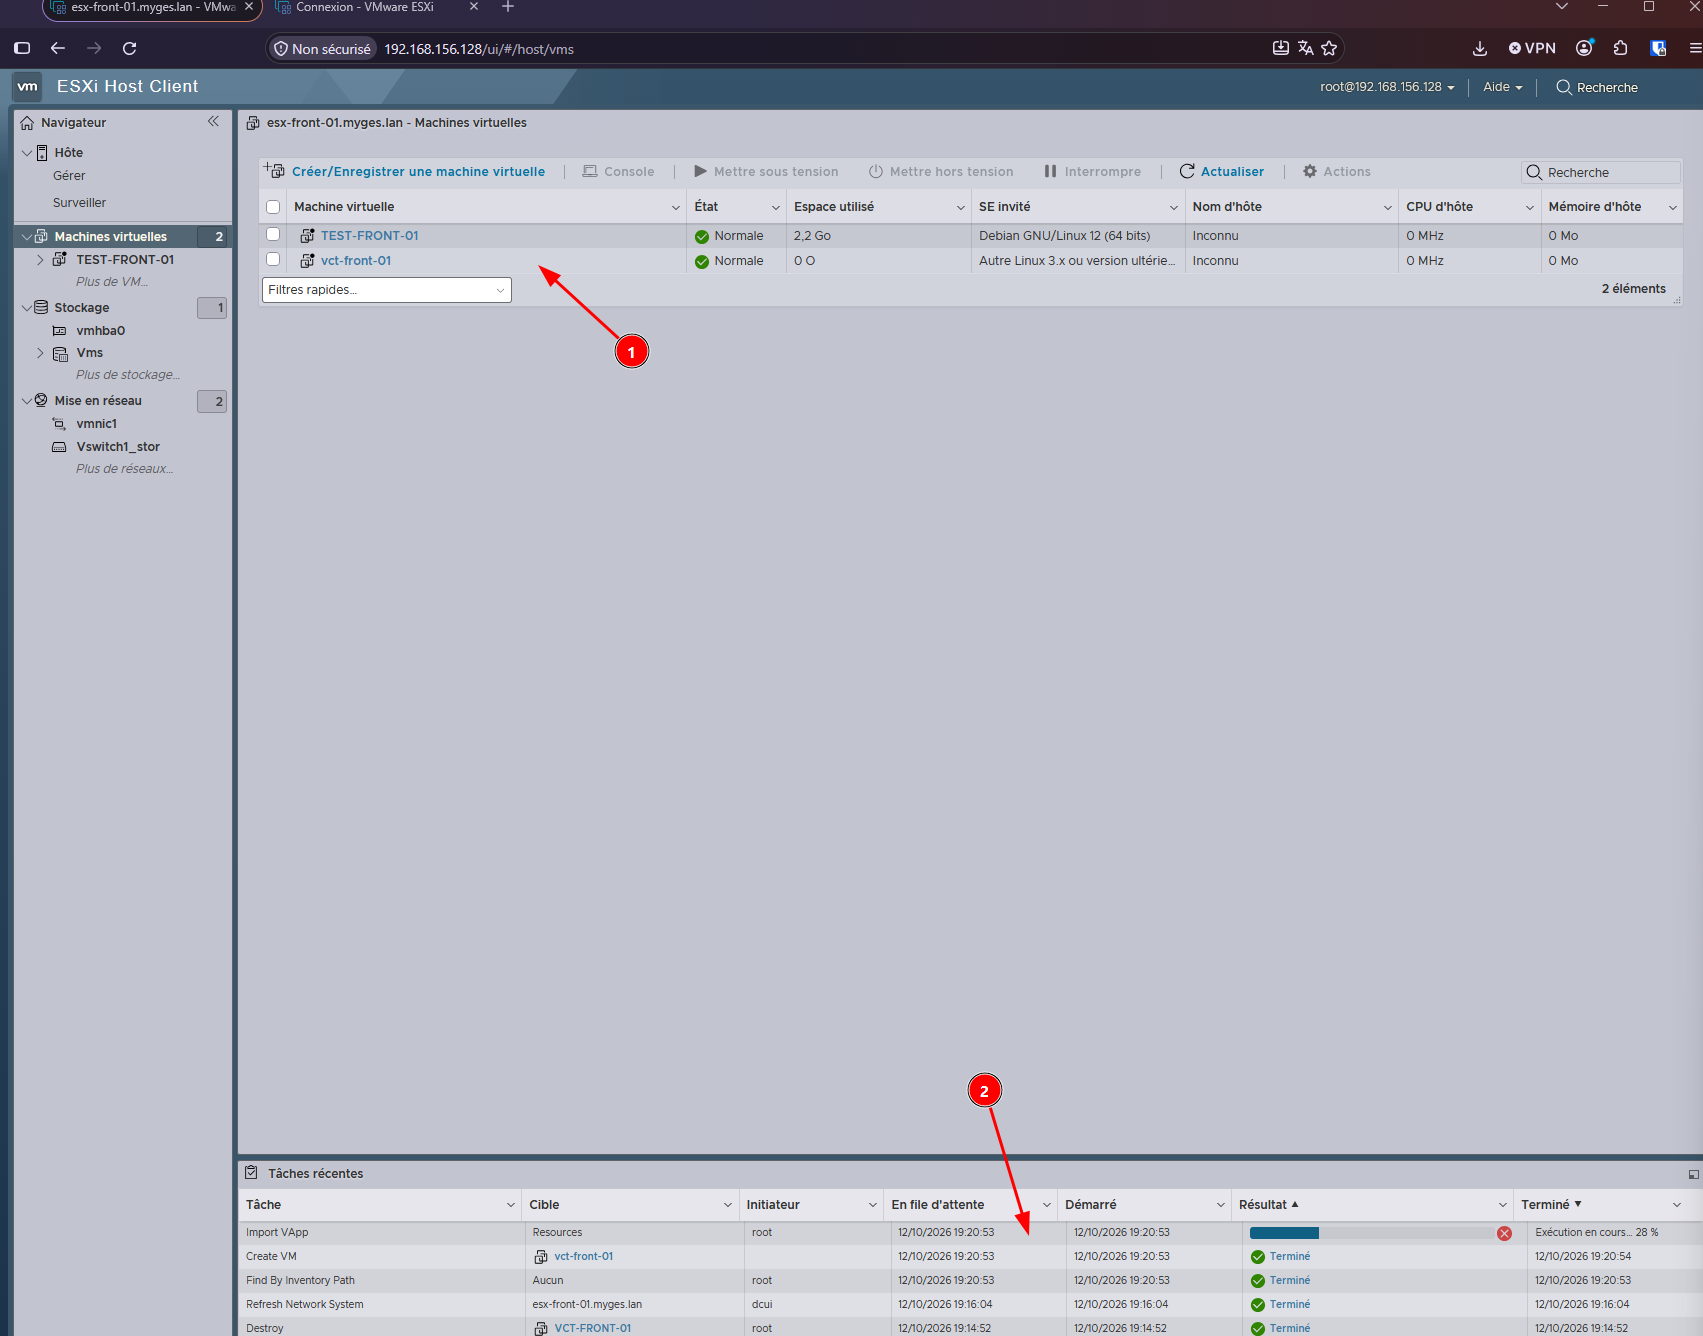
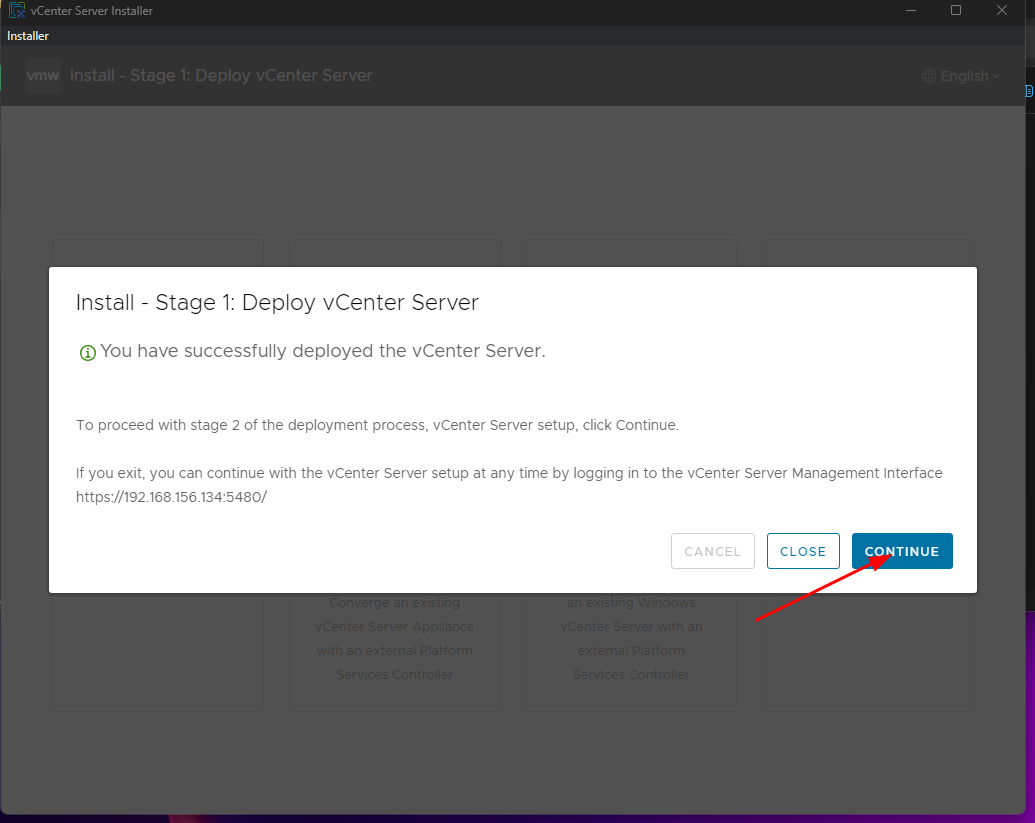
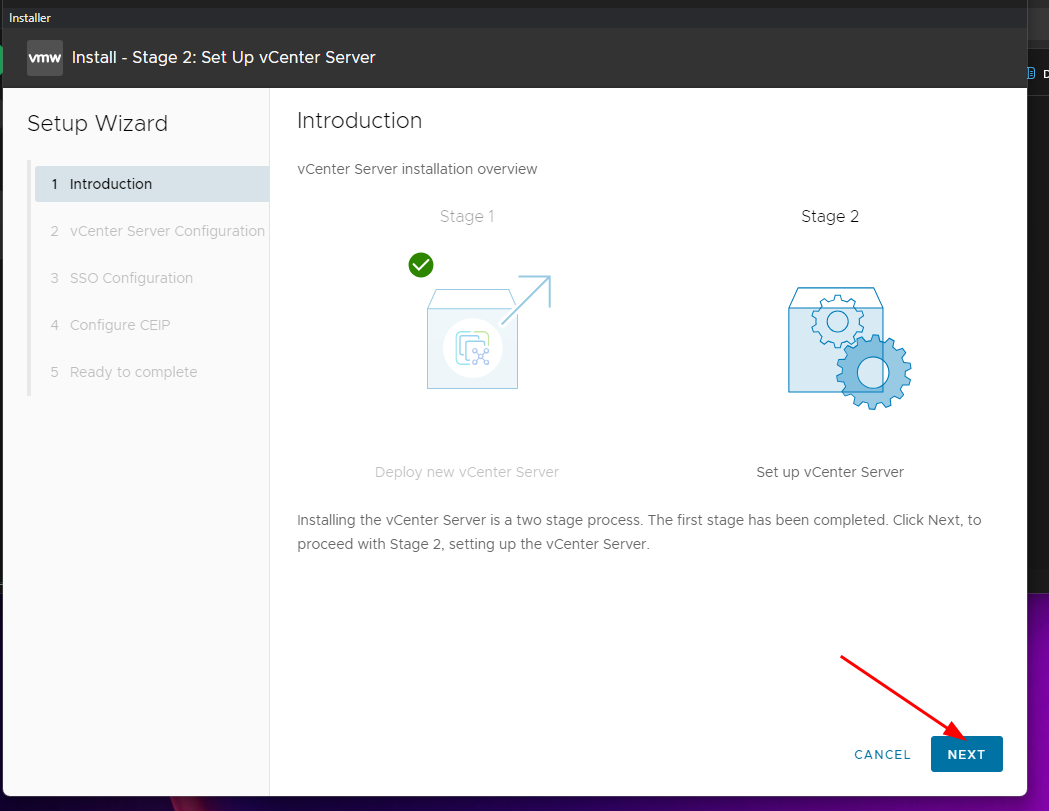
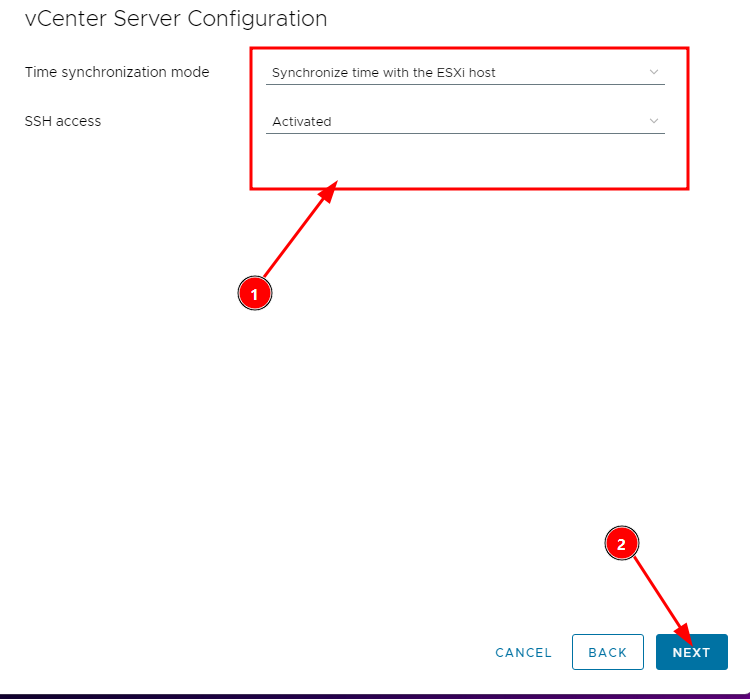
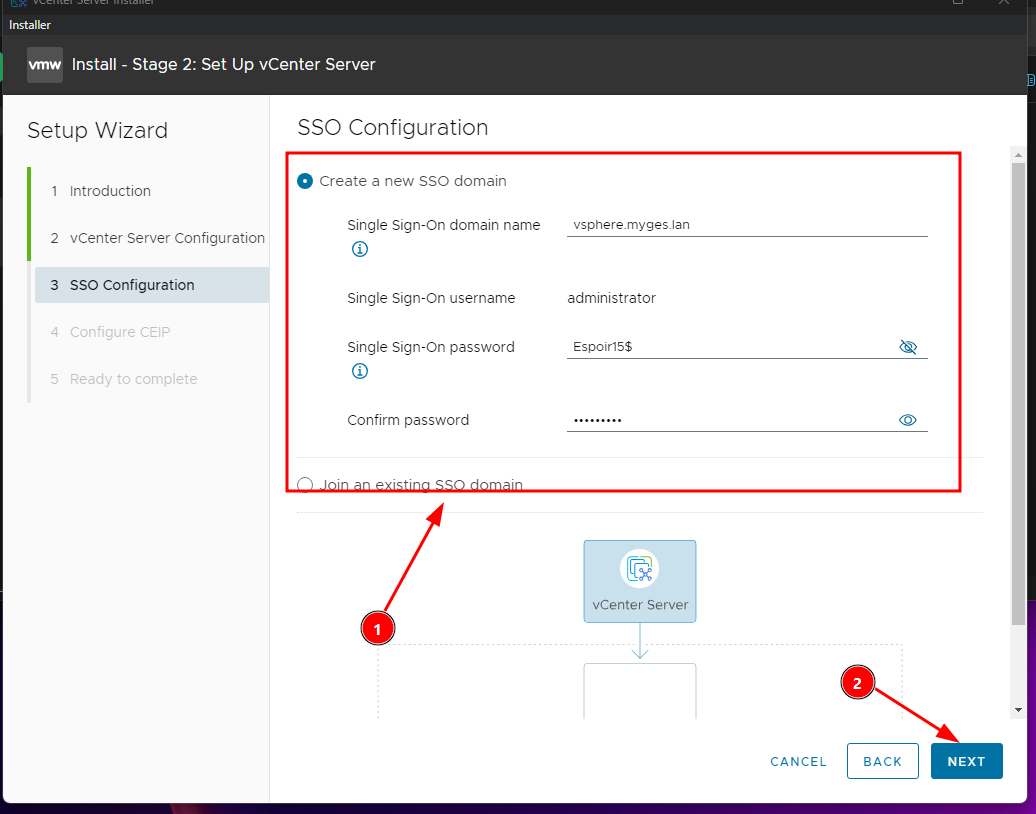
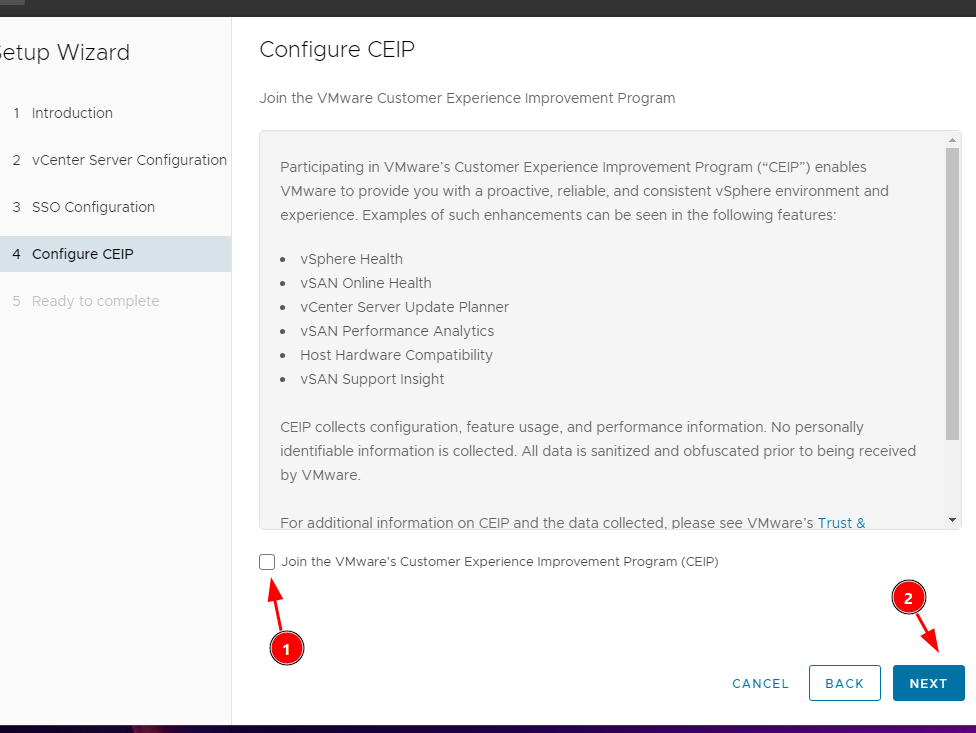
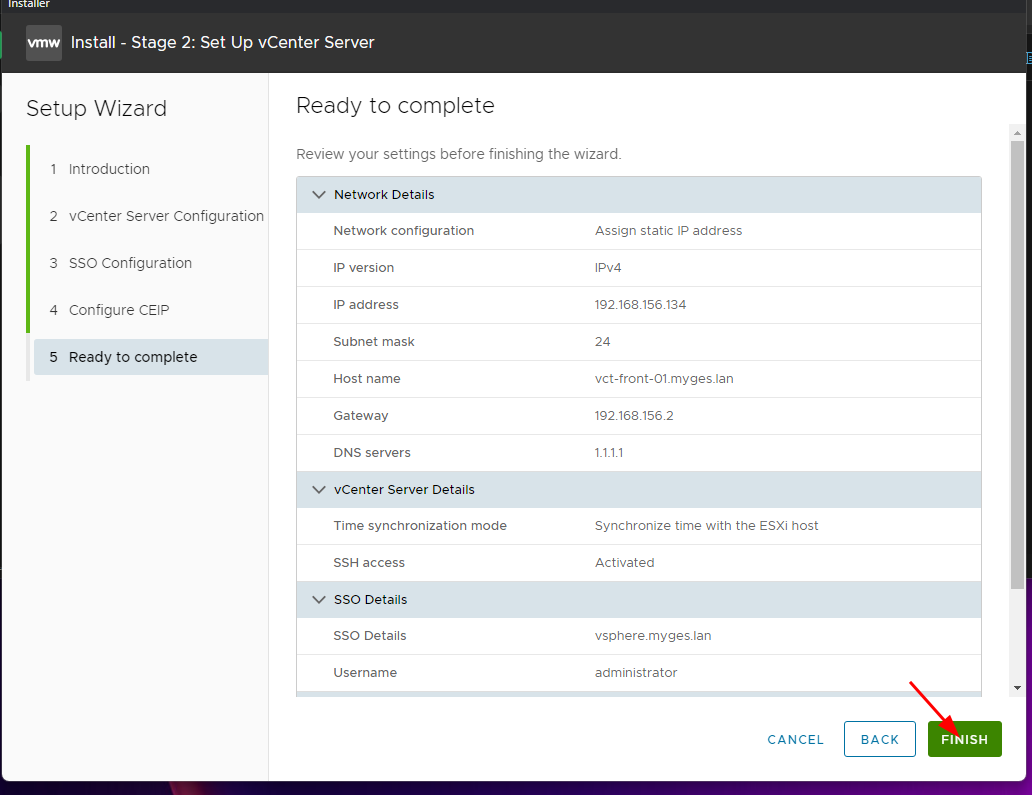
2. Attendre le déploiement du Vcenter --&gt; stage 1.   
    On peut se rendre sur esx 01 et voire l'avancement   
    [![image.png](https://book.techoops.fr/uploads/images/gallery/2026-10/scaled-1680-/jCcimage.png)](https://book.techoops.fr/uploads/images/gallery/2026-10/jCcimage.png)
    
    [![image.png](https://book.techoops.fr/uploads/images/gallery/2026-10/scaled-1680-/C8oimage.png)](https://book.techoops.fr/uploads/images/gallery/2026-10/C8oimage.png)
    
    [![image.png](https://book.techoops.fr/uploads/images/gallery/2026-10/scaled-1680-/jtKimage.png)](https://book.techoops.fr/uploads/images/gallery/2026-10/jtKimage.png)
    
    [![image.png](https://book.techoops.fr/uploads/images/gallery/2026-10/scaled-1680-/XuEimage.png)](https://book.techoops.fr/uploads/images/gallery/2026-10/XuEimage.png)
    
    [![image.png](https://book.techoops.fr/uploads/images/gallery/2026-10/scaled-1680-/QGEimage.png)](https://book.techoops.fr/uploads/images/gallery/2026-10/QGEimage.png)
    
    [![image.png](https://book.techoops.fr/uploads/images/gallery/2026-10/scaled-1680-/b4Oimage.png)](https://book.techoops.fr/uploads/images/gallery/2026-10/b4Oimage.png)
    
    [![image.png](https://book.techoops.fr/uploads/images/gallery/2026-10/scaled-1680-/TGMimage.png)](https://book.techoops.fr/uploads/images/gallery/2026-10/TGMimage.png)
3. N'ayant pas mis de DNS en place, il va falloir "feinter" la Vm en ajoutant dans son resolver DNS une redirection vers lui même. 
    1. Se connecter en SSH au vcenter  
        ```powershell
        C:\Users\kvega_admin>ssh root@192.168.156.134
        The authenticity of host '192.168.156.134 (192.168.156.134)' can't be established.
        ED25519 key fingerprint is SHA256:tUfMhjBr37ke3jgYK62akt7TF7XDucgxm1pza9FzLcs.
        This key is not known by any other names.
        Are you sure you want to continue connecting (yes/no/[fingerprint])? yes
        Warning: Permanently added '192.168.156.134' (ED25519) to the list of known hosts.
        
        VMware vCenter Server Appliance 8.0.3.00000
        
        (root@192.168.156.134) Password:
        Connected to service
        
            * List APIs: "help api list"
            * List Plugins: "help pi list"
            * Launch BASH: "shell"
        
        Command> shell
        ```
    2. Ajouter l'IP manuellement:  
        ```bash
        root@vct-front-01 [ ~ ]# cat >> /etc/dnsmasq.conf <<'EOF'
        address=/vct-front-01.myges.lan/192.168.156.134
        ptr-record=134.156.168.192.in-addr.arpa,vct-front-01.myges.lan
        EOF
        root@vct-front-01 [ ~ ]# systemctl restart dnsmasq
        ```
4. Attendre la fin du step 2  
    [![image.png](https://book.techoops.fr/uploads/images/gallery/2026-10/scaled-1680-/2xYimage.png)](https://book.techoops.fr/uploads/images/gallery/2026-10/2xYimage.png)
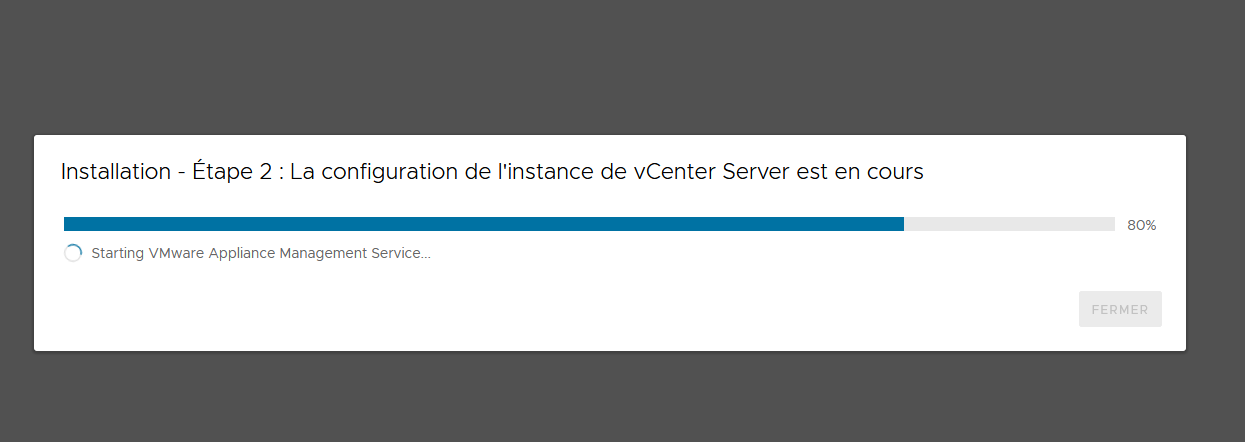
5. Ajouter dans le fichier de DNS (windows) l'entrée associée au vcenter 
    1. Ouvrir un navigateur en administrateur  
        ```powershell
        $hostsFile = "$env:SystemRoot\System32\drivers\etc\hosts"
        $entry     = "192.168.156.134`tvct-front-01.myges.lan`tvct-front-01"
        
        if (-not (Select-String -Path $hostsFile -Pattern 'vct-front-01' -Quiet)) {
            Add-Content -Path $hostsFile -Value "`r`n$entry" -Encoding ASCII
            Write-Host "Entrée ajoutée." -ForegroundColor Green
        } else {
            Write-Host "Une entrée vct-front-01 existe déjà :" -ForegroundColor Yellow
            Select-String -Path $hostsFile -Pattern 'vct-front-01'
        }
        
        ipconfig /flushdns | Out-Null
        Resolve-DnsName vct-front-01.myges.lan -Type A
        ```
6. Allez sur [https://vct-front-01.myges.lan](https://vct-front-01.myges.lan/?workflow=installer)  
    [![image.png](https://book.techoops.fr/uploads/images/gallery/2026-10/scaled-1680-/rrvimage.png)](https://book.techoops.fr/uploads/images/gallery/2026-10/rrvimage.png)
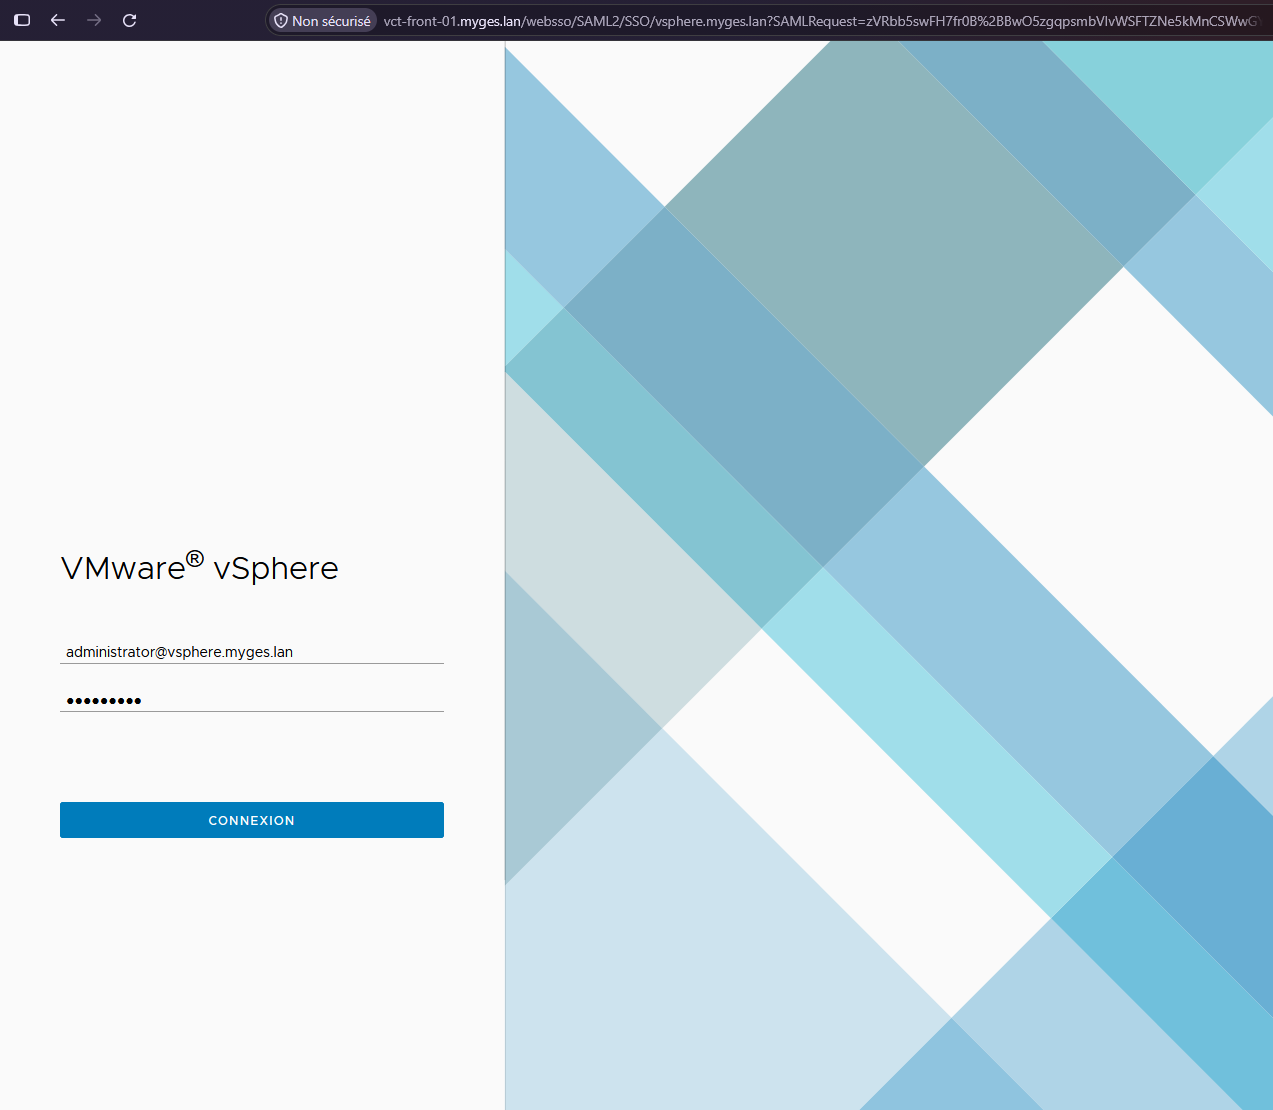
#### **Ajout des ESX au vcenter**

1. Créer un centre de donnée  
    [![image.png](https://book.techoops.fr/uploads/images/gallery/2026-10/scaled-1680-/E4mimage.png)](https://book.techoops.fr/uploads/images/gallery/2026-10/E4mimage.png)
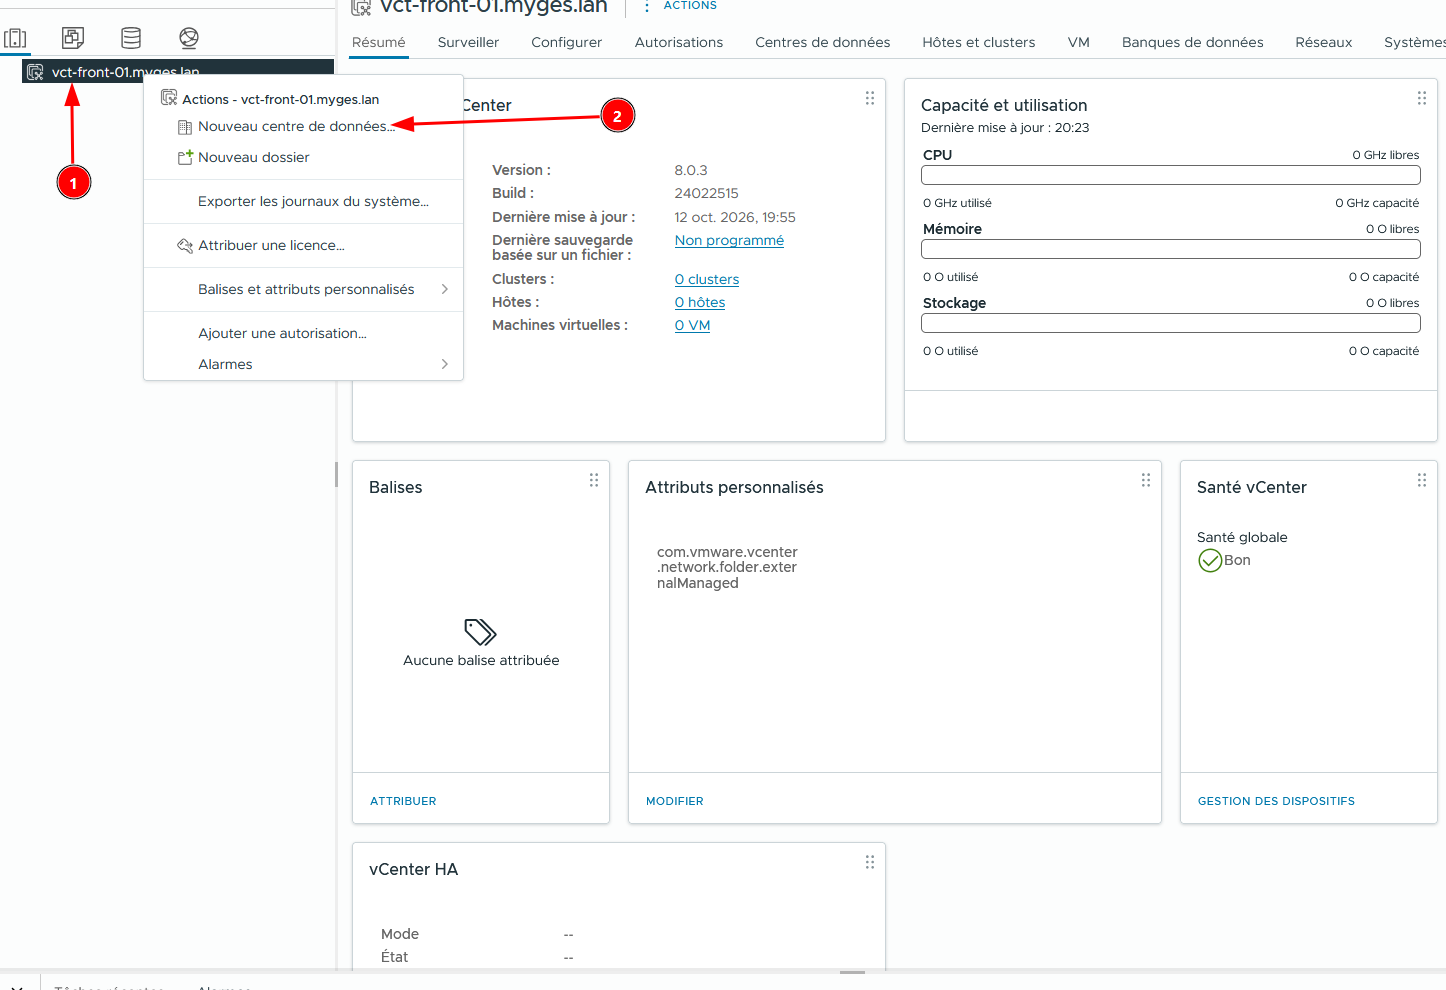
    
    [![image.png](https://book.techoops.fr/uploads/images/gallery/2026-10/scaled-1680-/6d9image.png)](https://book.techoops.fr/uploads/images/gallery/2026-10/6d9image.png)
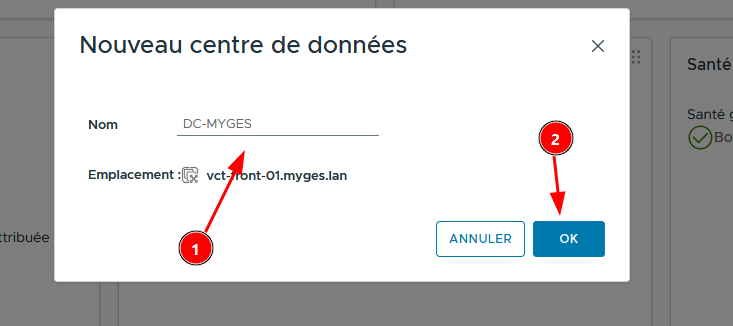
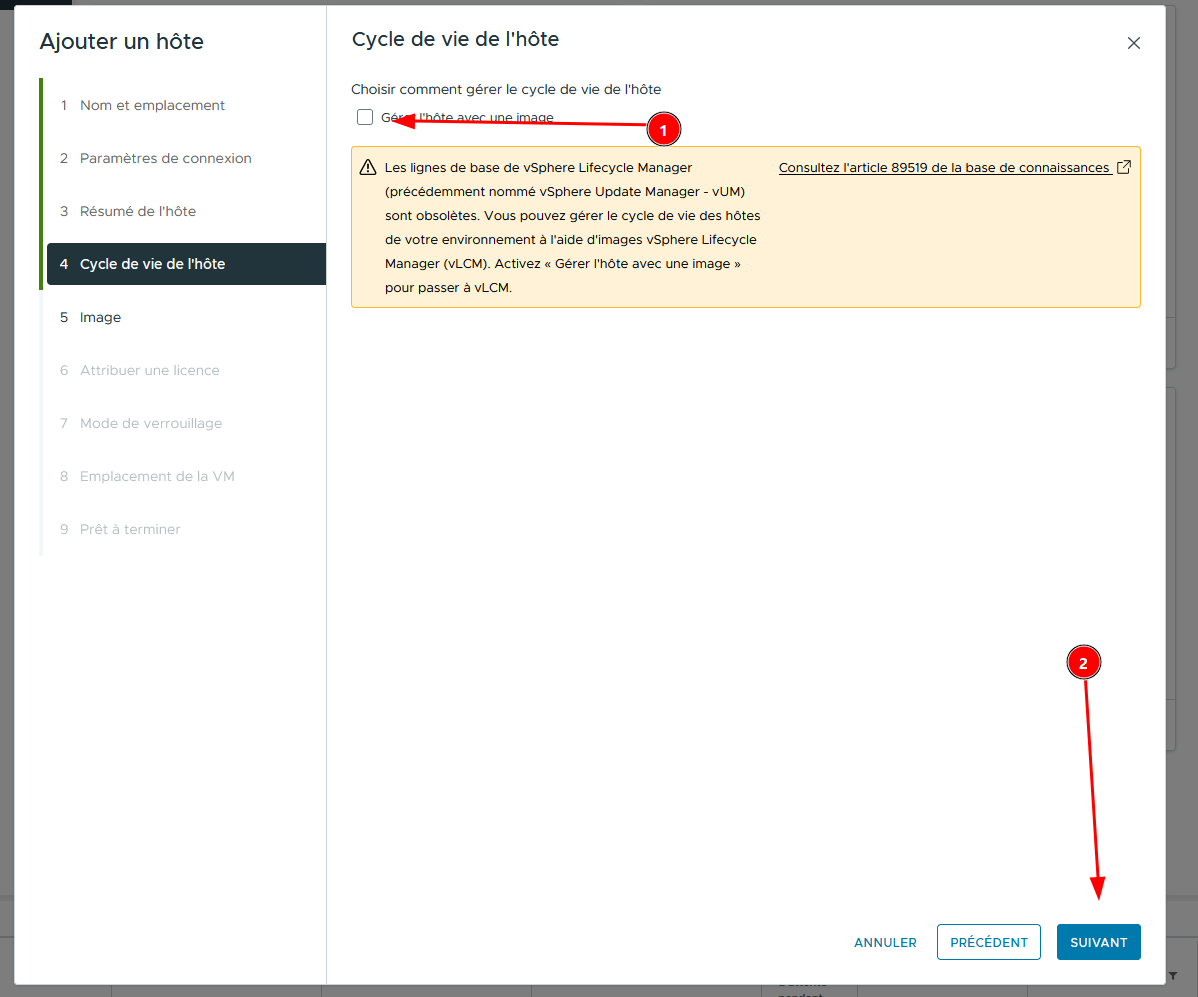
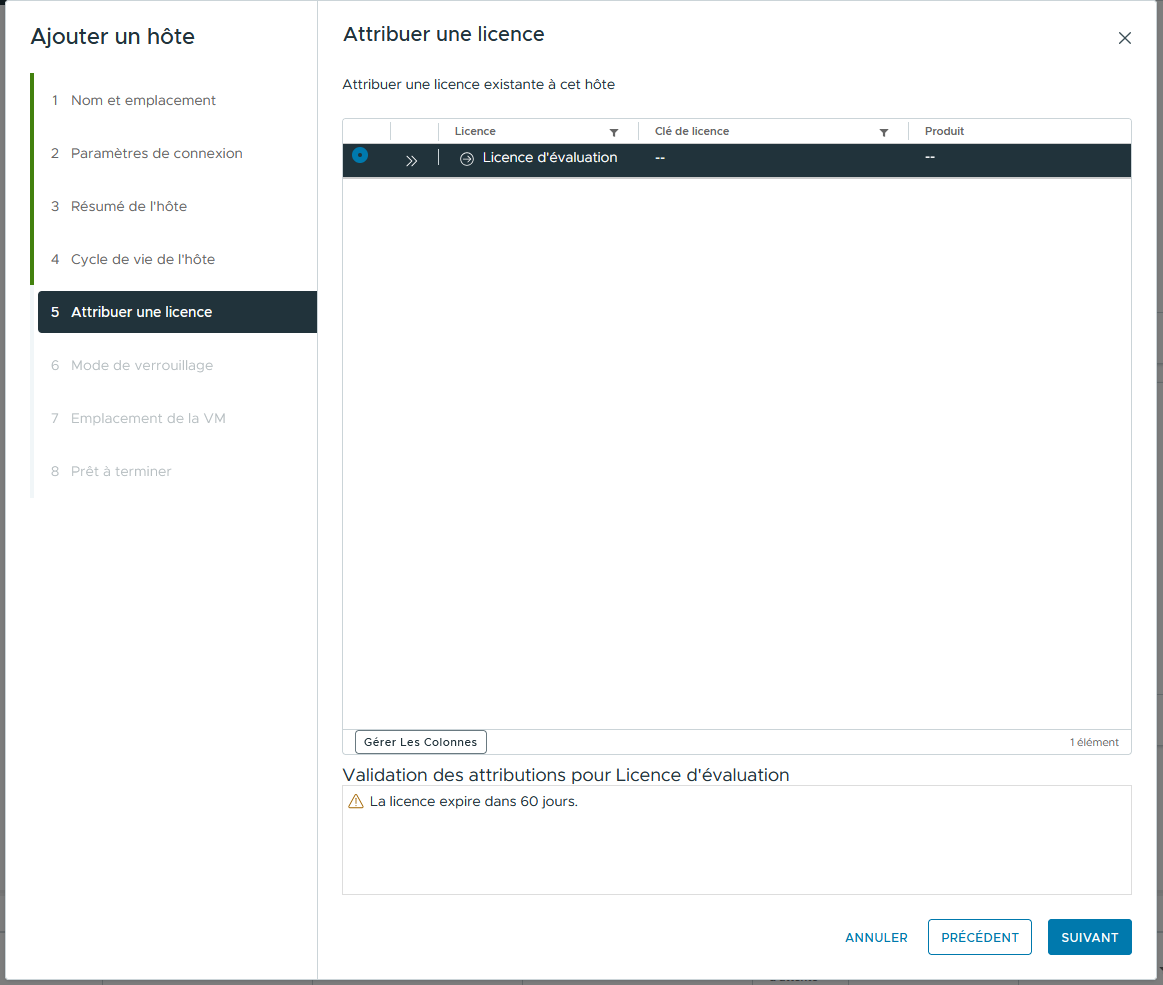
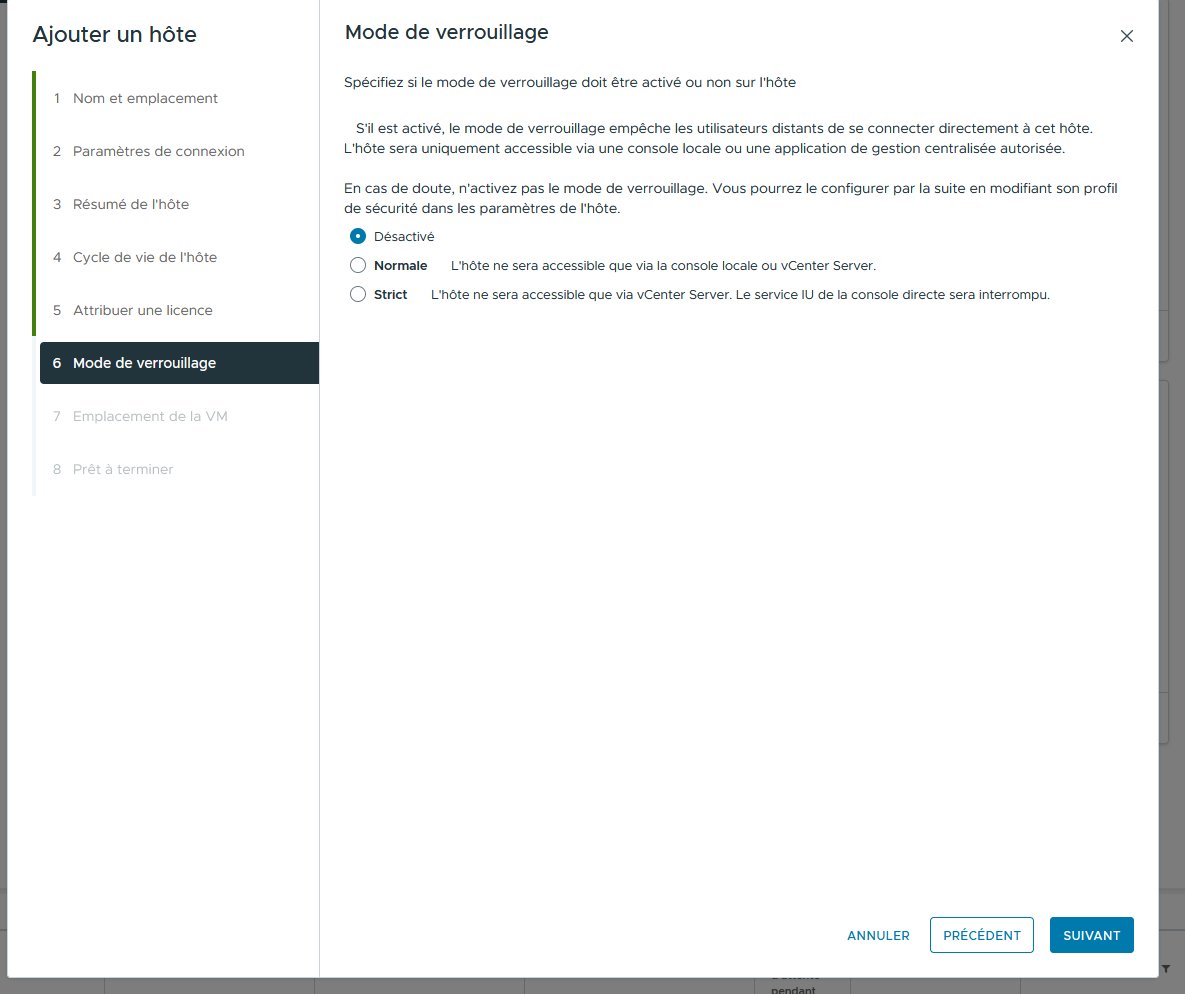
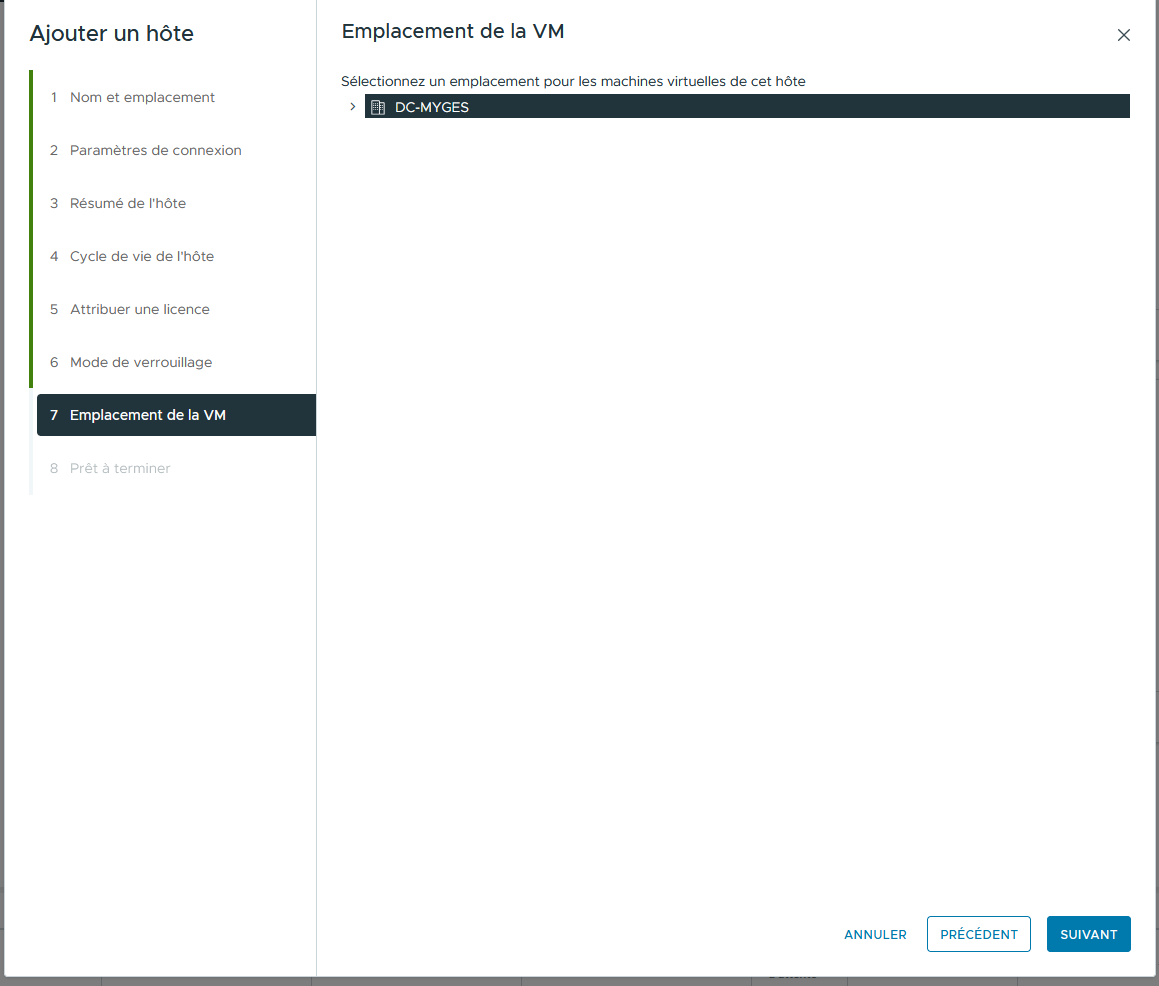
2. Ajouter les ESX sur le centre de donnée  
    [![image.png](https://book.techoops.fr/uploads/images/gallery/2026-10/scaled-1680-/rFzimage.png)](https://book.techoops.fr/uploads/images/gallery/2026-10/rFzimage.png)
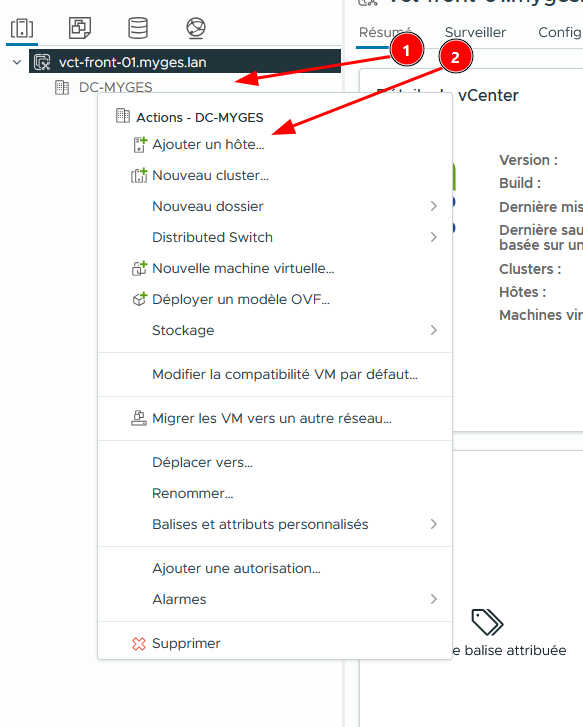
    
    [![image.png](https://book.techoops.fr/uploads/images/gallery/2026-10/scaled-1680-/pDqimage.png)](https://book.techoops.fr/uploads/images/gallery/2026-10/pDqimage.png)
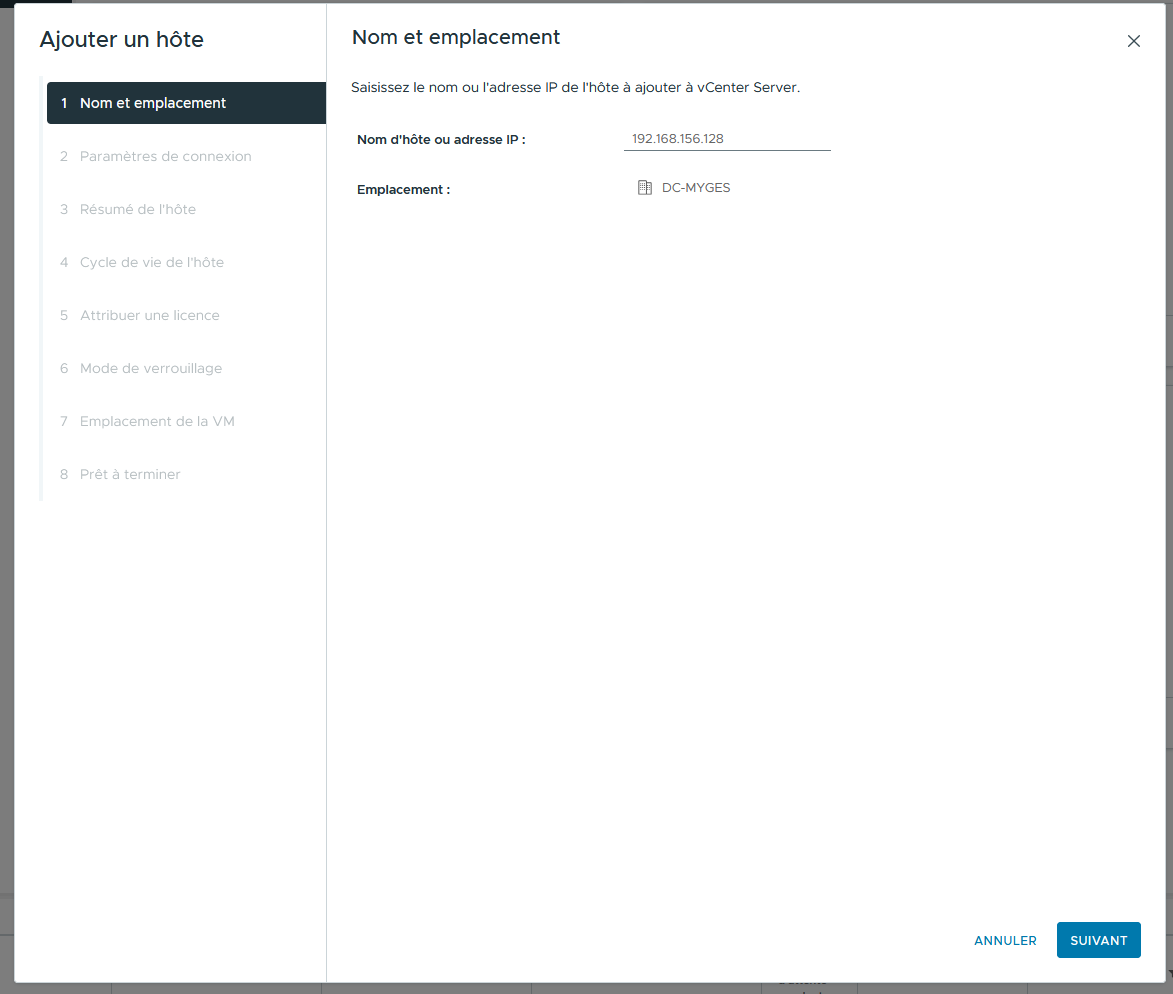
    
    [![image.png](https://book.techoops.fr/uploads/images/gallery/2026-10/scaled-1680-/5QZimage.png)](https://book.techoops.fr/uploads/images/gallery/2026-10/5QZimage.png)
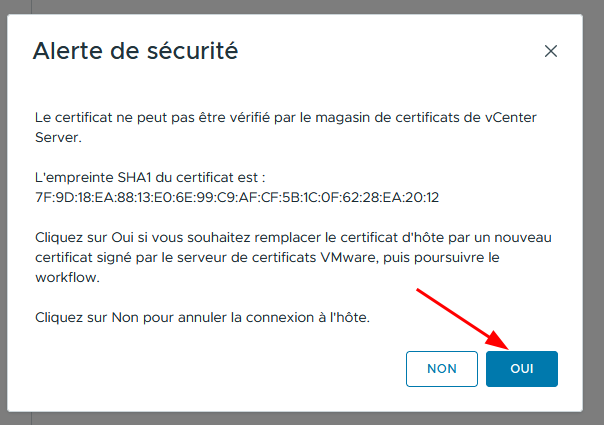
    
    [![image.png](https://book.techoops.fr/uploads/images/gallery/2026-10/scaled-1680-/uu0image.png)](https://book.techoops.fr/uploads/images/gallery/2026-10/uu0image.png)
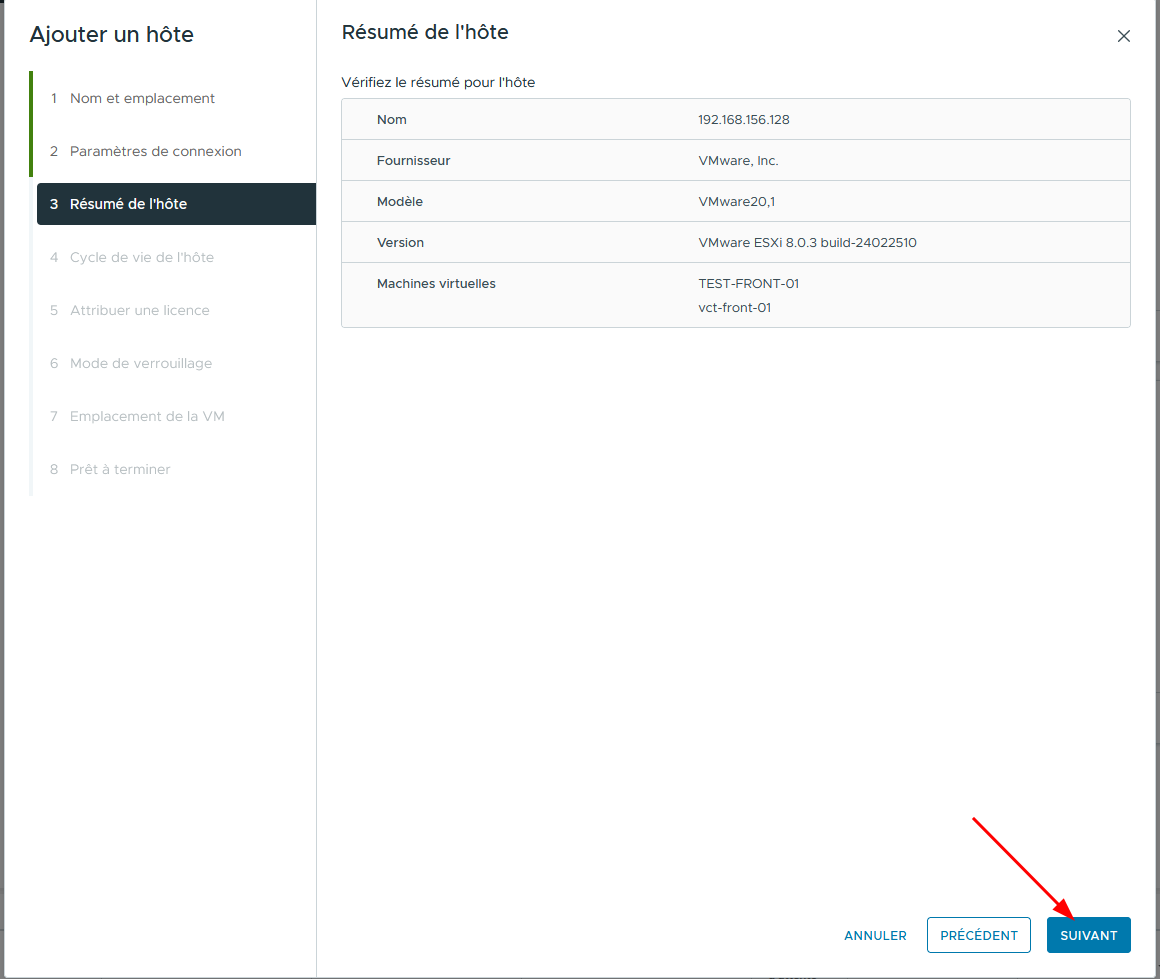
    
    [![image.png](https://book.techoops.fr/uploads/images/gallery/2026-10/scaled-1680-/Gztimage.png)](https://book.techoops.fr/uploads/images/gallery/2026-10/Gztimage.png)
    
    [![image.png](https://book.techoops.fr/uploads/images/gallery/2026-10/scaled-1680-/2aVimage.png)](https://book.techoops.fr/uploads/images/gallery/2026-10/2aVimage.png)
    
    [![image.png](https://book.techoops.fr/uploads/images/gallery/2026-10/scaled-1680-/1zYimage.png)](https://book.techoops.fr/uploads/images/gallery/2026-10/1zYimage.png)
    
    [![image.png](https://book.techoops.fr/uploads/images/gallery/2026-10/scaled-1680-/pupimage.png)](https://book.techoops.fr/uploads/images/gallery/2026-10/pupimage.png)
    
    [![image.png](https://book.techoops.fr/uploads/images/gallery/2026-10/scaled-1680-/uTRimage.png)](https://book.techoops.fr/uploads/images/gallery/2026-10/uTRimage.png)
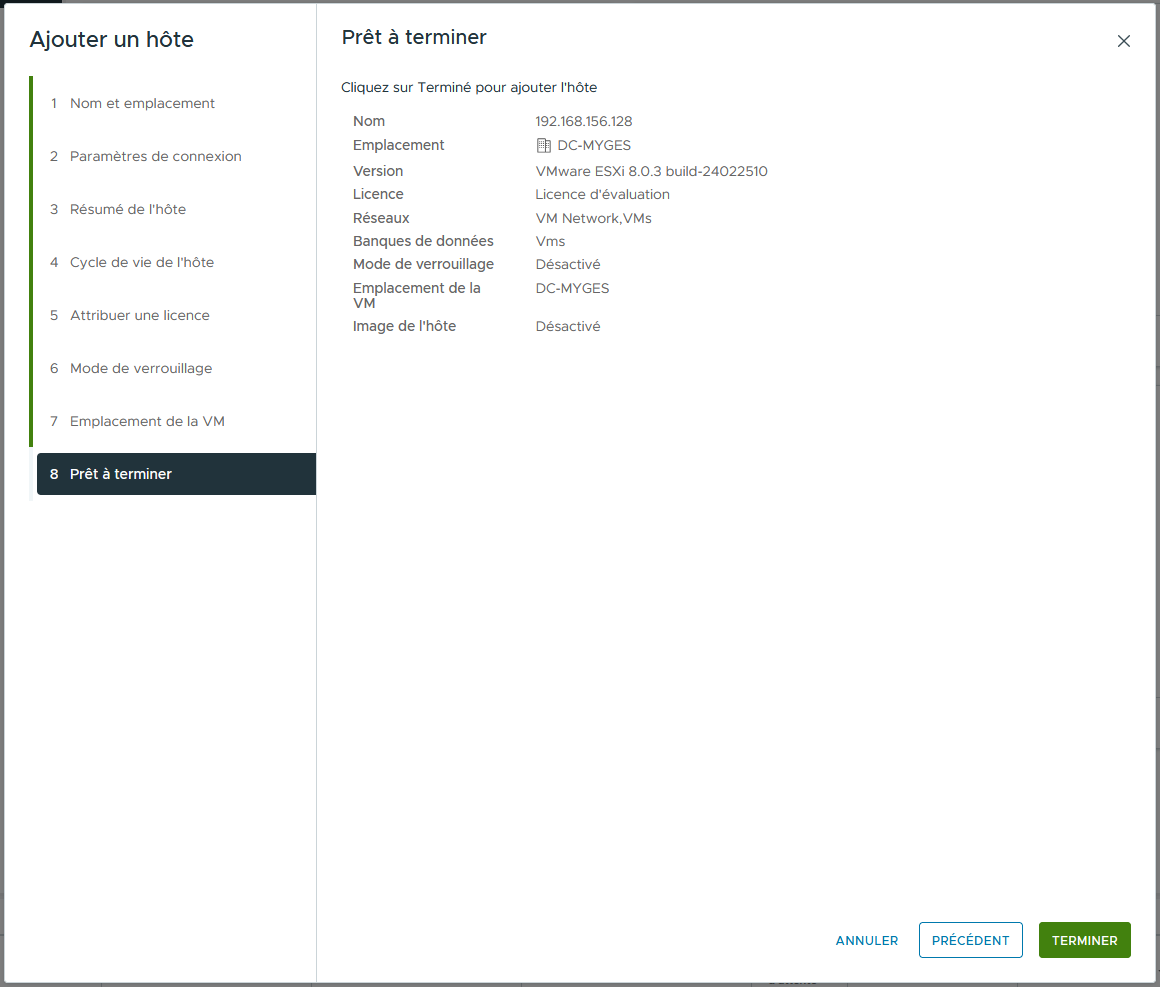
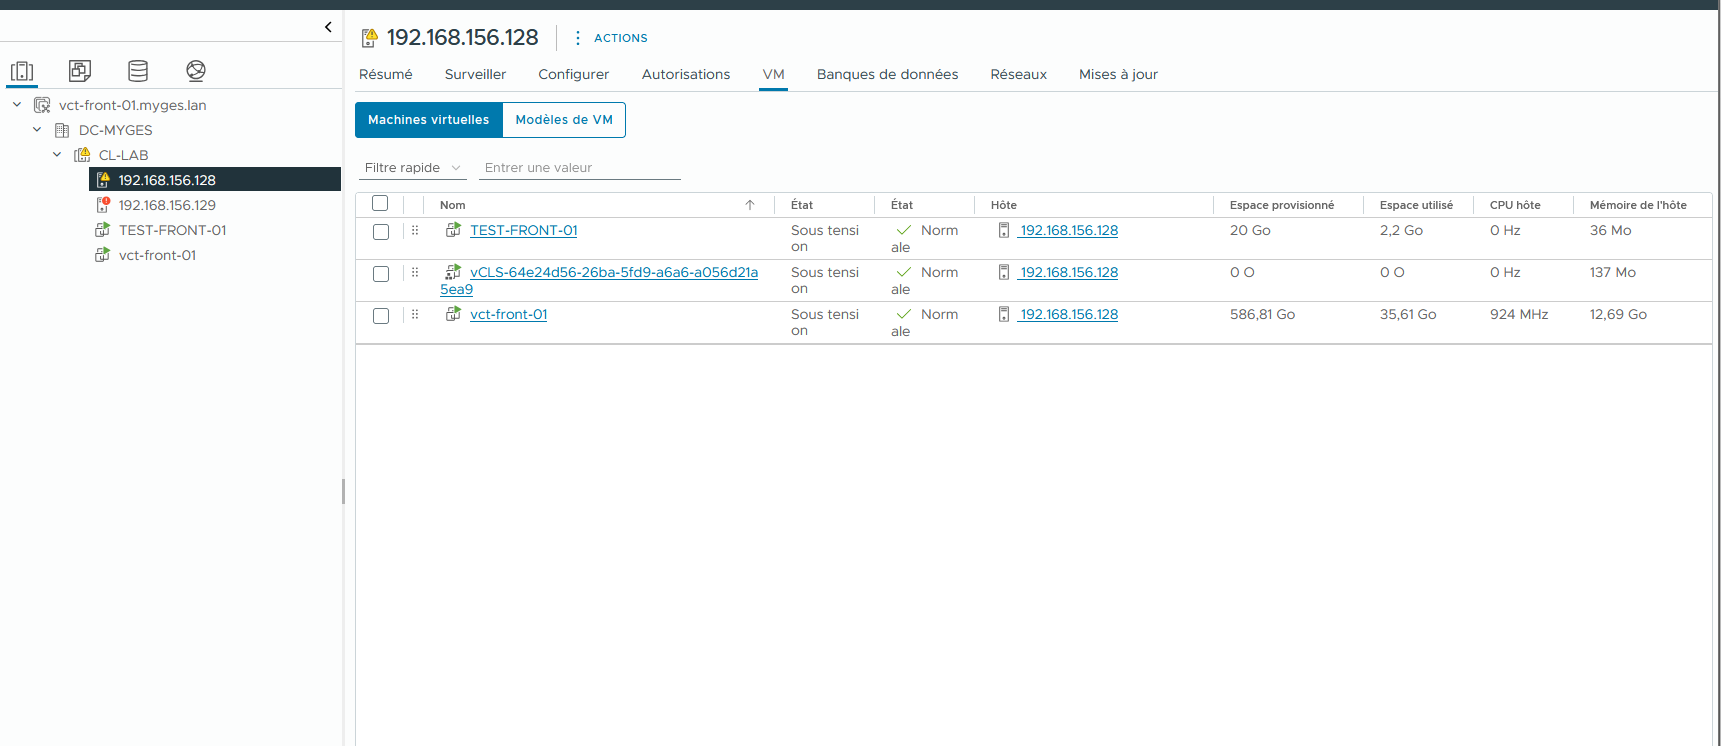
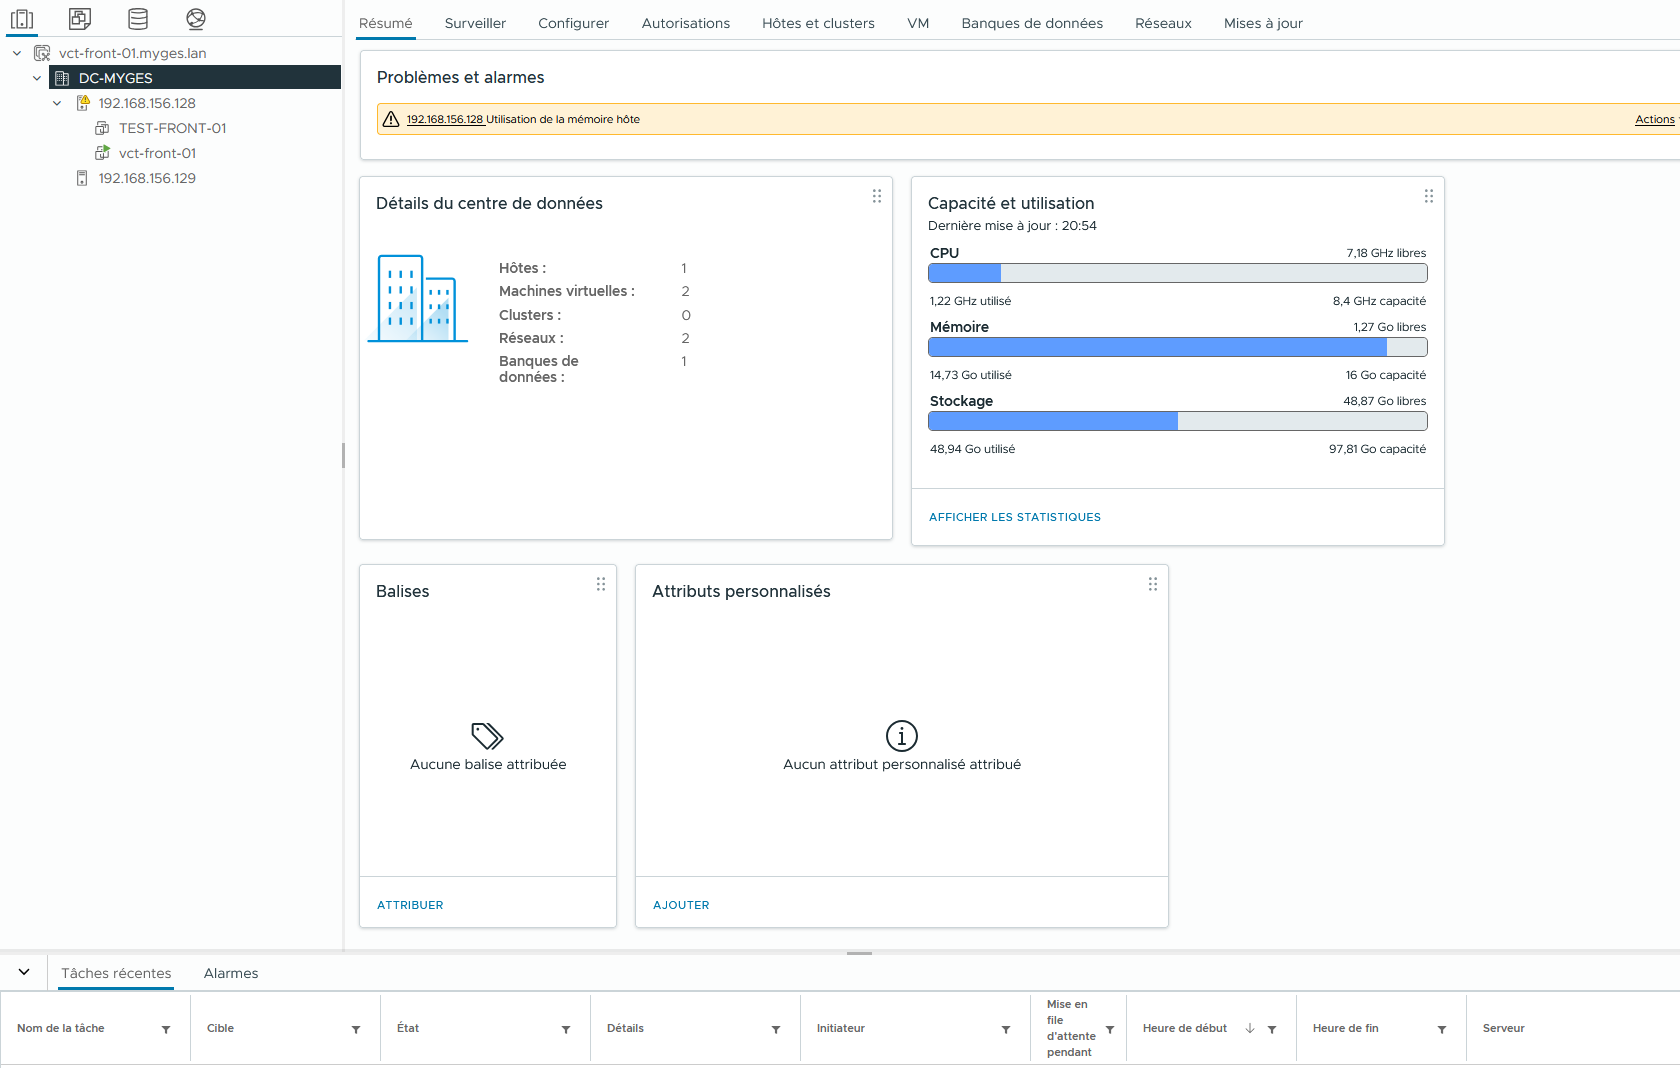
3. Une fois avoir ajouté tout les hôtes voici comment doit se trouver le cluster  
    [![image.png](https://book.techoops.fr/uploads/images/gallery/2026-10/scaled-1680-/oGZimage.png)](https://book.techoops.fr/uploads/images/gallery/2026-10/oGZimage.png)
# 6 - DRS, VMOTION et HA

####  **vMotion : déplacer une VM sans l'éteindre** 

Avant de parler de DRS, il faut connaître vMotion C'est la technologie qui permet de déplacer une VM allumée d'un hôte à un autre, sans coupure<span style="color:rgb(211,215,222);"> </span>pour les utilisateurs. La mémoire de la VM est copiée vers le nouvel hôte pendant qu'elle continue de tourner, puis la bascule finale ne dure qu'une fraction de seconde.

#### **DRS : l'équilibreur de charge**

signifie Distributed Resource Scheduler, soit « planificateur de ressources distribué ». Son rôle DRS surveille en permanence l'utilisation du processeur et de la mémoire de chaque hôte. Si un hôte est surchargé pendant qu'un autre se tourne les pouces, DRS déplace des VM (grâce à vMotion) pour équilibrer la charge. Il intervient aussi au démarrage d'une VM : il choisit automatiquement l'hôte le plus adapté pour l'accueillir.

##### Les modes d'automatisation

- Manuel : DRS fait des recommandations, l'administrateur décide.
- Partiellement automatisé<span style="color:rgb(211,215,222);"> </span>: DRS place les VM au démarrage, mais propose seulement les déplacements ensuite.
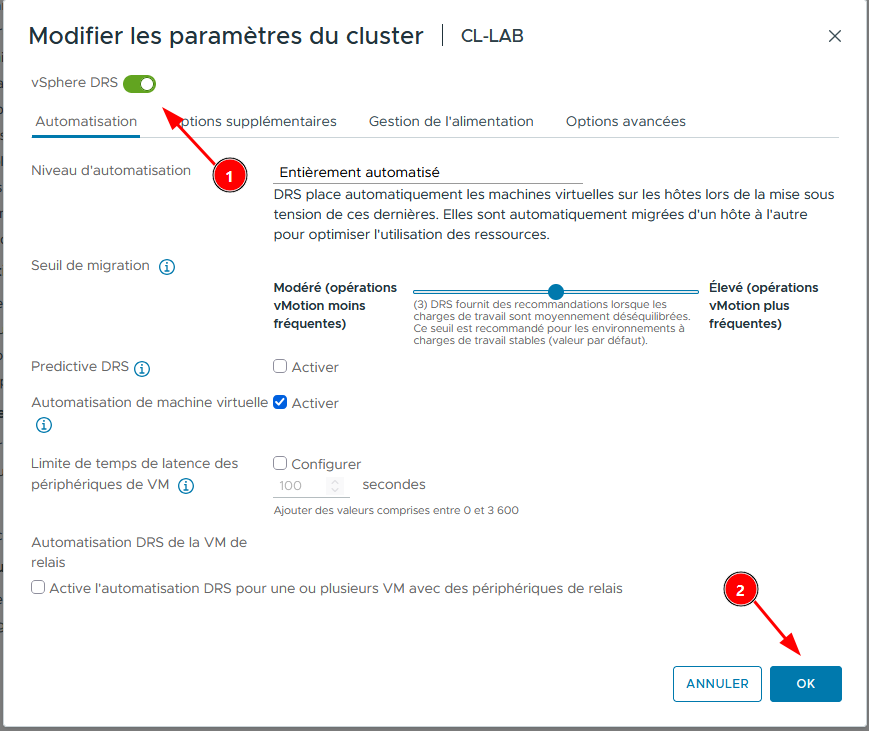
- Entièrement automatisé : DRS déplace lui-même les VM quand c'est utile.

#### **HA : le filet de sécurité**

HA signifie High Availability, soit « haute disponibilité ».

Son rôle HA surveille l'état des hôtes du cluster. Si un hôte tombe en panne (coupure électrique, plantage, câble arraché…), HA redémarre automatiquement ses VM sur les hôtes restants.

#### **Prérequis** 

**Prérequis du poste hôte :**

- 500 Go de disque
- 32 Go de RAM
- Virtualisation activée dans le BIOS

**Prérequis avant de commencer le TP :**

- Avoir 1 Vcenter
- Avoir 2 ESX

##### Mise en place de vmotion  


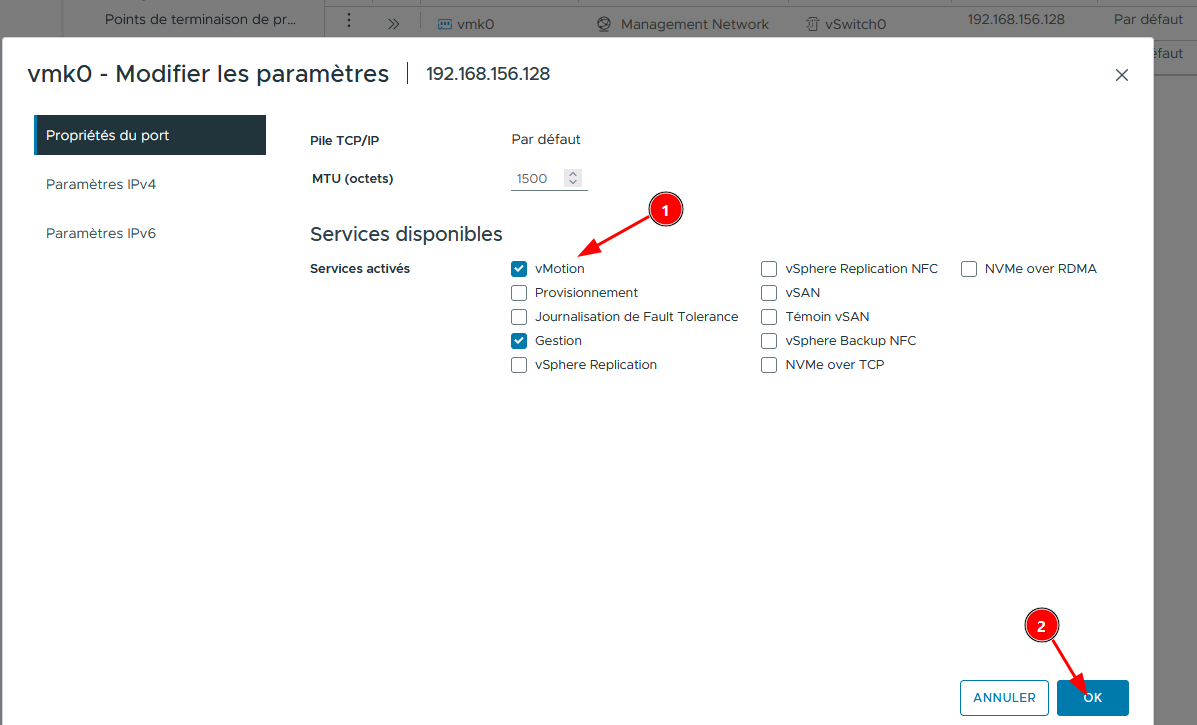
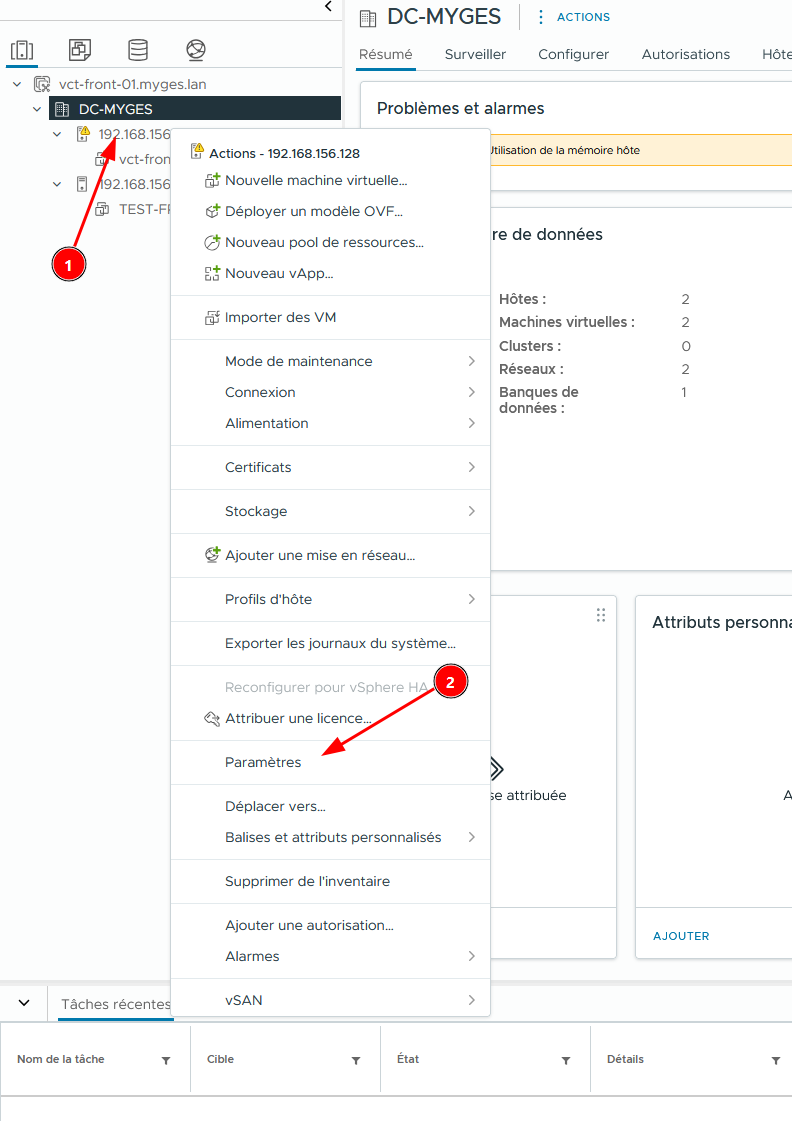
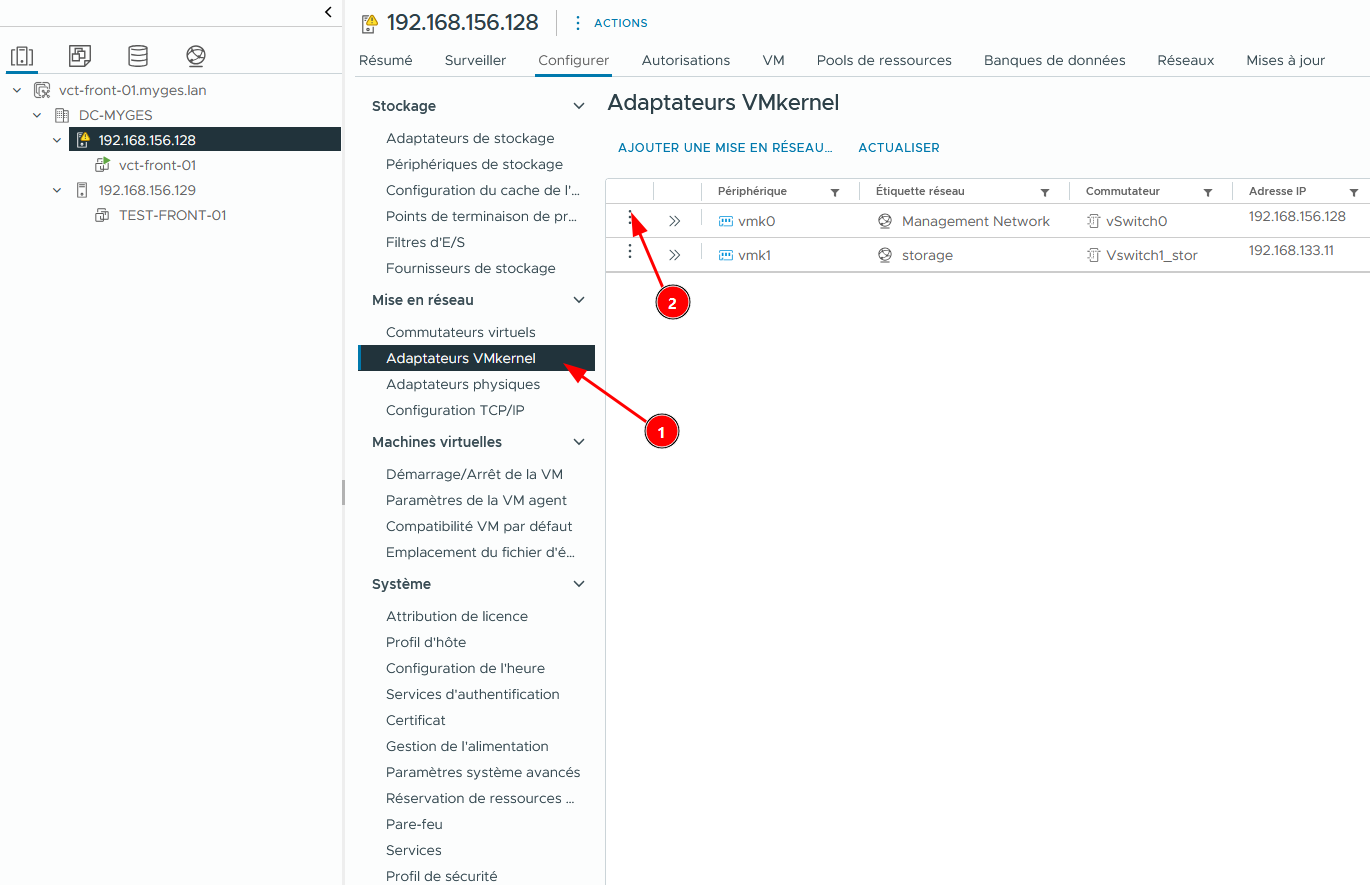
1. Paramétrer vmotion sur la pile réseau  
    [![image.png](https://book.techoops.fr/uploads/images/gallery/2026-10/scaled-1680-/42Mimage.png)](https://book.techoops.fr/uploads/images/gallery/2026-10/42Mimage.png)
    
    [![image.png](https://book.techoops.fr/uploads/images/gallery/2026-10/scaled-1680-/Ngbimage.png)](https://book.techoops.fr/uploads/images/gallery/2026-10/Ngbimage.png)
    
    [![image.png](https://book.techoops.fr/uploads/images/gallery/2026-10/scaled-1680-/INmimage.png)](https://book.techoops.fr/uploads/images/gallery/2026-10/INmimage.png)
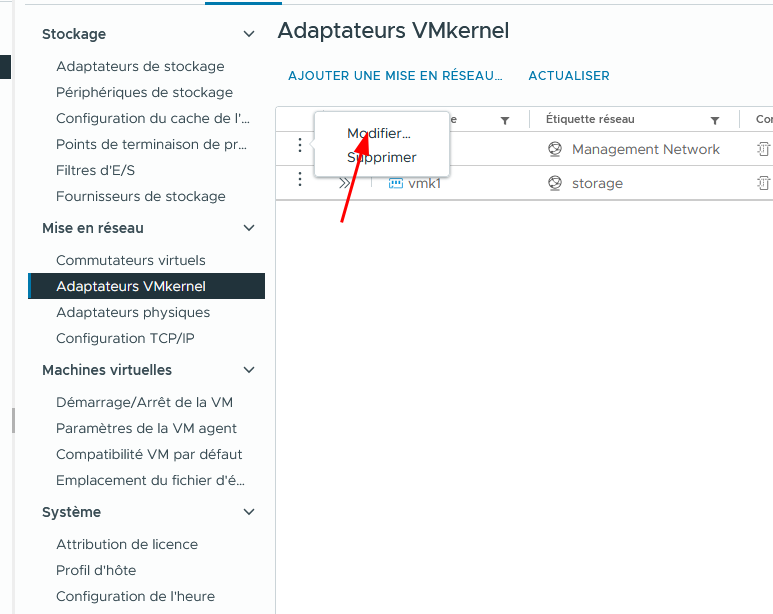
    
    <p class="callout info">[![image.png](https://book.techoops.fr/uploads/images/gallery/2026-10/scaled-1680-/rbNimage.png)](https://book.techoops.fr/uploads/images/gallery/2026-10/rbNimage.png)  
    A faire sur les deux hôtes ESX !!</p>
2. Test de vmotion 
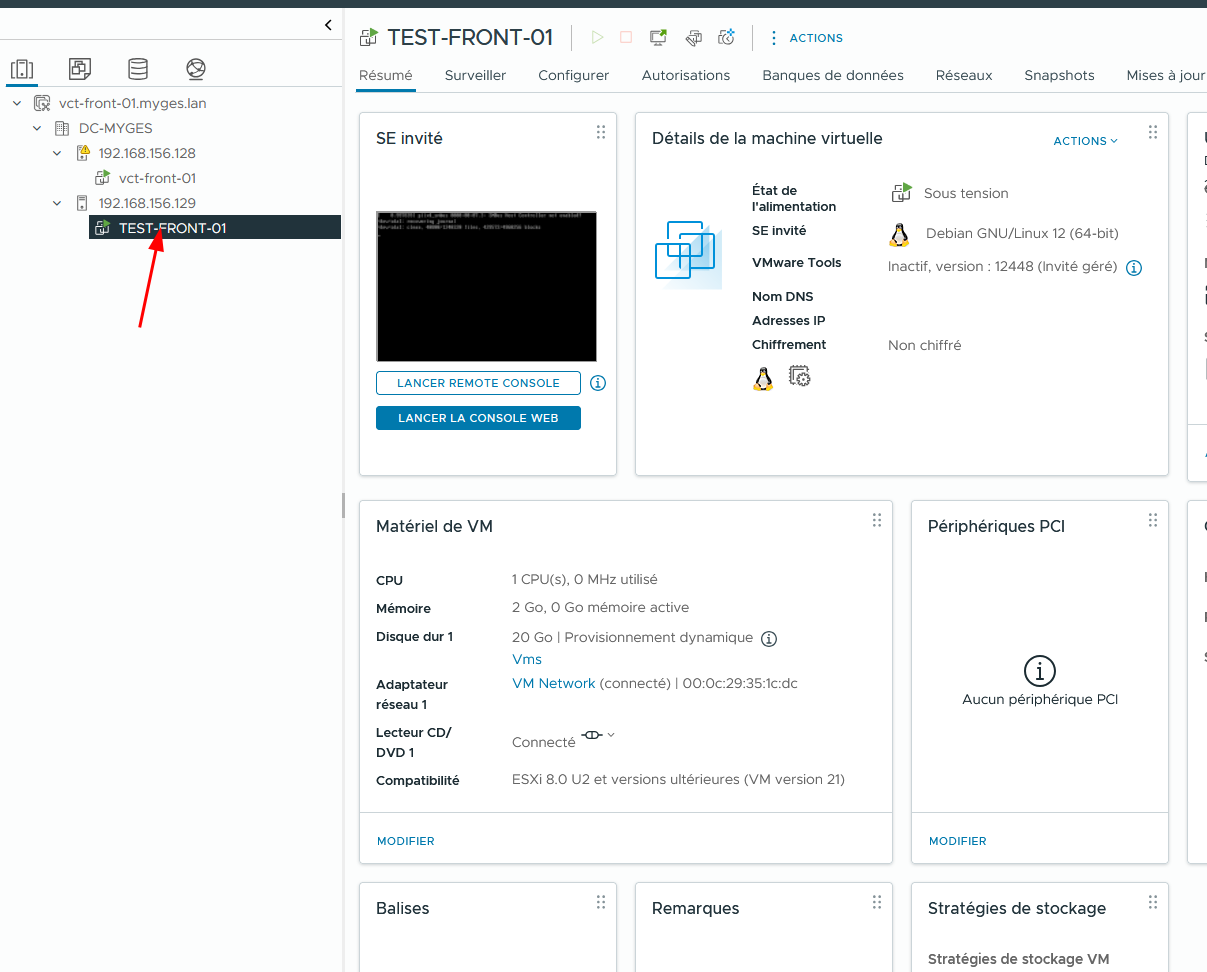
    1. Allumer une VM  
        [![image.png](https://book.techoops.fr/uploads/images/gallery/2026-10/scaled-1680-/d5Zimage.png)](https://book.techoops.fr/uploads/images/gallery/2026-10/d5Zimage.png)
    2. Effectuer un ping infini sur l'ip de la VM   
        [![image.png](https://book.techoops.fr/uploads/images/gallery/2026-10/scaled-1680-/uzRimage.png)](https://book.techoops.fr/uploads/images/gallery/2026-10/uzRimage.png)
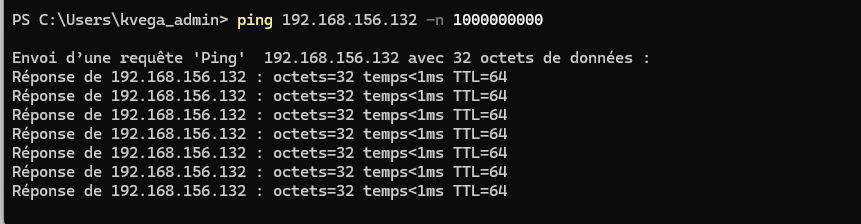
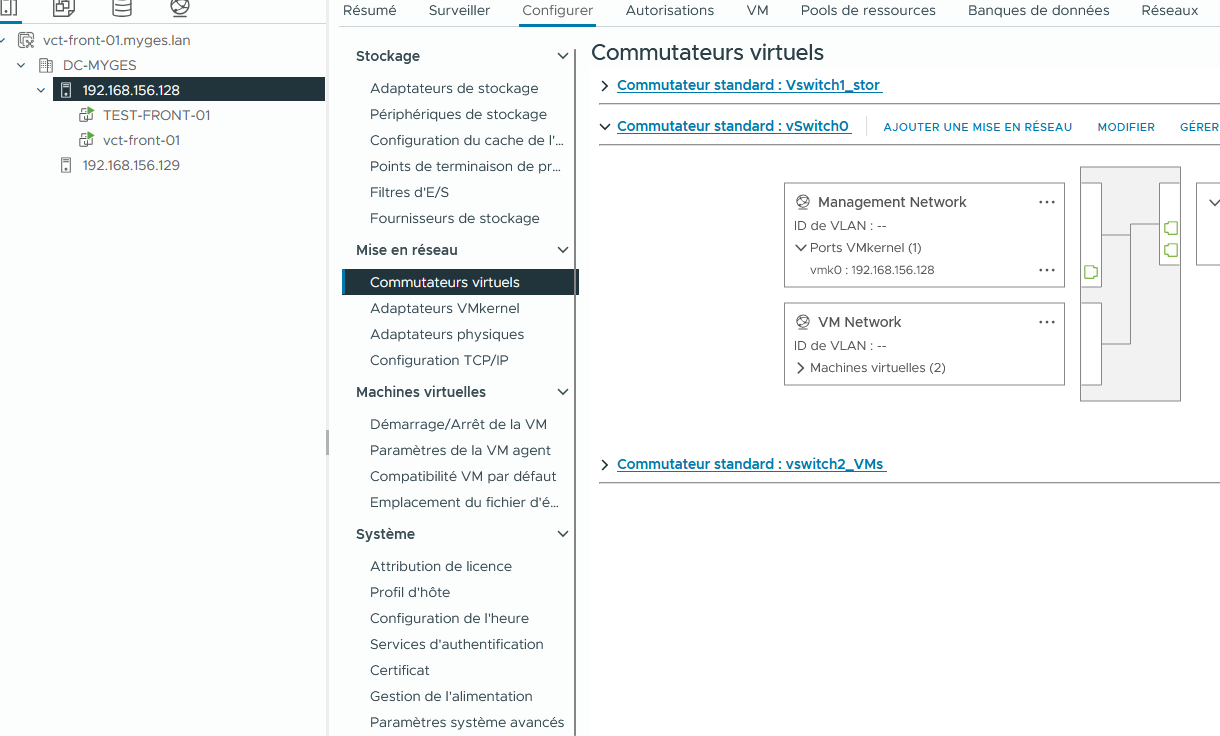
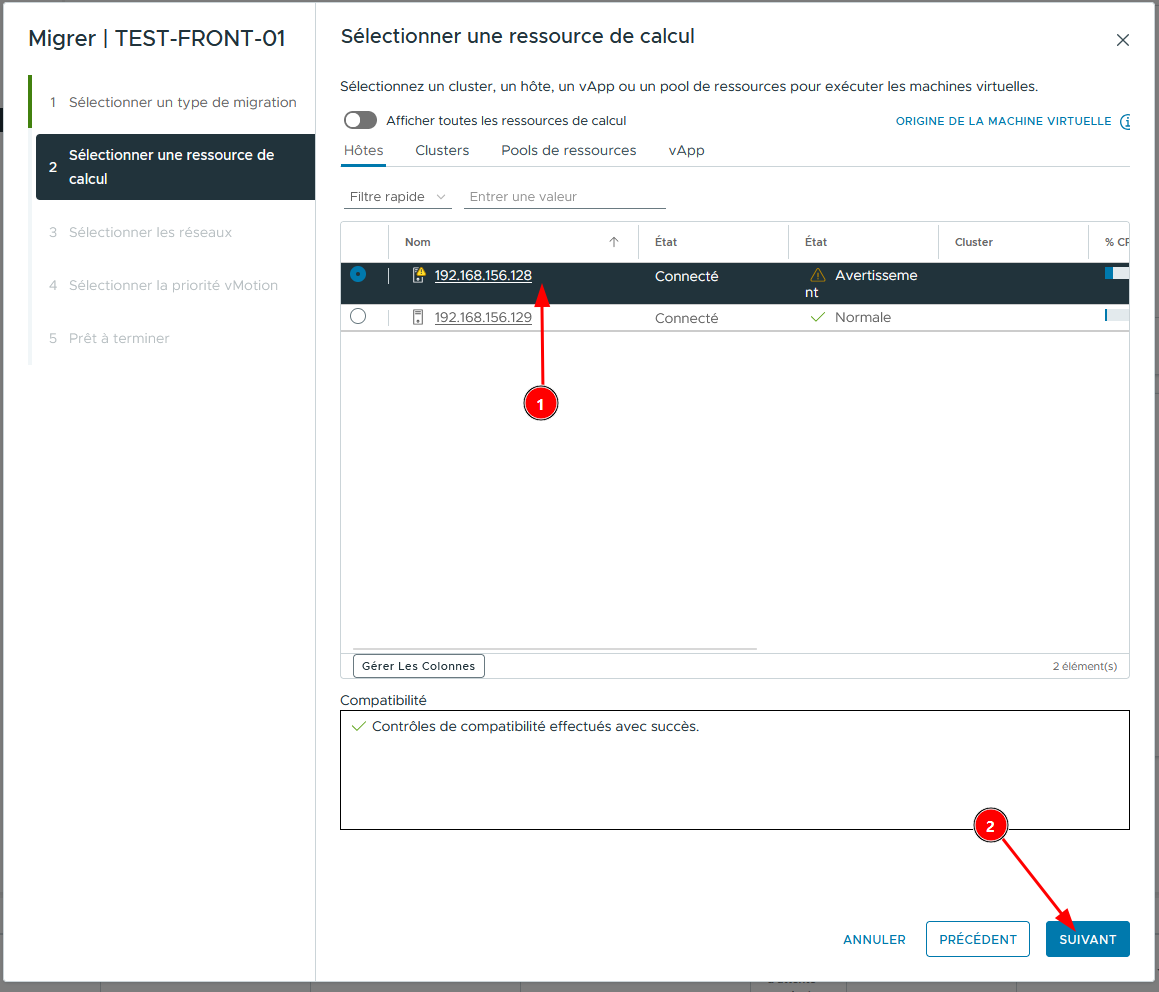
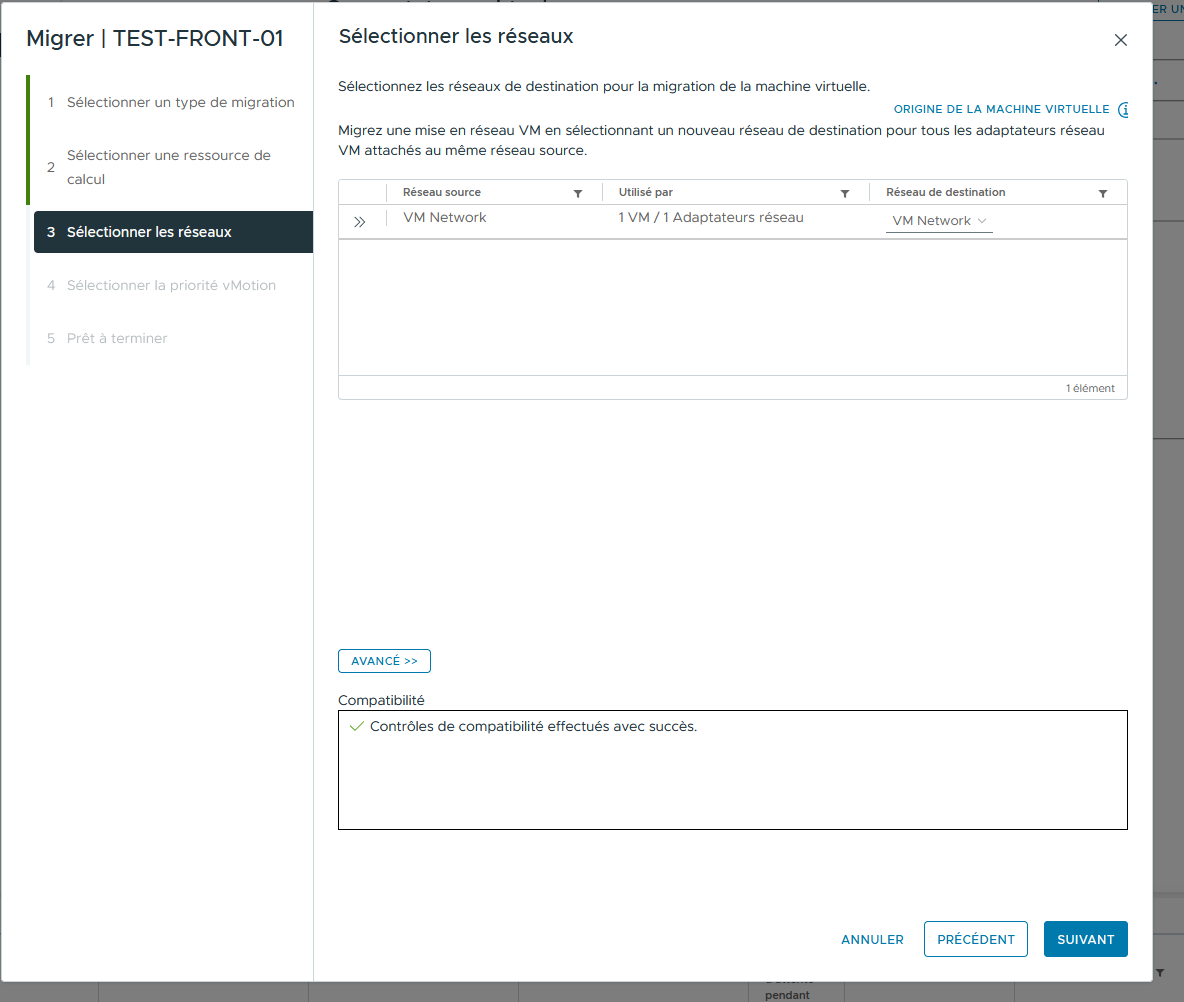
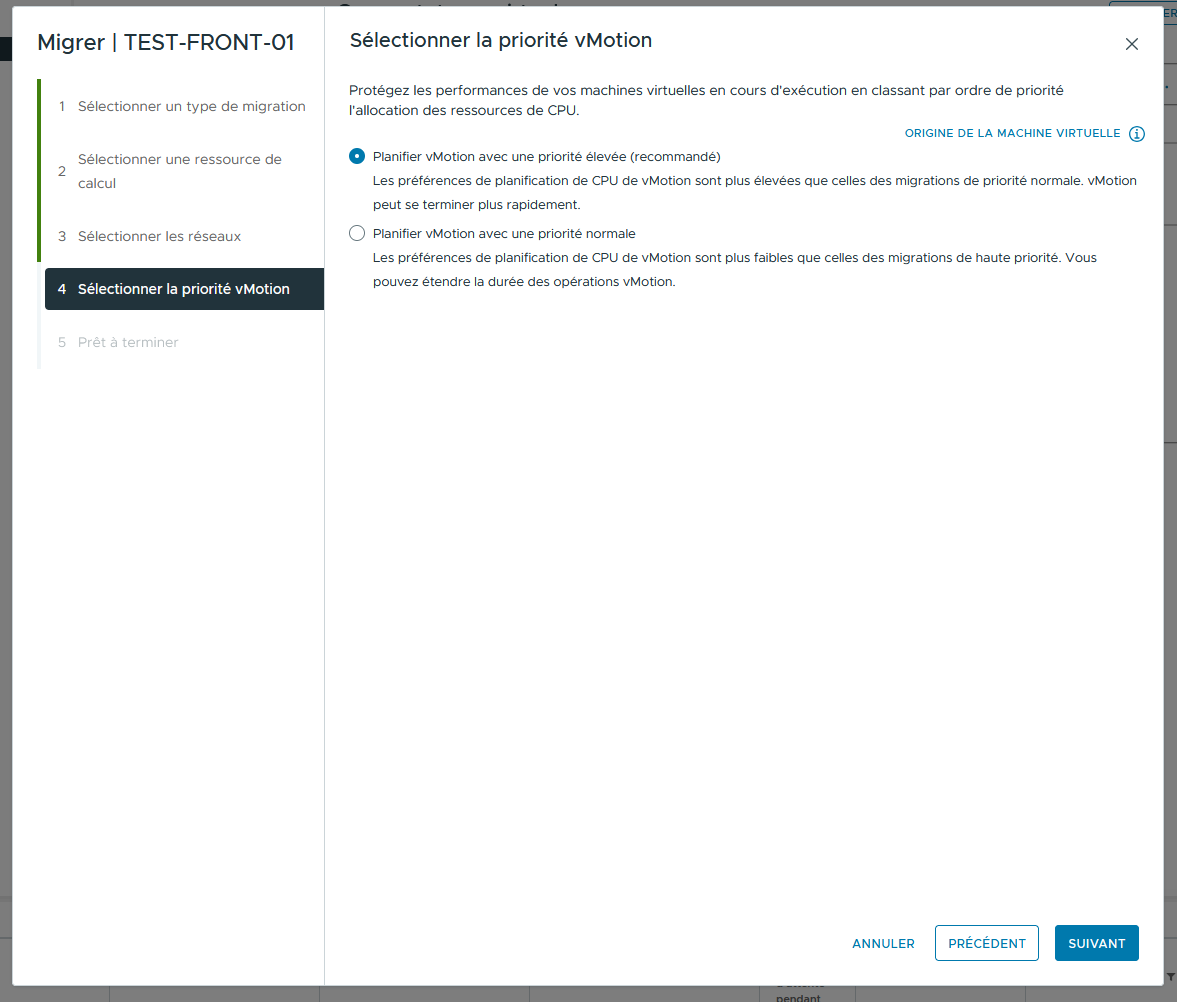
    3. Déplacer les VM d'un hôte a un autre sans l'éteindre  
        [![image.png](https://book.techoops.fr/uploads/images/gallery/2026-10/scaled-1680-/Alsimage.png)](https://book.techoops.fr/uploads/images/gallery/2026-10/Alsimage.png)
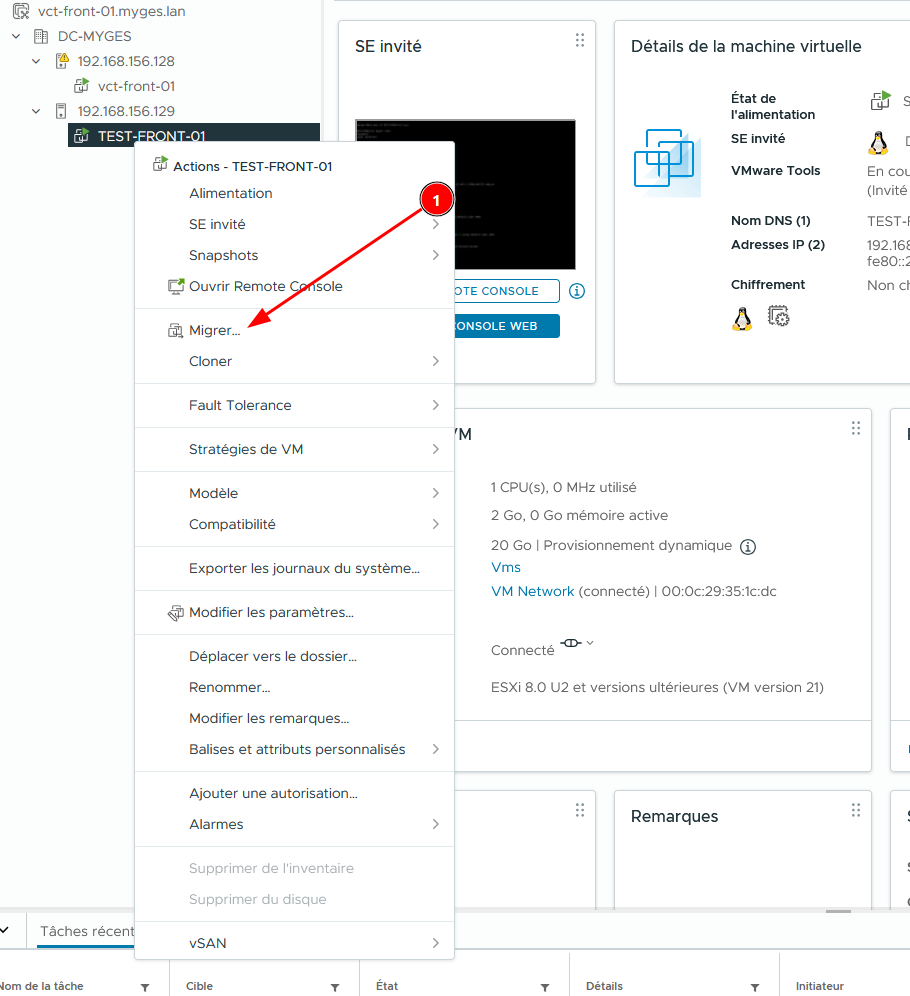
        
        [![image.png](https://book.techoops.fr/uploads/images/gallery/2026-10/scaled-1680-/lGOimage.png)](https://book.techoops.fr/uploads/images/gallery/2026-10/lGOimage.png)
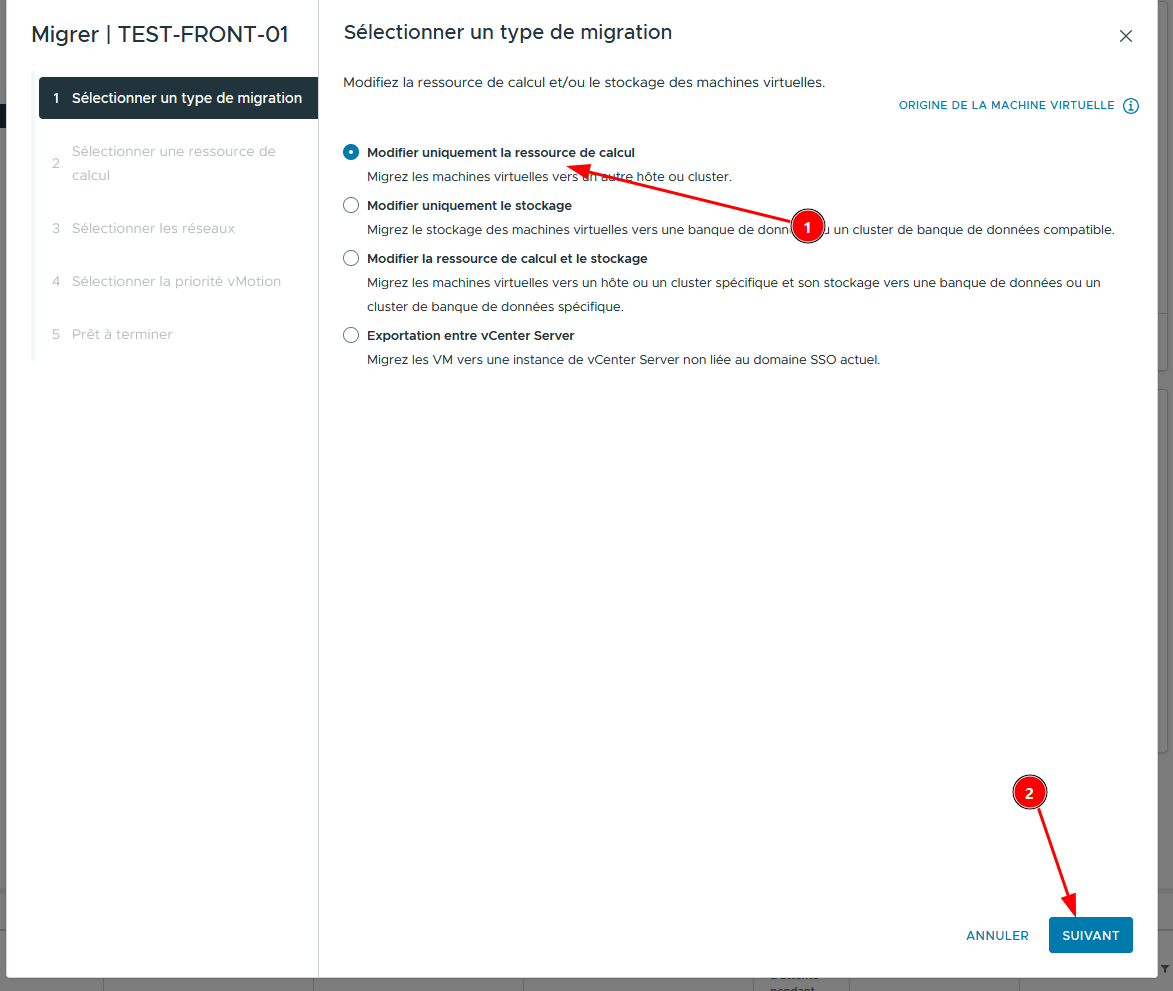
        
        [![image.png](https://book.techoops.fr/uploads/images/gallery/2026-10/scaled-1680-/1Ruimage.png)](https://book.techoops.fr/uploads/images/gallery/2026-10/1Ruimage.png)
        
        [![image.png](https://book.techoops.fr/uploads/images/gallery/2026-10/scaled-1680-/FOmimage.png)](https://book.techoops.fr/uploads/images/gallery/2026-10/FOmimage.png)
        
        [![image.png](https://book.techoops.fr/uploads/images/gallery/2026-10/scaled-1680-/f4nimage.png)](https://book.techoops.fr/uploads/images/gallery/2026-10/f4nimage.png)
        
        <p class="callout success">[![image.png](https://book.techoops.fr/uploads/images/gallery/2026-10/scaled-1680-/IS6image.png)](https://book.techoops.fr/uploads/images/gallery/2026-10/IS6image.png)  
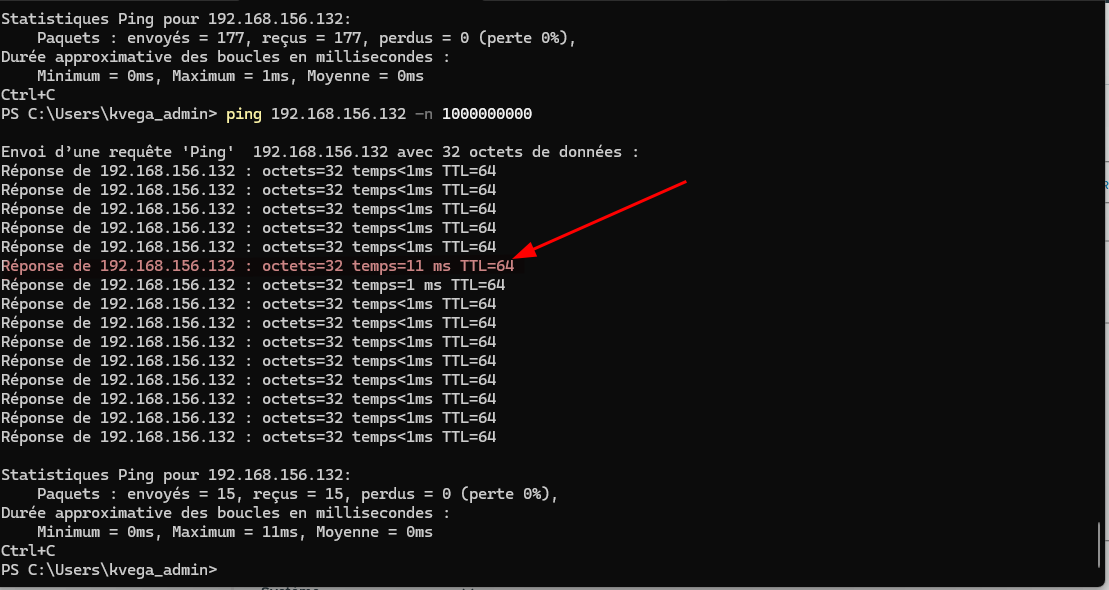
        La VM a bien été migrée !! Ci-dessous une capture de l'écran du ping on y voit un léger temps de réponse supplémentaire mais aucun arrêt  
        </p>
        
        [![image.png](https://book.techoops.fr/uploads/images/gallery/2026-10/scaled-1680-/wLwimage.png)](https://book.techoops.fr/uploads/images/gallery/2026-10/wLwimage.png)

##### Mise en place du DRS

On ne pourra pas tester DRS car il faudrait surcharger l'un des ESX ce que je ne ferai pas sur ce TP.

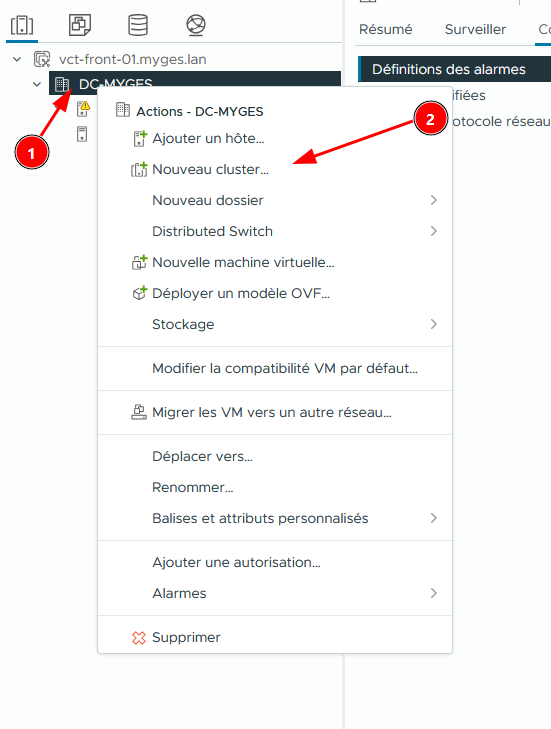
1. Création d'un cluster  
    [![image.png](https://book.techoops.fr/uploads/images/gallery/2026-10/scaled-1680-/k68image.png)](https://book.techoops.fr/uploads/images/gallery/2026-10/k68image.png)
    
    [![image.png](https://book.techoops.fr/uploads/images/gallery/2026-10/scaled-1680-/LJVimage.png)](https://book.techoops.fr/uploads/images/gallery/2026-10/LJVimage.png)
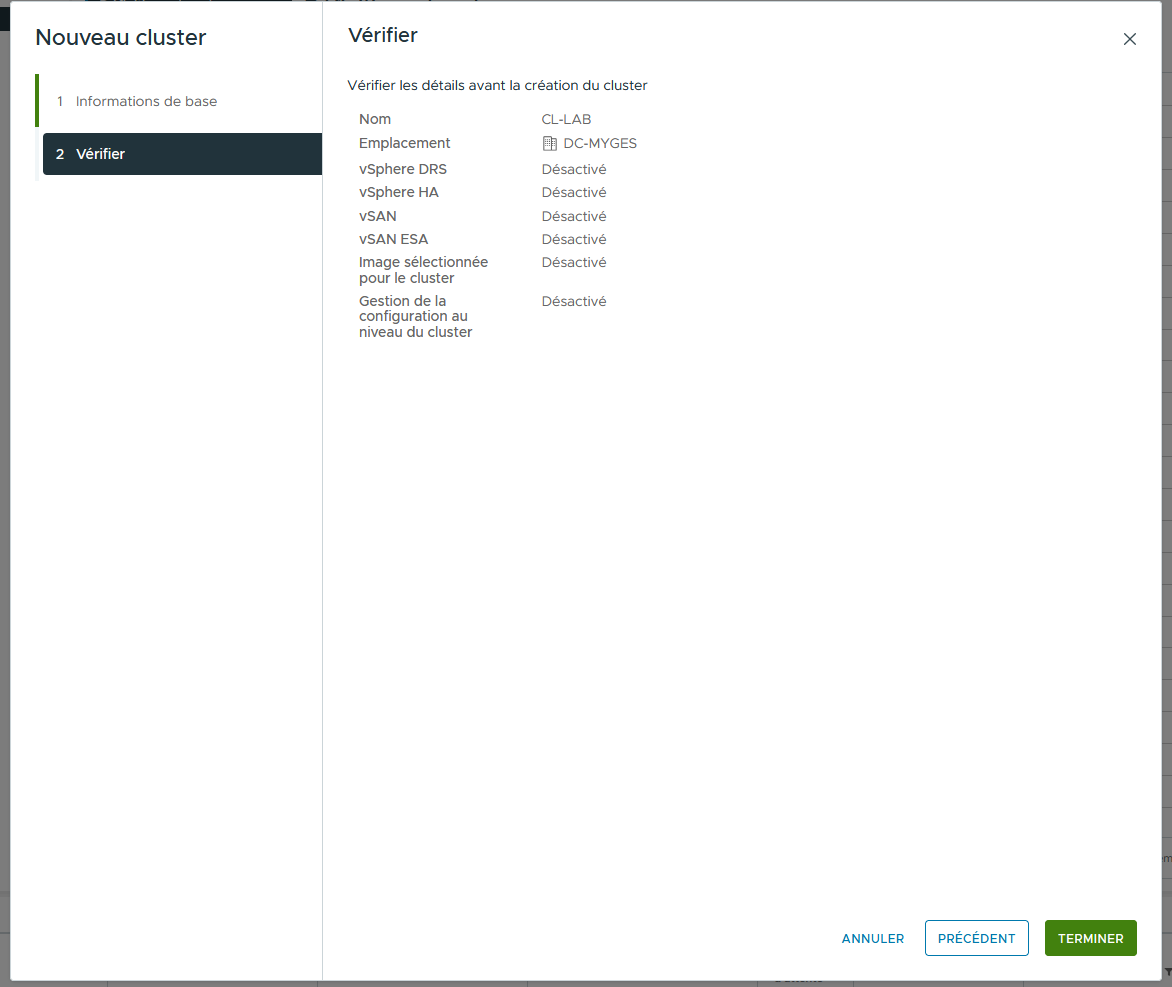
    
    [![image.png](https://book.techoops.fr/uploads/images/gallery/2026-10/scaled-1680-/E61image.png)](https://book.techoops.fr/uploads/images/gallery/2026-10/E61image.png)
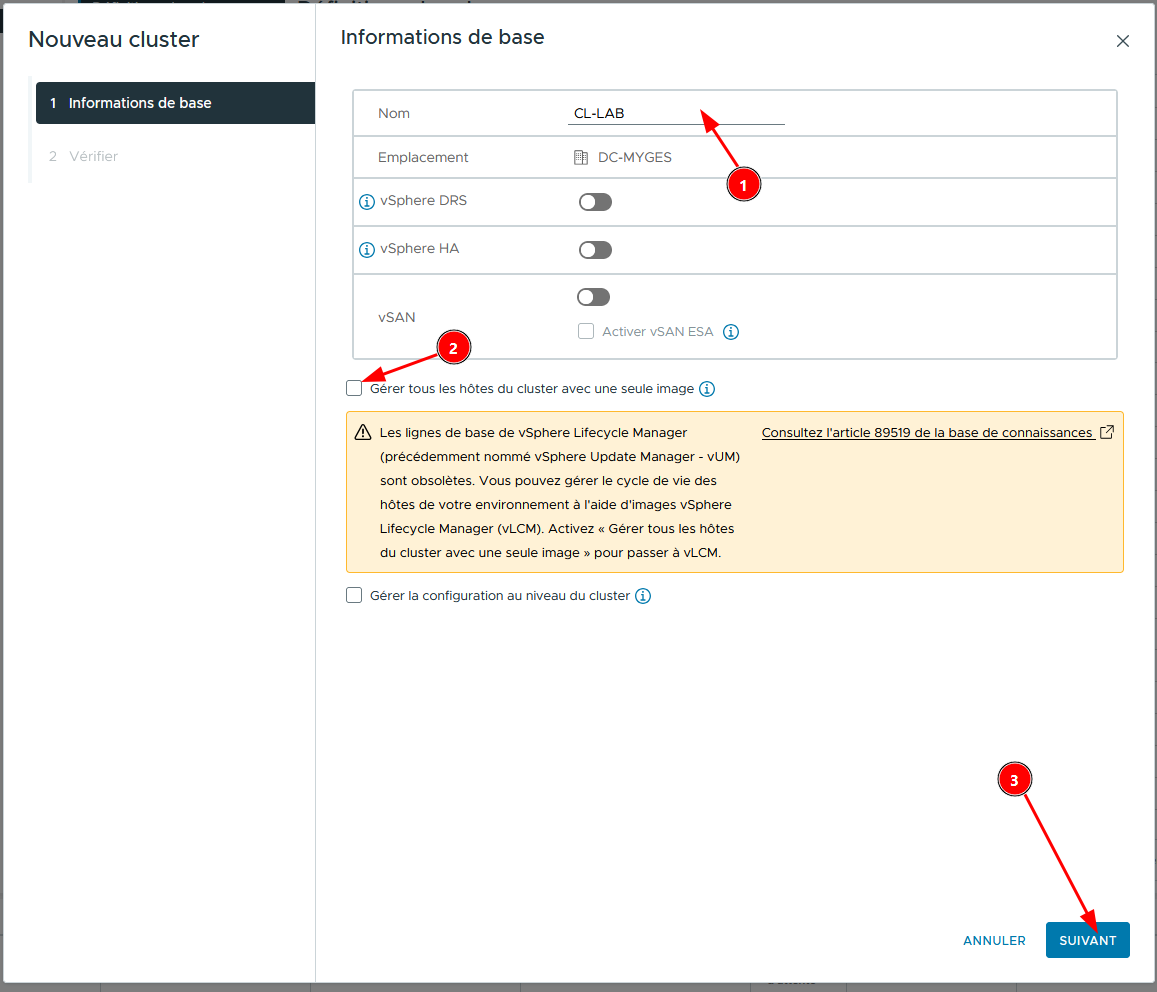
2. Ajouter les deux ESX dans le nouveau cluster en les glissant dedans  
    [![image.png](https://book.techoops.fr/uploads/images/gallery/2026-10/scaled-1680-/i0Dimage.png)](https://book.techoops.fr/uploads/images/gallery/2026-10/i0Dimage.png)
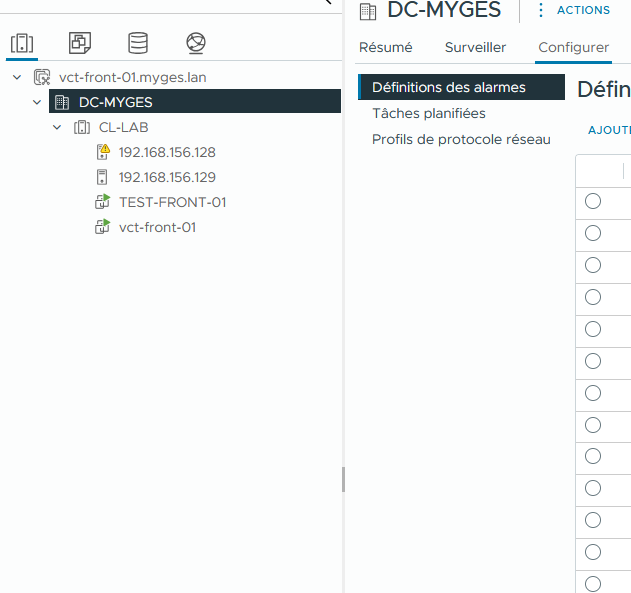
3. Paramétrer le DRS dans la configuration du cluster  
    [![image.png](https://book.techoops.fr/uploads/images/gallery/2026-10/scaled-1680-/kjeimage.png)](https://book.techoops.fr/uploads/images/gallery/2026-10/kjeimage.png)
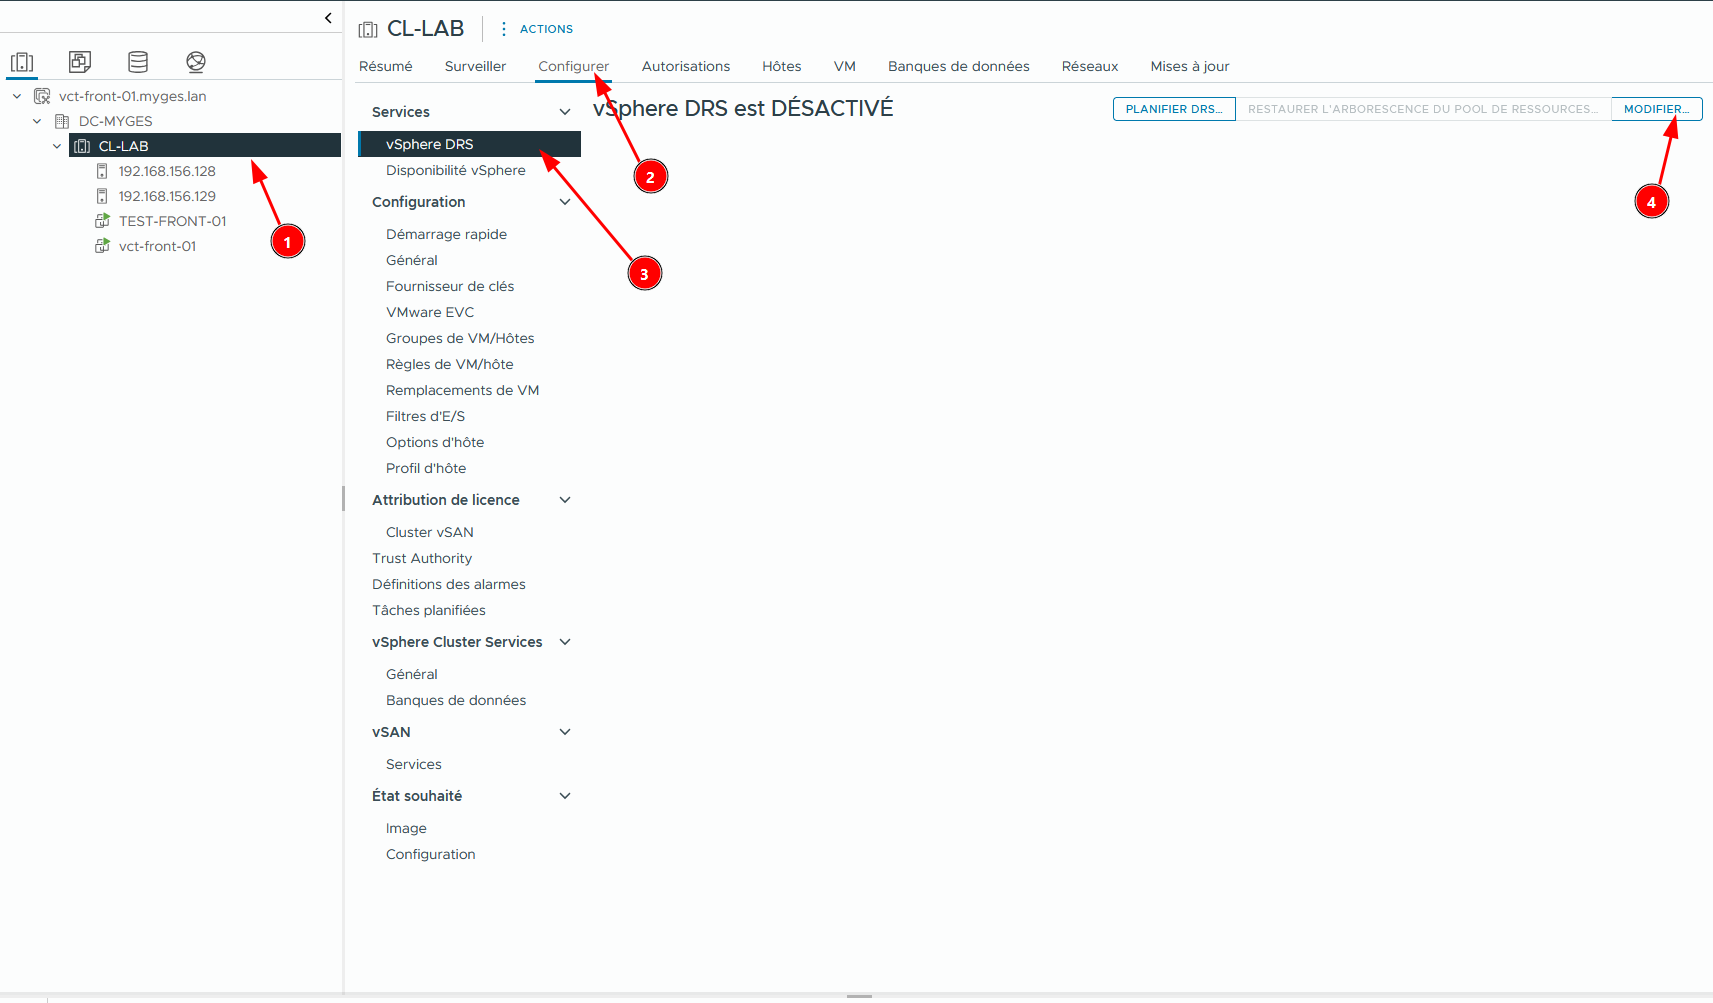
4. Activer le DRS  
      
      
    [![image.png](https://book.techoops.fr/uploads/images/gallery/2026-10/scaled-1680-/H2gimage.png)](https://book.techoops.fr/uploads/images/gallery/2026-10/H2gimage.png)
##### Mise en place du HA

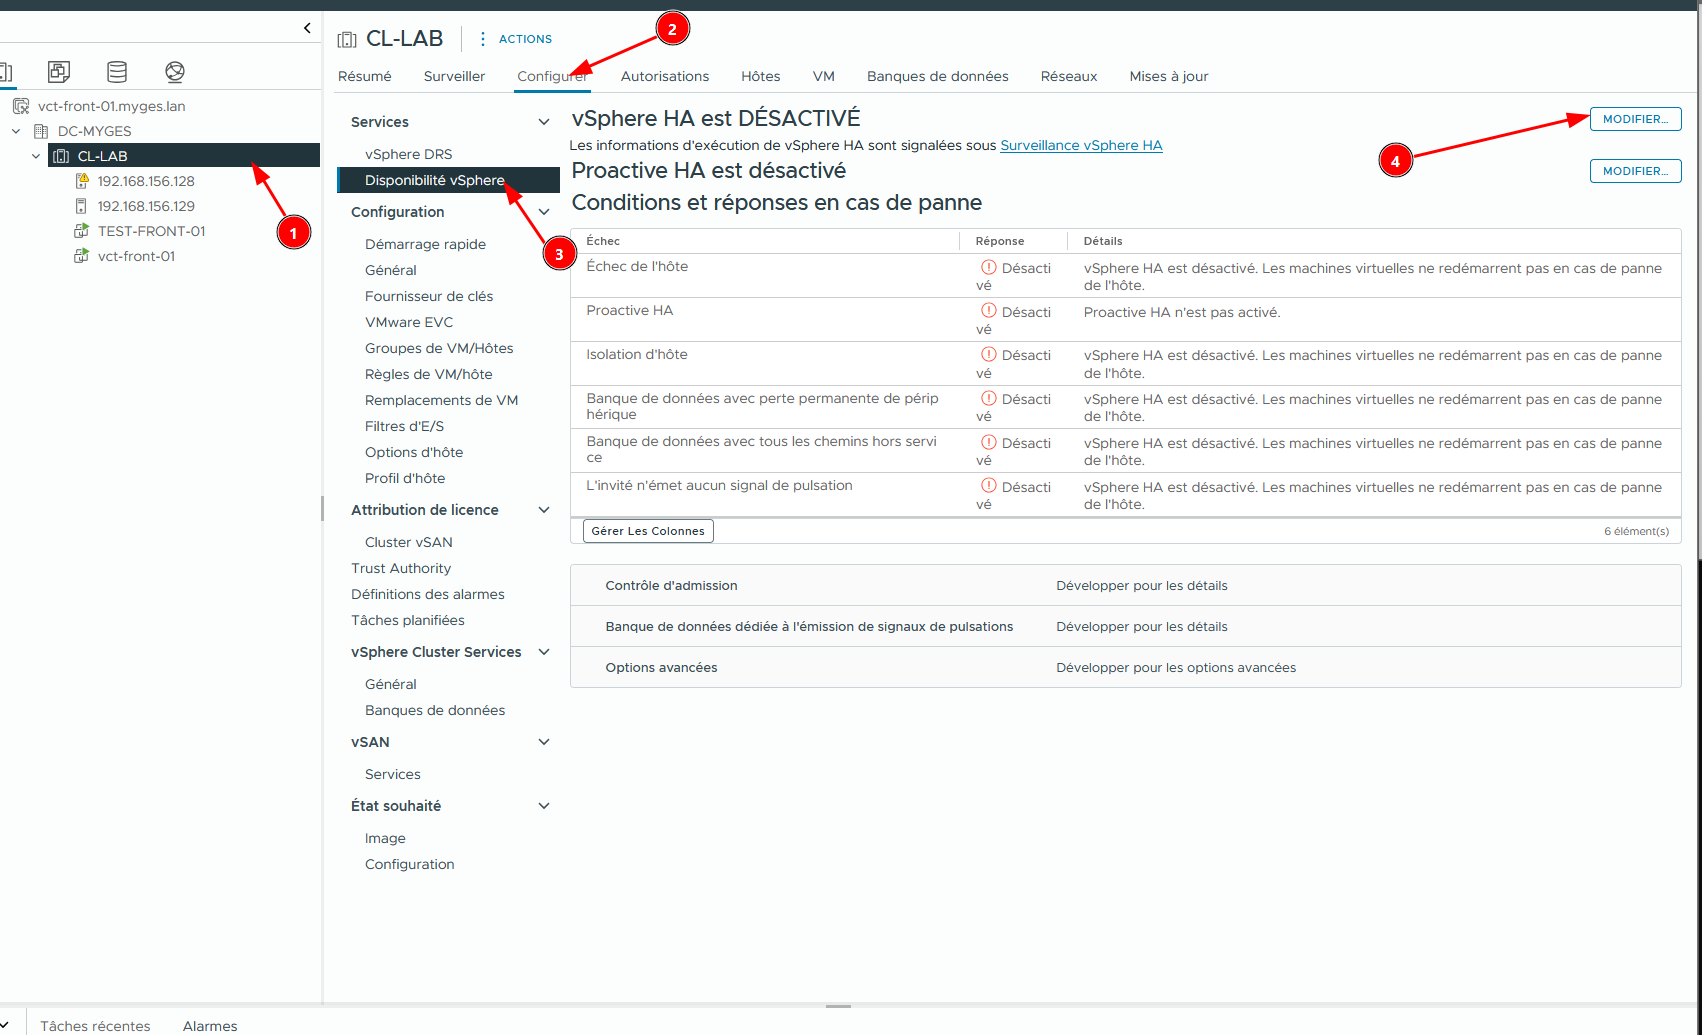
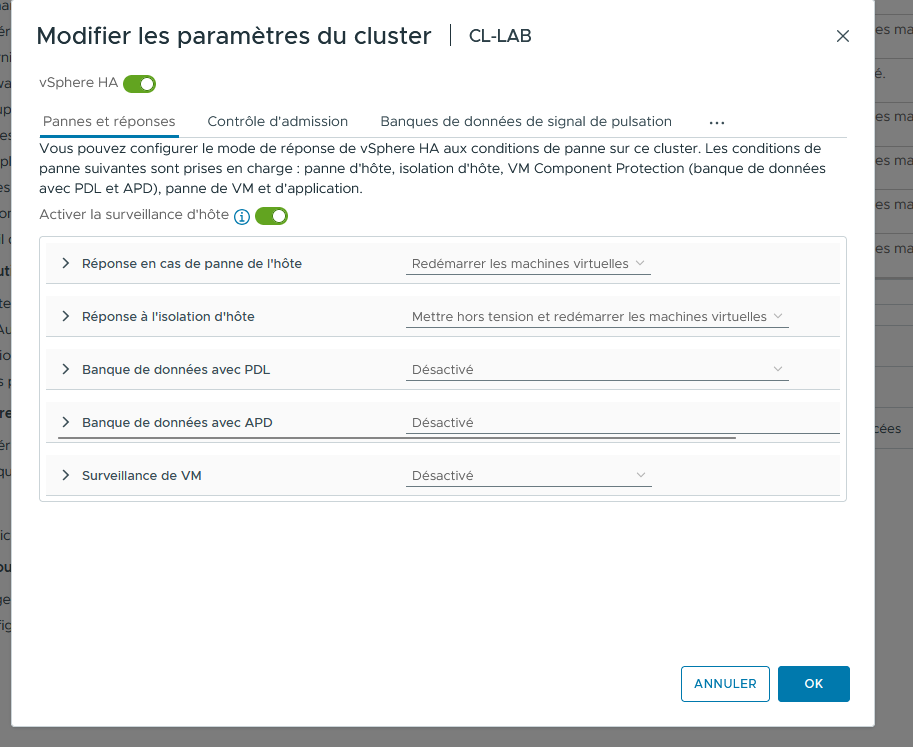
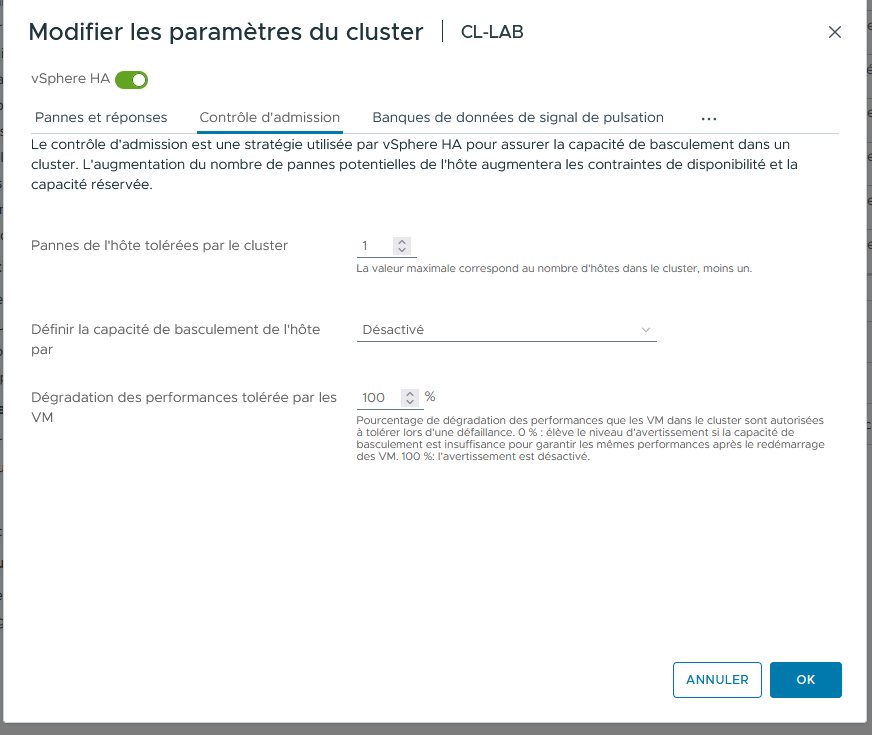
1. tiver le HA  
    [![image.png](https://book.techoops.fr/uploads/images/gallery/2026-10/scaled-1680-/Xxvimage.png)](https://book.techoops.fr/uploads/images/gallery/2026-10/Xxvimage.png)
    
    [![image.png](https://book.techoops.fr/uploads/images/gallery/2026-10/scaled-1680-/IQKimage.png)](https://book.techoops.fr/uploads/images/gallery/2026-10/IQKimage.png)
    
    [![image.png](https://book.techoops.fr/uploads/images/gallery/2026-10/scaled-1680-/c46image.png)](https://book.techoops.fr/uploads/images/gallery/2026-10/c46image.png)
    
    [![image.png](https://book.techoops.fr/uploads/images/gallery/2026-10/scaled-1680-/EZVimage.png)](https://book.techoops.fr/uploads/images/gallery/2026-10/EZVimage.png)
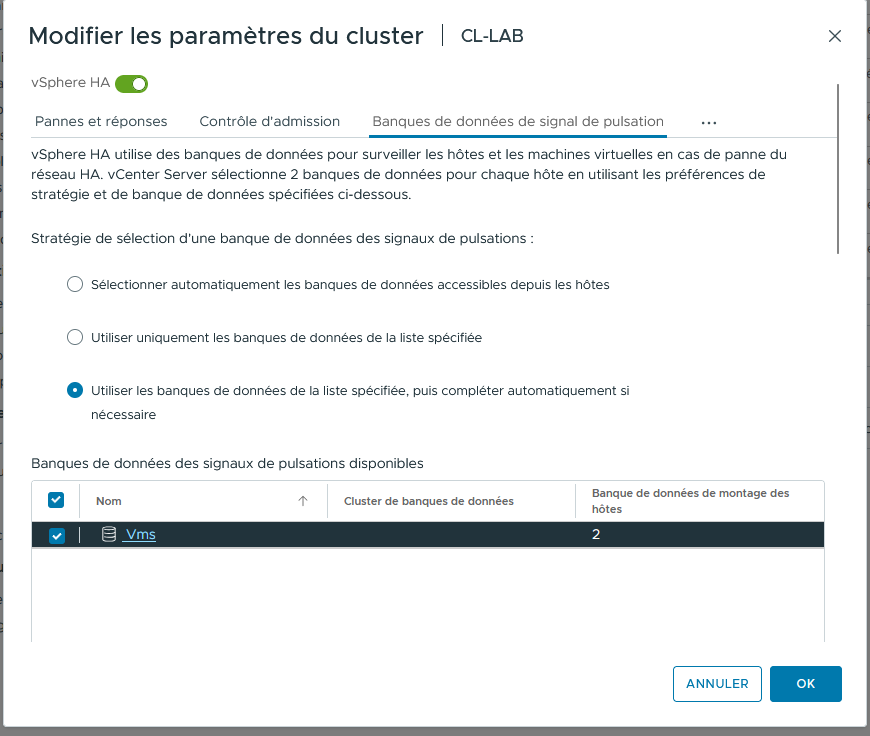
    
    [![image.png](https://book.techoops.fr/uploads/images/gallery/2026-10/scaled-1680-/AfOimage.png)](https://book.techoops.fr/uploads/images/gallery/2026-10/AfOimage.png)
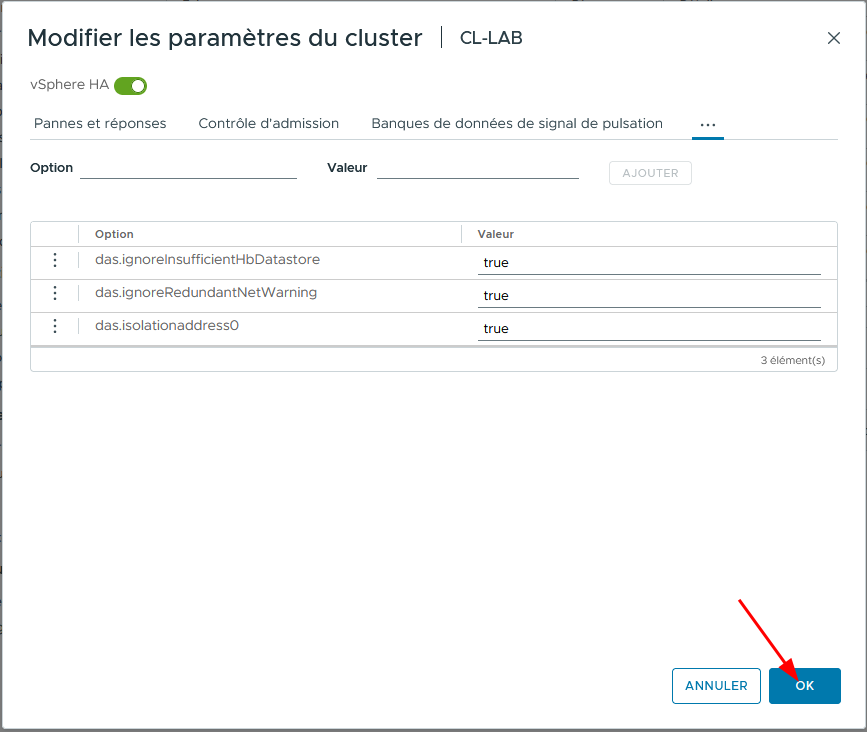
    
    Tableau explicatif des options avancée  
    <table style="border-collapse:collapse;width:100%;height:89.4px;"><colgroup><col style="width:35.3548%;"></col><col style="width:16.769%;"></col><col style="width:47.8761%;"></col></colgroup><thead><tr style="height:29.8px;"><td style="height:29.8px;">Option</td><td style="height:29.8px;">Option</td><td>Pourquoi ?</td></tr></thead><tbody><tr style="height:29.8px;"><td style="height:29.8px;">das.ignoreInsufficientHbDatastore</td><td style="height:29.8px;">true</td><td>Un seul datastore</td></tr><tr><td>das.isolationaddress0</td><td>192.168.156.2</td><td>Gateway du réseau qui permet de check si un hôte est isolé</td></tr><tr style="height:29.8px;"><td style="height:29.8px;">das.ignoreRedundantNetWarning</td><td style="height:29.8px;">true</td><td>Si pas de redondance de gestion</td></tr></tbody></table>
2. Test  
    Il faut laisser une machine sur ESX-FRONT-02 (pas le vcenter) et l'éteindre (ESX-FRONT-02), on verra alors la VM déplacée vers le noeud restant.  
    [![image.png](https://book.techoops.fr/uploads/images/gallery/2026-10/scaled-1680-/4tvimage.png)](https://book.techoops.fr/uploads/images/gallery/2026-10/4tvimage.png)
    
    [![image.png](https://book.techoops.fr/uploads/images/gallery/2026-10/scaled-1680-/Ux4image.png)](https://book.techoops.fr/uploads/images/gallery/2026-10/Ux4image.png)
    
    <p class="callout warning">[![image.png](https://book.techoops.fr/uploads/images/gallery/2026-10/scaled-1680-/y6fimage.png)](https://book.techoops.fr/uploads/images/gallery/2026-10/y6fimage.png)  
      
    La Vm est bien migré sur le seul hôte disponible !! </p>