Haproxy
Installation
Installation
Installation sur conteneur LCX
Déploiement du conteneur:
Pour l'installation d'haproxy sur un conteneur lxc il y a certaines options à paramétrer:
resource "proxmox_lxc" "ha-servers" {
  count = 1
  hostname = "ha-front-0${1 + count.index}"
  target_node = "pve-front-01"
  ostemplate   = "/var/lib/vz/template/cache/debian-12-standard_12.0-1_amd64.tar.zst"
  unprivileged = false
  onboot = true
  start = true
  searchdomain = "kvega.local"
  memory = 1024
  cores = 1

  rootfs {
    storage = "local-lvm"
    size    = "8G"
  }

  features {
    fuse    = false
    nesting = true
    mount   = "nfs"
  }

  network {
    name   = "eth0"
    bridge = "vmbr1"
    ip     = "172.16.250.3/26"
    gw     = "172.16.250.1"
  }

  ssh_public_keys = <<-EOT
    Votre clé ssh publique
  EOT
}
Après avoir déployé le conteneur il faudra se connecter desssus en ssh.
Puis procéder comme suit:
- Installer haproxy
-
apt update -y && apt upgrade -y -
apt install haproxy -y
-
- Vérifier le fonctionnement de haproxy
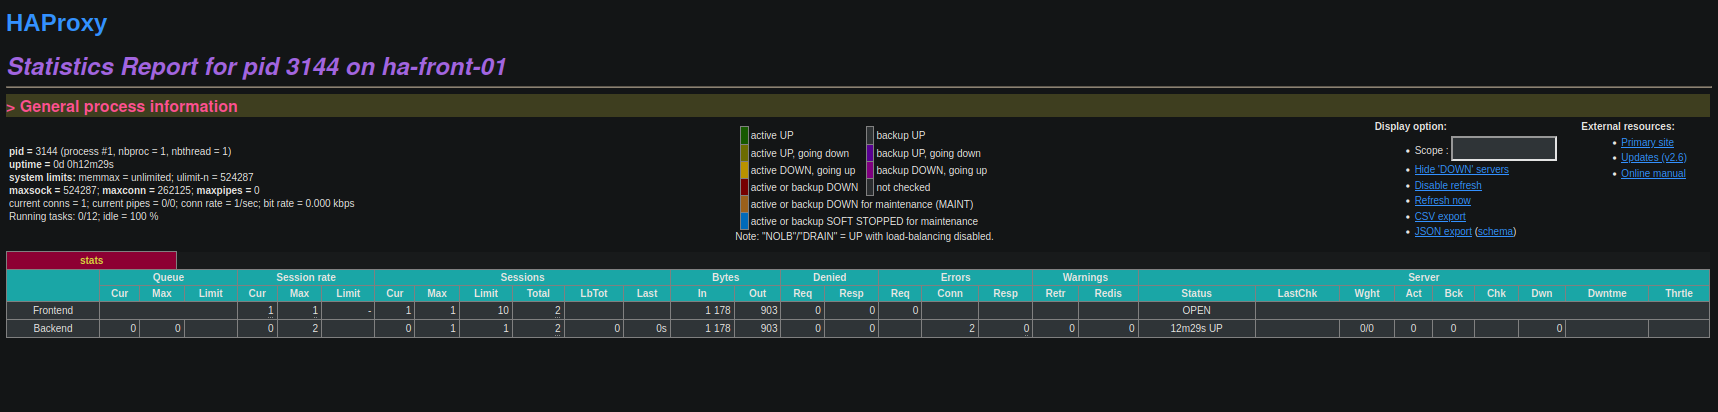
root@ha-front-01:~# systemctl status haproxy * haproxy.service - HAProxy Load Balancer Loaded: loaded (/lib/systemd/system/haproxy.service; enabled; preset: enabled) Active: active (running) since Thu 2023-09-21 10:16:53 UTC; 32s ago Docs: man:haproxy(1) file:/usr/share/doc/haproxy/configuration.txt.gz Main PID: 2831 (haproxy) Tasks: 2 (limit: 4607) Memory: 39.2M CPU: 124ms CGroup: /system.slice/haproxy.service |-2831 /usr/sbin/haproxy -Ws -f /etc/haproxy/haproxy.cfg -p /run/haproxy.pid -S /run/haproxy-master.sock `-2833 /usr/sbin/haproxy -Ws -f /etc/haproxy/haproxy.cfg -p /run/haproxy.pid -S /run/haproxy-master.sock Sep 21 10:16:53 ha-front-01 systemd[1]: Starting haproxy.service - HAProxy Load Balancer... Sep 21 10:16:53 ha-front-01 haproxy[2831]: [NOTICE] (2831) : New worker (2833) forked Sep 21 10:16:53 ha-front-01 haproxy[2831]: [NOTICE] (2831) : Loading success. Sep 21 10:16:53 ha-front-01 systemd[1]: Started haproxy.service - HAProxy Load Balancer. - Paramétrer le fichier de configuration haproxy pour avoir accès à la page de statistique
nano /etc/haproxy/haproxy.cfgLigne à ajouter à la fin du fichier:
global log /dev/log local0 log /dev/log local1 notice chroot /var/lib/haproxy stats socket /run/haproxy/admin.sock mode 660 level admin stats timeout 30s user haproxy group haproxy daemon # Default SSL material locations ca-base /etc/ssl/certs crt-base /etc/ssl/private # See: https://ssl-config.mozilla.org/#server=haproxy&server-version=2.0.3&config=intermediate ssl-default-bind-ciphers ECDHE-ECDSA-AES128-GCM-SHA256:ECDHE-RSA-AES128-GCM-SHA256:ECDHE-ECDSA-AES256-GCM-SHA384:ECDHE-RSA-AES256-GCM-SHA384:ECDHE-ECDSA-CHACHA20-POLY1305:ECDHE-RSA-CHACHA20-POLY1305:DHE-RSA-AES128-GCM-SHA256:DHE-RSA-AES256-GCM-SHA384 ssl-default-bind-ciphersuites TLS_AES_128_GCM_SHA256:TLS_AES_256_GCM_SHA384:TLS_CHACHA20_POLY1305_SHA256 ssl-default-bind-options ssl-min-ver TLSv1.2 no-tls-tickets listen stats bind :9000 mode http log global maxconn 10 timeout queue 100s timeout connect 5s timeout client 1m timeout server 1m stats enable stats hide-version stats refresh 30s stats show-node stats auth admin:password stats uri /haproxy?stats - Tester la configuration haproxy:
root@ha-front-01:~# haproxy -c -f /etc/haproxy/haproxy.cfg Configuration file is valid - Si le fichier est valide on reload le serveur haproxy:
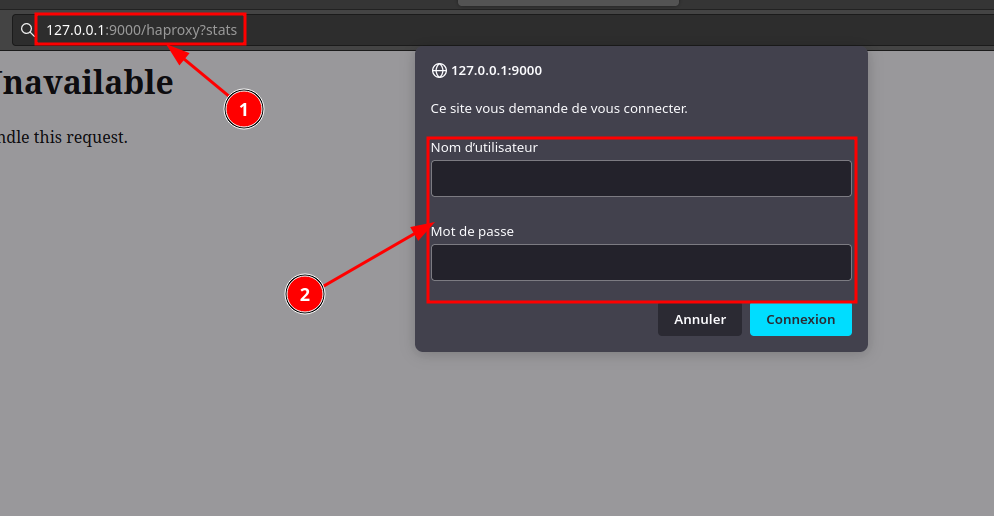
root@ha-front-01:~# systemctl reload haproxy.service - Pour tester si la page est OK et si le serveur haproxy est derriére un firewall on peut faire un tunnel ssh pour accéder à la page:
Mise en place d'un tunnel SSH:ssh -L 9000:172.16.250.3:9000 root@192.168.1.44
On atterit bien sur la page de statistiques de haproxy:
Installation
Installation de serveur web derriére le Haproxy
PRÉREQUIS:
- Avoir 2 machine disonible pour installer les serveur web dessus.
- Installer le service nginx:
apt update; apt upgrade; apt install nginx - Tester si le serveur est bien installé
Mes deux serveurs web on ces IPs 172.16.250.4 et 172.16.250.5
Se connecter sur un serveur disposant de la commande curl:root@bastion-front-01:~/GIT/cours_bts# for i in {4..5}; do echo -e "####Je vais tester 172.16.250.${i}### \n";curl -IL http://172.16.250.$i ; done ####Je vais tester 172.16.250.4### HTTP/1.1 200 OK Server: nginx/1.22.1 Date: Thu, 21 Sep 2023 16:51:40 GMT Content-Type: text/html Content-Length: 615 Last-Modified: Thu, 21 Sep 2023 16:47:16 GMT Connection: keep-alive ETag: "650c7394-267" Accept-Ranges: bytes ####Je vais tester 172.16.250.5### HTTP/1.1 200 OK Server: nginx/1.22.1 Date: Thu, 21 Sep 2023 16:51:40 GMT Content-Type: text/html Content-Length: 615 Last-Modified: Thu, 21 Sep 2023 16:47:20 GMT Connection: keep-alive ETag: "650c7398-267" Accept-Ranges: bytesLes deux serveurs répondent bien
- Modifier le fichier affiché par Nginx:
echo $HOSTNAME > /var/www/html/index.nginx-debian.htmlOn refait la commande pour tester:
root@bastion-front-01:~/GIT/cours_bts# for i in {4..5}; do echo -e "####Je vais tester 172.16.250.${i}### \n";curl -L http://172.16.250.$i ; done
####Je vais tester 172.16.250.4###

web-front-01
####Je vais tester 172.16.250.5###

web-front-02
Les deux serveurs répondent bien leurs Hostname(NOM)
- Paramétrer le serveur haproxy pour qu'il renvoie vers les serveurs web
Ajouter les ligne suivante dans le fichier /etc/haproxy/haproxy.cfg#L'ip que je veux mettre en avant frontend http-external bind 172.16.250.3:80 default_backend http #Les IP vers lesquelles je veux renvoyer les requete backend http balance roundrobin mode http option forwardfor option http-server-close server web-front-01 172.16.250.4:80 check server web-front-02 172.16.250.5:80 check - On Va tester le fichier de configuration
haproxy -c -f /etc/haproxy/haproxy.cfg
- Puis on va reload le service
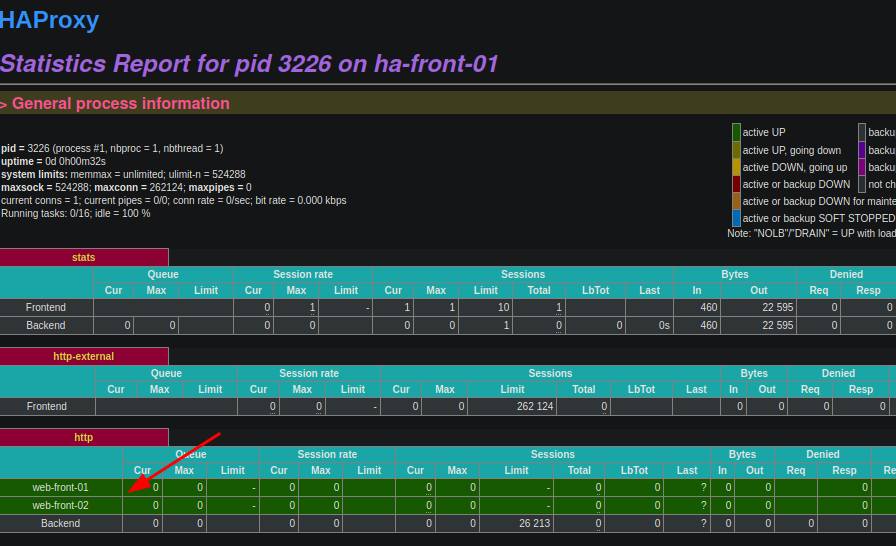
systemctl reload haproxy - Nous allons tester sir le haproxy prends bien en compte en regardant la page de stats
 C'est OK on voit bien les deux serveurs
 - On va tester avec la commande curl
root@bastion-front-01:~/GIT/cours_bts# for i in {1..2}; do curl http://172.16.250.3; done
web-front-01
web-front-02